(7) Printing of Handy Search scan test data
Before starting to print, check the external output destination setting on the parameter
setting screen.
Make sure that external output is set to printer (I).
After the confirmation, return to the scan test screen, and perform the following printing
procedure:
a) Press
the
13
OUTPUT
key.
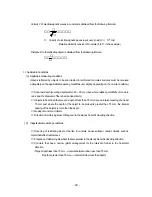
b) Data in the range from 0 m (0 s) up to the currently displayed screen will be printed.
c)
During printing, the name of the file (“No Name Data” for case where the data was not
opened and has not been saved), date, data no. are displayed on the liquid crystal display
in addition to the message “Printing”.
Remarks
●
See Section 3.6 External Output Methods regarding Handy Search settings.
●
For details on printer handling, see the printer instruction manual.
●
To stop in the middle of printing, press any key.
●
The printing range is from 0 m (0 s) to the display screen. To print all the scan test data, scroll
to the last scan test screen using the cursor keys
, and then start printing.
●
The direction of printed image data changes depending on the setting of the screen
inversion function. For the printer to always output image data in the same direction, retain
the same setting "Normal or Reverse" for "Inversion of the screen."
See "Section 3.2.3 “Inverting the Screen” regarding inverting of the screen.
‑ 80 ‑
Summary of Contents for Handy Search NJJ-95B
Page 1: ...Handy Search Instruction Manual...
Page 8: ...Appearance of the NJJ 95B vii...
Page 21: ...Rear view Units in trigonometry mm 9...
Page 24: ...8 14 15 Figure 2 2 Side View 16 17 14 18 Figure 2 3 Rear View 12...
Page 73: ...Display of thumbnails Figure 3 17 CF Control Screen 61...
Page 83: ...B Terminals ACharge confirmation mark Figure 3 22 Battery Pack 71...
Page 85: ...Shutter Charge lamp Figure 3 23 Battery Charger 73...
Page 96: ...Concrete Rebar D 75mm L 75mm D 75mm Difficult to implement 84...
Page 103: ...Dimensions Weight About 149 W x 147 H x 216 D mm Approximately 1 1kg 91...


