background image

baTTERY chaRGiNG iNSTRUcTiONS

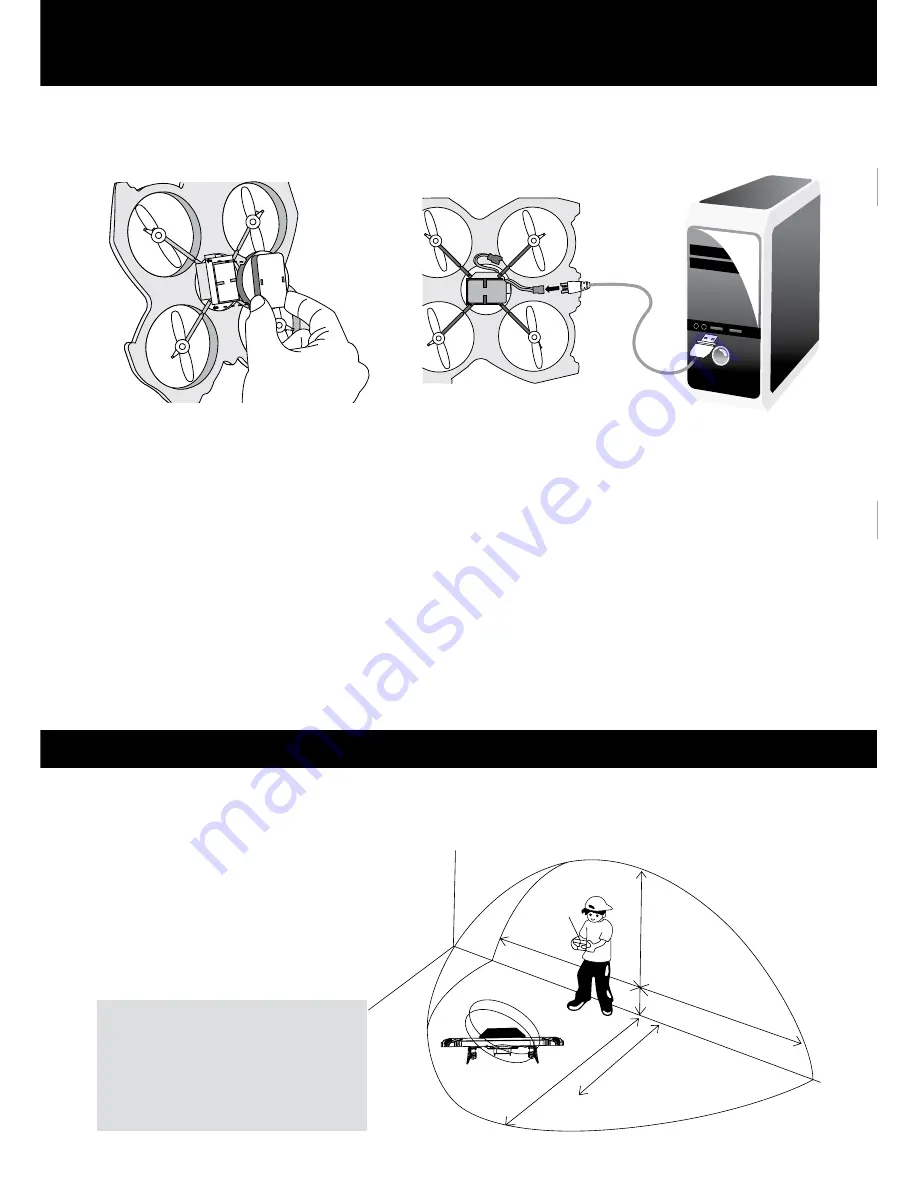
To charge the Venom, first make sure that the power switch is on. Remove the battery cover 
from the underside of the Venom and connect the charging cable to the battery. Plug the 
USB plug into a computer USB socket and the Venom will charge. The LED will remain lit while 
charging, and will extinguish when the battery is fully charged.

Notes:

The Venom charges in 40 - 50 minutes. The flight time is approx. 6 - 8 minutes. After use,

allow the battery to cool for 5 - 10 mins before charging. Ensure the motors have cooled 

before flying.

Warning on li-poly battery:

Do not put the battery into fire or near a high heat source.

Do not place battery onto hot surfaces.

Keep the battery in a dry and low-temperature environment.

Only use the charger supplied to charge the battery.

Do not over-charge the battery.

Do not connect the battery with other circuits.

Turn off the power of the product immediately after use to save battery power.

bEST cONdiTiONS fOR fliGhT

Do not fly in strong winds. High winds will greatly affect the control of the Venom.
Do not fly in extreme temperature, these will affect the battery and the time of flight of the 
Venom. Where possible, fly the Venom in wide-open spaces, away from buildings, animals and 
other people.

NOTicE:

Be sure to fly the Venom in plenty 
of open space. If the indicator 
light on the control begins to 
flash, the batteries are low on 
power and may need replacing.

Distance

of 3M

Distance

of

2.5M

Distance of 3M

Distance of 2M

Dista

nce

 o

f 3

M

FIGURE 1

FIGURE 2

Summary of Contents for Venom 4

Page 1: ...ble flight The Venom can complete several manoeuvres A 6 axis gyro and integrated altitude control ensures fine control in the air Please read the instructions carefully before use Please keep the ins...

Page 2: ...weight 36 g Flight range 30 M Charging time Approx 40 50 mins Flying time Approx 6 8 mins VENOM main technical index Using Battery Charger 1 Venom s battery built in 3 7V 300 mAh Li poly 2 Remote cont...

Page 3: ...teries are to be inserted with the correct polarity Exhausted batteries are to be removed from the toy The supply terminals are not to be short circuited RECYCLING BATTERIES WASTE ELECTRICAL and ELECT...

Page 4: ...tery onto hot surfaces Keep the battery in a dry and low temperature environment Only use the charger supplied to charge the battery Do not over charge the battery Do not connect the battery with othe...

Page 5: ...ntrolled using the right stick If the Venom does not fly straight or level it may need to be trimmed Use the trim switches to adjust the flight until it is level and stable Control Advice The Venom ha...

Page 6: ...the rotation trim switch to the right until the rotation stops If the Venom is rotating clockwise it needs to be trimmed To do this move the rotation trim switch to the left until the rotation stops I...

Page 7: ...he Venom Deliberately crashing the Venom could cause severe damage that cannot be repaired PROBLEM Controller does not work Can not control the drone Drone can not rise Drone landing too fast CAUSE SO...

Page 8: ...Remote Controller Part 04 3 7V 300mAh Li Poly Part 05 Main Blade A Part 06 Main Blade B Part 09 Carbon Fiber Tube Part 08 Plastic Of Motor Set Part 07 Main Frame Part 10 USB Charging Part 11 Main Mot...

Reviews: