7
8
5. Connection
5-1 Receiver //
6-1 Setting US-936K receiver system
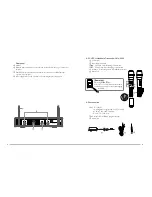
(1) Connect to the subsequent unit (e.g. mixer, or amplifier)
Connect one end of a proper AF cable to the AF Output or AF Output mixed , then
plug another end to the “MIC IN” input socket of a mixer or a amplifier (Step 1 of Figure 1)
(2) Connect the power supply unit
Plug in one end of AC/DC adaptor cable to Power Supply Jack in the rear panel of
receiver, and plug another end into an AC outlet
(Step 2 of Figure 1)
Caution
To prevent accidental disconnection of the plug of the power supply unit from the jack, lead
the cable around the hook for strain relief .
6. Operation
1. Turn on the power to the receiver
(1) Pull the receiver antenna out.
(2) Press the power switch to turn on the power.
(3) To turn off: Keep pressing the power switch down; the power is off about 1 second later.
2. Set the preset channels for receiver
Press the Channel Select
▲
,
▼
keys to select US-936K preset channels; a total of 225 sets
are available. A preset channel is displayed by the LED while the corresponded frequency is
displayed on LCD . Keeping
▲
or
▼
pressed down can change the channels faster. (Fig.2)
3. Frequency key
If to adjust the frequency as you like rather than using a preset channel, press the Frequency key
▲
,
▼
to adjust the frequency at an increment of “+/-” 0.025MHz; keeping the
▲
or
▼
keys pressed down
makes the frequency change faster. (Fig.3)
4. Volume key
Press
▲
,
▼
to adjust the volume as needed in the range between 0 and 31dB; keeping the
▲
or
▼
keys pressed down makes the volume change faster. (Fig.4)
MIXER
AUDIO OUTPUT
DC INPUT
2
1
DCV INPUT
12-18V/500mA
AF OUTPUT
RX1
AF OUTPUT
RX2
AF OUTPUT
Mixed
32
29
22
21
20
32
Figure
2
Figure
3
Figure
4
Figure
1
7
8
1
3
4
6
預設頻道


