background image

 Digital Bread Maker

4

Before First Use

Remove any labels and/or swing tickets.
In order to remove any residue 
from the manufacturing process 
before use, proceed as follows: 

1.  Follow the “Cleaning” instructions (see 

right). Ensure the parts are completely 
dry.

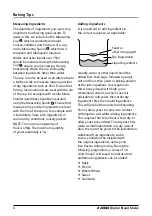
2.  Place the Bread Pan   in the Bread 

Maker Body   at an angle (see diagram 
below) and adjust until it drops home. 

Rotate the Bread Pan   clockwise to lock 
into place.

3.  Locate the Kneading Blade   on the 

spindle in the centre of the Bread Pan   
and push down until it is seated.

4.  Select the Programme 12 (Bake) 

using the Menu Button  . Start the 
programme using the Start/Stop Button 

.

• 

It is normal for small amount of 
smoke and a hot smell to be emitted 
during this process; manufacturing 
residues are being removed.

5.  After 10 minutes, stop the programme 

using the Start/Stop Button  . Allow the 
machine to cool for 20 minutes.

6.  Repeat steps 1 to 3 above to clean and 

re-assemble the Bread Maker.

Cleaning

Disconnect the Bread Maker from the 
power and allow to cool before cleaning.

1.  Rotate the Bread Pan   counterclockwise 

to unlock (see diagram). Lift out of the 
Bread Maker Body  .

2.  Hold the Kneading Blade   firmly and 

pull upwards to remove it from the 
spindle in the centre of the Bread Pan  .

• 

If the Kneading Blade   is difficult to 
remove, fill the Bread Pan   with hot 
water and allow to soak for 30 minutes.

3.  Wash the Bread Pan   and Kneading 

Blade   in warm water and detergent or 
washing-up liquid. Do not use any harsh 
or abrasive cleaning materials. Both these 
items are dishwasher safe.

4.  Wash the Cup  , Spoon   and Hook 

 in warm water and detergent or 

washing-up liquid. Do not use any harsh 
or abrasive cleaning materials.

5.   Wipe the Bread Maker Body   and Lid 

 with a cloth, slightly dampened with 

warm water and detergent. Do not use 
any abrasive cleaning materials.

• 

DO NOT IMMERSE ANY PART OF THE 
BREAD MAKER BODY   IN WATER

6.  Dry all parts thoroughly before storing, 

when the Lid   should be left closed.

Summary of Contents for JEA91

Page 1: ...No JEA91 Instruction Manual RecipeBook Please read this instruction manual carefully before use and save for later reference Unpack your Digital Bread Maker carefully and remove packing pieces labels...

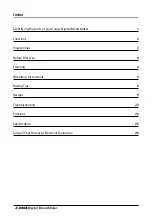
Page 2: ...parts of your Judge Digital Bread Maker 1 Functions 2 Programmes 3 Before First Use 4 Cleaning 4 Operating Instructions 5 Baking Tips 6 Recipes 9 Troubleshooting 22 Cautions 24 Specification 25 Judge...

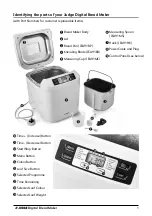
Page 3: ...er Body Lid Bread Pan JEA91BP Kneading Blade JEA91KB Measuring Cup JEA91MC Time Increase Button Time Decrease Button Start Stop Button Menu Button Colour Button Loaf Size Button Selected Programme Tim...

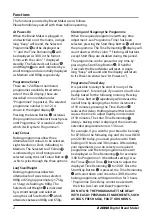
Page 4: ...t see Programme Time has been selected pressing the Start Stop Button will start the programme The Time Remaining display will count down with the colon flashing All buttons except Start Stop are disa...

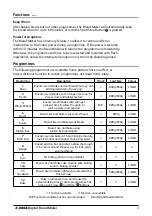
Page 5: ...and bake with a longer rise time for crisper crust and lighter texture 800g 650g L M D 3 Whole Wheat Knead rise and bake with a longer preheat time to allow the grain to soak up water and expand N R...

Page 6: ...Repeat steps 1 to 3 above to clean and re assemble the Bread Maker Cleaning Disconnect the Bread Maker from the power and allow to cool before cleaning 1 Rotate the Bread Pan counterclockwise to unlo...

Page 7: ...in all programmes 9 Start the programme using the Start Stop Button 10 During the programme if the Bread Maker pauses and sounds 10 short beeps you may add additional ingredients such as fruit 11 Whe...

Page 8: ...d NOTE The maximum quantity of flour is 490g The maximum quantity of yeast separately is 7g Adding Ingredients It is important to add ingredients in the correct sequence as applicable Usually water or...

Page 9: ...ster such as brown sugar Yeast Yeast is a living organism which is nourished by the sugars in the mixture causing it to ferment and create carbon dioxide gas which makes the bread rise and gives it it...

Page 10: ...ater temperature should be between 20 and 25 however for the Fast and Ultra Fast programmes the initial water temperature should be between 48 and 50 as measured by a cooking thermometer Water may be...

Page 11: ...uick white loaf 13 Quick banana and walnut cake loaf 13 Fruit loaf 14 Gluten Free loaf 15 Ultra fast white loaf 16 Granary bread rolls 17 Chorizo mushroom and pesto pizza 18 Marmalade 19 Fruit loaf ca...

Page 12: ...f 2 53 hours 280ml Warm Water 20 25 C 2 tbsp Olive Oil 1 tsp 7g Salt 2 tbsp 24g Caster Sugar 3 Cups 420g Strong White Flour 1 x 7g Sachet Fast Action Dried Yeast Pour the water into the Bread Pan foll...

Page 13: ...White Flour 1 x 7g Sachet Fast Action Dried Yeast Pour the water into the Bread Pan followed by the olive oil salt and sugar Gently and evenly add the flour over the top of the liquid Make a little w...

Page 14: ...ven mitts carefully remove the Bread Pan by twisting slighty anticlockwise and lifting clear Release the bread by turning the Bread Pan upside down and lightly tapping the contents onto a board Transf...

Page 15: ...800g Loaf 2 10 hours 175g 1 2 Bananas mashed 50g Sultanas 30g Butter melted 1 tbsp Milk Zest of 1 Lime 125g Chopped Walnuts 215g Plain Flour tsp Bicarbonate of Soda tsp Baking Powder 115g Caster Suga...

Page 16: ...to select either 650g Medium or 800g Large Press the Colour Button to choose either light medium or dark crust Press the Start Button and the programme will begin After approximately 25 minutes the Br...

Page 17: ...hours 280ml Warm Water 20 25 C 2 tbsp Olive Oil 1 tsp 7g Salt 2 tbsp 24g Caster Sugar 3 Cups 420g Gluten Free Bread Flour 1 x 7g Sachet Fast Action Dried Yeast Pour the water into the Bread Pan follo...

Page 18: ...m the wet ingredients and salt Close the Lid Press the Menu Button to select Programme 7 Ultra Fast Press the Loaf Size Button to select either 650g Medium or 800g Large Press the Colour Button to cho...

Page 19: ...large baking tray by brushing with a little oil The machine will bleep after the allotted time to tell you that the dough is made and risen Remove onto a floured surface knead lightly with floured han...

Page 20: ...ld have doubled in size Whilst the dough is being made Preheat your oven to 250 C In a large saucepan heat up the olive oil until hot then add the onions garlic and green pepper and cook stirring occa...

Page 21: ...ridge When the Bread Maker indicates that the marmalade is ready spoon a little marmalade onto the saucer and place into the fridge for 5 minutes Take the cold saucer out of the fridge and with your f...

Page 22: ...e fruit and walnut pieces close the Lid and the Programme will continue After the Programme has finished open up the Lid brush on the glaze and leave in the tin for 10 minutes before turning out onto...

Page 23: ...s 270ml Warm Water 20 25 C 1 tbsp 26g Butter melted 1 tsp 10g Salt 1 tbsp 18g Caster Sugar 1 tbsp 10g Milk Powder 3 Cups 420g Strong White Flour 1 x 7g Sachet Fast Action Dried Yeast Pour the water in...

Page 24: ...then the Kneading Blade can be easily removed and cleaned Bread Quality Consistency Issues Problem Cause Solution Bread rises too fast Bread or dough size too large Any combination of too much yeast t...

Page 25: ...h water Too many fruit ingredients Too much whole grain flour Too little yeast sugar or salt Measure ingredients correctly Incorrect flour Stale flour Use only fresh and correctly stored ingredients o...

Page 26: ...perience or knowledge unless they have been given supervision or instruction concerning use of the appliance by a person responsible for their safety Always keep the appliance out of the reach of chil...

Page 27: ...not be inserted into the Bread Maker Body as this can give rise to the risk of a fire or short circuit Never cover the Bread Maker with a towel or any other material heat and steam must be able to esc...

Page 28: ...d The Guarantee does not cover damage defect or failure caused by or resulting from accidents external damage alteration modification abuse misuse or misapplication The Guarantee does not cover any da...

Reviews: