background image

11

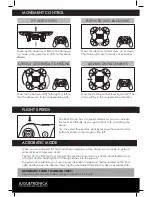
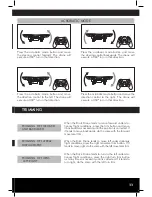
MOVEMENT CONTROL

FLIGHT SPEEDS

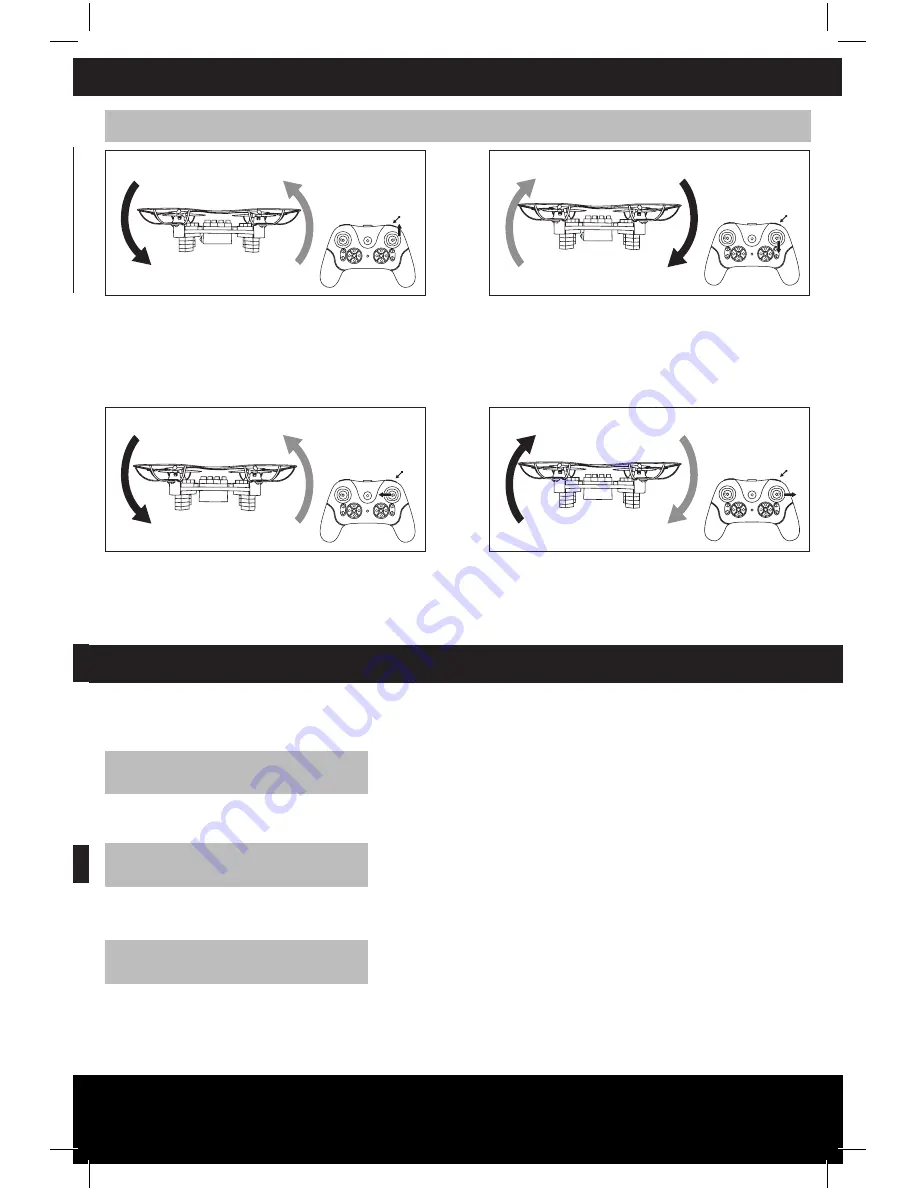
Move the steering control lever right or left: The 

drone will fly in the corresponding direction.

Move the steering control lever up or down: 

The drone will move forwards or backwards.

ACROBATIC MODE

ACROBATIC MODE

Press the acrobatic mode button and move 

the steering control forward: The drone will 

execute a 360º turn in that direction.

Press the acrobatic mode button and move 

the direction control to the left: The drone will 

execute a 360º turn in that direction.

Press the acrobatic mode button and move the 

direction control to the right: The drone will 

execute a 360º turn in that direction.

Press the acrobatic mode button and move 

the steering control backwards: The drone will 

execute a 360º turn in that direction.

TRIMMING

TRIMMING OF FORWARD 
AND BACKWARD

TRIMMING OF TURNS
 LEFT RIGHT

TRIMMING OF LATERAL 
DISPLACEMENT

When the Brick Drone tends to move forward under sta-

tionary flight conditions, press the trim button and move 

it backwards as necessary until the position is corrected. If 

it tends to move backwards, do the same with the forward 

movement trim.

When the Brick Drone tends to turn to the left under sta-

tionary flight conditions, press the right turn trim button 

as many times as necessary until is corrected. If it tends to 

turn right, do the same with the left turn trim.

When the Brick Drone tends to move left under stationary 

flight conditions, press the right movement trim button. If it 

tends to move right, do the same with the left movement trim.

Summary of Contents for BRICK DRONE

Page 1: ...RICK DRONE Thank you for purchasing our Brick Drone Please read the instructions carefully to be fully familiar with the features and functioning of the drone so as to fly it safely Save this instruct...

Page 2: ...nes durante la carga de la bater a Movement Control Trimming Pictures and videos with your Brick Drone Functions of the Brick Drone App download and features Flight speeds Acrobatic mode 3 3 5 8 9 9 1...

Page 3: ...ions You should always maintain eye contact with your drone not exceeding in any case the 1 20m high Although it is not necessary to be a professional pilot you must always fly safely You can fly your...

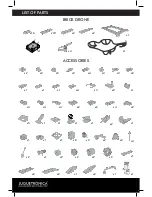
Page 4: ...PARTS BRICK DRONE ACCESSORIES x2 x2 x10 x16 x4 x3 x2 x1 x2 x2 x1 x3 x4 x4 x4 x2 x2 x1 x2 x1 x2 x3 x1 x1 x1 x5 x1 x1 x8 x2 x2 x1 x1 x1 x4 x1 x2 x5 x4 x2 x1 x2 x3 x2 x2 x1 x2 x2 x2 x2 x2 x2 x1 x1 x1 x1...

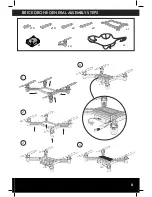
Page 5: ...5 BRICK DRONE GENERAL ASSEMBLY STEPS 1 3 2 4 x2 x2 x10 x16 x1 x1 x1 x4 5...

Page 6: ...MODELO FINALIZADO 7 8 6 WIRING PLACEMENT ENGINE WITH RED BLUE WIRES ENGINE WITH WHITE BLACK WIRES ENGINE WITH WHITE BLACK WIRES ENGINE WITH RED BLUE WIRES BATTERY CABLE Trim turn...

Page 7: ...LLER Remove the battery cover unscrew the screws Place 3 AA batteries not included and place back the cover of the batteries and screw it 1 Place the batteries according to the polarity 2 Do not mix n...

Page 8: ...ace while you do so 3 If the drone LED blinks slowly the battery is running low Land it and charge the drone battery with the supplied USB charger When the drone is flying uncontrollably and it become...

Page 9: ...ts 3 Do not charge the battery as soon as you finish flying Wait for the battery to cool down otherwise the battery may swell explode or burn 4 Ensured you to use the original USB charger provided wit...

Page 10: ...g control lever right or left The drone will fly in the corresponding direction Move the steering control lever up or down The drone will move forwards or backwards ACROBATIC MODE When you ve controll...

Page 11: ...ection TRIMMING TRIMMING OF FORWARD AND BACKWARD TRIMMING OF TURNS LEFT RIGHT TRIMMING OF LATERAL DISPLACEMENT When the Brick Drone tends to move forward under sta tionary flight conditions press the...

Page 12: ...the propeller is released LIGHTS CONTROL The LEd lights drone can be activated or deactivated by pressing the control of top courses as shown in the side image The first press turns on the LED lights...

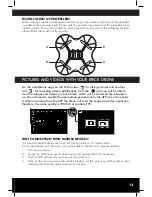
Page 13: ...nction within a 10 meters radius As you get familiar with the drone you will be able to handle it at a greater distance 1 Turn on your drone 2 Access the settings on your mobile device and activate th...

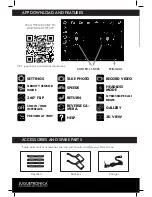
Page 14: ...FEATURES RETURN 3D VIEW HEADLESS MODE REVERSE CA MERA GYROSCOPE CALI BRATE GRAVITY SENSOR MODE SHOW HIDE INTERFACE PREVIEW AT 720P TAKE PHOTO RECORD VIDEO GALLERY HELP 360 FLIP SPEEDS SCAN THE QR CODE...

Page 15: ...15 MODEL 1 ASSEMBLY INSTRUCTIONS FINISHED MODEL x2 x2 x1 x4 x2 x2 x2 x2 1 5 6 2 3 4 A1 A2 A3 A STEP 1 6 GENERIC ASSEMBLY PAGS 5 6 x2 x2 x2 x2 x4 x6 x2 x2 x2 x2 x1 x1 Red Black...

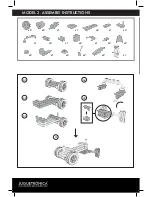
Page 16: ...MODEL 2 ASSEMBLY INSTRUCTIONS x1 x2 x1 x1 x2 x1 x1 x2 x2 x2 x3 x1 x2 x2 x1 x2 x2 x2 x1 x2 A1 A4 A5 A2 A3 A 45...

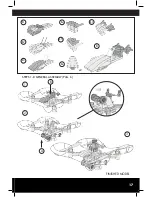
Page 17: ...17 FINISHED MODEL B4 B1 B2 B3 B5 B6 B7 B B A 180 1 2 3 STEPS 1 8 GENERAL ASSEMBLY PAG 6 x2...

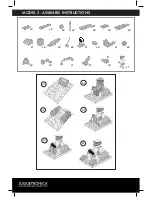
Page 18: ...MODEL 3 ASSEMBLY INSTRUCTIONS x2 x5 x2 x2 x2 x2 x2 x2 x1 x1 x1 x1 x6 x2 x1 x2 x2 x2 x1 A1 A2 A3 A4 A5 A x2 x2...

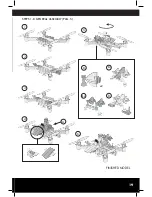
Page 19: ...19 FINISHED MODEL 1 5 6 2 3 STEPS 1 8 GENERAL ASSEMBLY PAG 5 4 A B1 B2 B3 B x2...

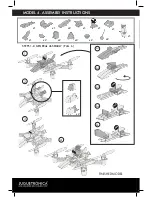
Page 20: ...FINISHED MODEL MODEL 4 ASSEMBLY INSTRUCTIONS A1 A2 A3 A4 A x2 1 2 3 4 x1 x1 x1 x1 x2 x1 x1 x1 x2 x2 x2 x2 x2 STEPS 1 8 GENERAL ASSEMBLY PAG 6...

Page 21: ...21 MODEL 5 ASSEMBLY INSTRUCTIONS FINISHED MODEL ATTENTION This model is not based on the generic assembly it is a variant 1 2 3 4 A1 A2 A x4 x1 x4 x2 x2 x2 x2 x1 x1 x1 x2 x2 Red Red x1 Black Black x4...

Page 22: ...he transmitter are not charged 3 The synchronisation between the drone and the station was not successful 1 The transmitter does not have enough power 2 There is another radio frequency equipment near...

Page 23: ...23 DESING YOUR OWN DRONE...

Page 24: ...nd Technical Support Shop C Alberto Aguilera 1 28015 Madrid Espa a The crossed out wheeled bin icon indicates that products and batteries should not be disposed of as organic waste as they contain sub...

Reviews: