– 4 –
SPECIFICATIONS
○
Presser foot lifting amount : Standard 9mm.
○
Max. presser foot pressure : 88N.
* Line voltage : At 100%
11.
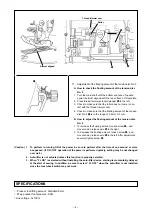
Adjustment of the floating amount of the tension disc No. 2.
A.
How to check the floating amount of the tension disc
No. 2
1. Turn the main shaft until the bottom end face of needle
eyelet is almost aligned with the top surface of throat plate.
2. Press thread trimmer solenoid plunger
to the left.
3. Check to make sure that the roller does not come in con-
tact with the thread trimmer cam.
4. Check to make sure that the floating amount of the tension
disc No. 2
is in the range of 0.5 mm to 1 mm.
B.
How to adjust the floating amount of the tension disc
No. 2
1. To increase the floating amount, loosen screw
, and
move tension release wire
to the right.
2. To decrease the floating amount, loosen screw
, and
move tension release wire
to the left. After adjustment,
securely tighten screw
.
(Caution) 1. To perform re-turning ON of the power, be sure to perform after the time of one second or more
has passed. (If ON / OFF operation of the power is performed quickly, setting may be not changed
over well.)
2. Auto-lifter is not actuated unless this function is properly selected.
3. When “FL ON” is selected without installing the auto-lifter device, starting is momentarily delayed
at the start of sewing. In addition, be sure to select “FL OFF” when the auto-lifter is not installed
since the touch-back switch may not work.
Almost aligned
Thread trimmer cam
Roller
Summary of Contents for AK85C
Page 1: ...AK85C INSTRUCTION MANUAL ...


