– 28 –
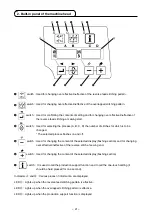
6
5
4
3
6
5
4
3
7
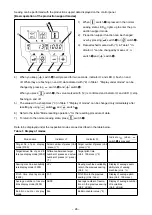
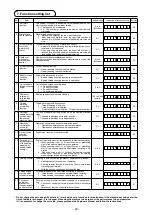
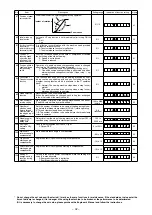
Functions can be selected and specified.
(caution) refer to the Instruction Manual for each operation panel for how to operate sewing patterns us-
ing other operation panel than the built-in panel of the machine head.
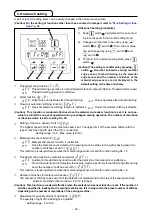
) Turn ON the power wth
swtch
7
held
pressed.
(The tem whch has been changed durng the
prevous work s dsplayed.)
* If the screen dsplay does not change, re-carry
out operaton descrbed n step ).
(caution) Be sure to re-turn oN the power switch
when one or more seconds have passed after
turning it oFF. If the power switch is re-turned
oN immediately after turning it oFF, the sewing
machine may fail to operate normally. In such a
case, be sure to turn oN the power switch again
properly.
2) To move the settng No. forward, press
swtch
4
. To move the settng No. backward,
press
swtch
3
.
(caution) If the setting No. is moved forward (or
backward), the previous (or subsequent) content
of the setting is confirmed. Be careful when the
content of a setting is changed (when the
/
switch is touched).
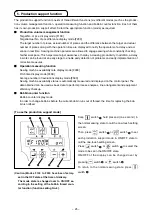
Example) Changng the maxmum number of revolu-
tons (settng No. 96)
Press
swtch
3
or
swtch
4
to call set-
tng No. "96."
The current set value s dsplayed on ndcator
B
.
Press
swtch
5
to change the settng to
"2500."
* The content of settng of the settng No. returns
to the ntal value by pressng
swtch
5
and
swtch
6
smultaneously.
3) After completon of the changng procedure, press
swtch
3
or
swtch
4
to confirm the updat
-
ed value.
(caution) If the power is turned oFF before carry-
ing out this procedure, the changed content is
not updated. When
switch
3
is pressed, the
display on the panel changes to the previous
setting No. When
switch
4
is pressed, the display on the panel changes to the subsequent setting
No. after completion of the operation, the machine is returned to the normal sewing state by turning
oFF the power and re-turning it oN.
6. Setting of functions

