– 1 –
ENGLISH
SPECIFICATIONS
S :
Micro-quantity lubrication
M :
Semi-dry
D :
Dry
S : Medium-weight materials
H : Heavy-weight materials
A : Light weight materials
• The sewing speed will vary depending on the sewing conditions. The sewing speed preset at the time of shipping is 4,000sti/min. The thread trimming
speed can be changed within the range of ( ). The thread trimming speed preset at the time of shipping is 500sti/min.
* 1 : When stitch length exceeds 4 mm or more, set the max. sewing speed to 4,000 sti/min or less for use.
* 2 : Needle used depends on the destination.
*
3 : MA type is for light-weight materials. In the case the sewing machine is used with its speed of stitch set at 4,000 sti/min or higher, the presser
regulating spring and thread tension spring should be changed with S type ones.
DDL-9000B-
-SS
-MS
-DS
-SH
-MA
*3
Max. sewing speed
5,000 sti/min
4,000 sti/min
4,500 sti/min
5,000 sti/min
Thread trimming speed
500 sti/min (100 to 500sti/min)
Stitch length
5mm
*1
4mm
Presser foot lift
(by knee lifter)
10 mm (standard) 15 mm (max.)
Needle
*2
134 #65 to #110
DP×5 #65 to #110
134 #125 to #160
DP×5 #125 to #160
134 #60 to #75
DP×5 #60 to #75
DB×1 #9 to #18
DB×1 #9 to #18
DB×1 #20 to #23
DB×1 #20 to #23
DB×1 SAN10 #8 to #11
DB×1 SF #8 to #11
Lubricating oil
JUKI NEW DEFRIX OIL No. 1 or JUKI MACHINE OIL #7
-
JUKI NEW DEFRIX OIL No. 1 or JUKI MACHINE OIL #7
Noise
SS,MS,MA ;
'- Equivalent continuous emission sound pressure level (L
pA
) at the workstation:
A-weighted value of 77 dBA ; (Includes K
pA
= 2.5 dBA) ; according to ISO 10821- C.6.2 -ISO 11204 GR2 at 4,000 sti/min.
SH ;
'- Equivalent continuous emission sound pressure level (L
pA
) at the workstation:
A-weighted value of 77 dBA ; (Includes K
pA
= 2.5 dBA) ; according to ISO 10821- C.6.2 -ISO 11204 GR2 at 4,000 sti/min.
DS ;
'- Equivalent continuous emission sound pressure level (L
pA
) at the workstation:
A-weighted value of 79
dBA ; (Includes K
pA
= 2.5 dBA) ; according to ISO 10821- C.6.2 -ISO 11204 GR2 at 4,000 sti/min.
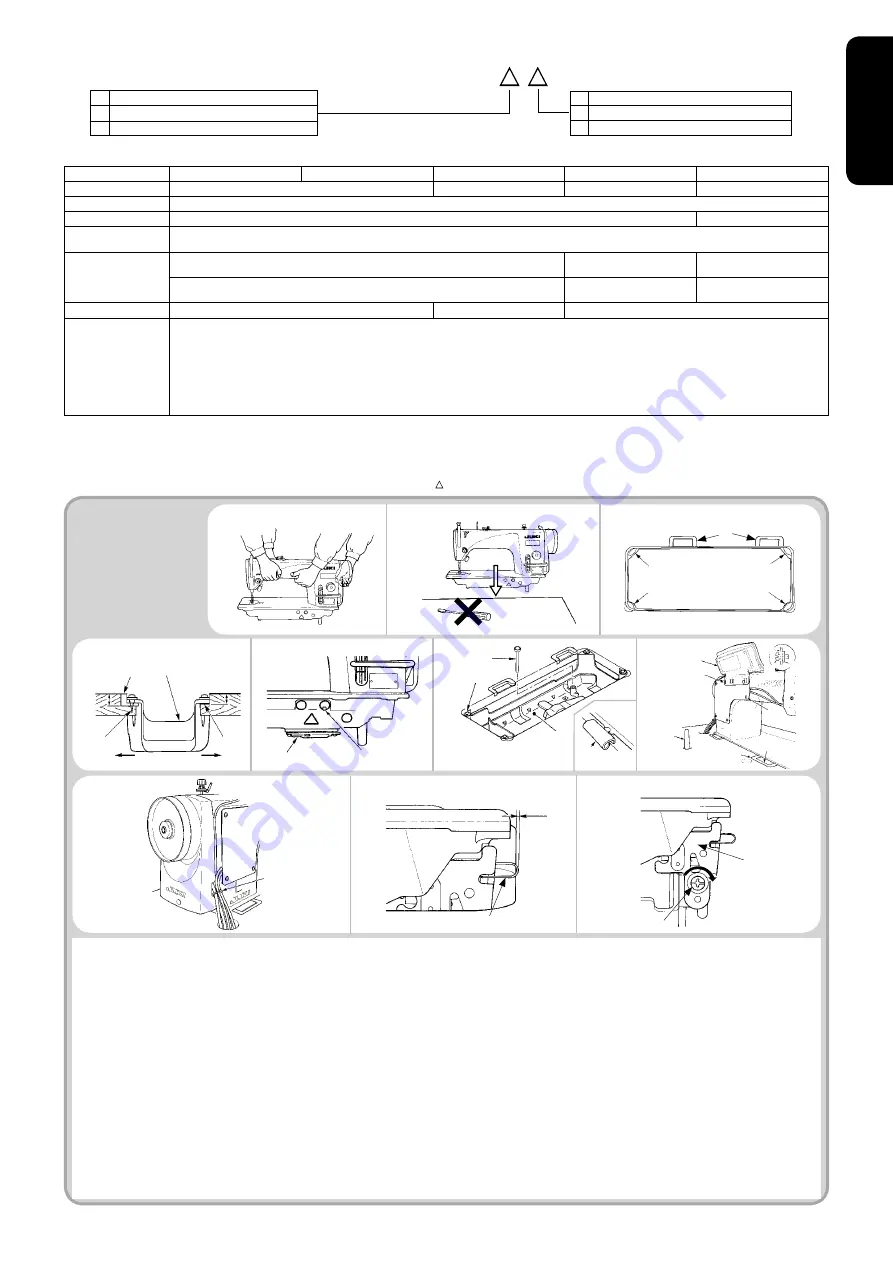
1. INSTALLATION
1)
2)
8)
23.5 mm
19.5 mm
1
2
4
3
A
B
3)
4)
5)
1) Carry the sewing machine with two persons as shown in the figure above.
(Caution) Do not hold the handwheel.
2) Do not put protruding articles such as the screwdriver and the like at the location where the sewing machine is placed.
3) The under cover should rest on the four corners of the machine table groove. Mount rubber hinge seat
8
on the table and fix it on the table with a nail.
4) Fix two rubber seats
1
on side
A
(operator’s side) using nails
2
as illustrated above. Fix two cushion seats
3
on side
B
(hinged side) using a rubber-based adhesive. Then place
under cover
4
on the fixed seats.
5) Remove air vent cap
5
attached to the machine bed.
(Caution)
1. If the sewing machine is operated without removing air vent cap
5
, oil leakage from gear box portion C may occur.
2. Be sure to attach cap
5
when transporting the machine head in the state that the machine head is removed from the machine table.
6) Fit knee lifter pressing rod
6
. Fit hinge
7
into the opening in the machine bed, and fit the machine head to table rubber hinge
8
before placing the machine head on cushions
9
on
the four corners.
7) Securely attach head support rod
!0
to the table until it goes no further. Regarding the control panel
!1
, remove two side plate fixing screws
!2
, place the rubber packing
!3
, which is
one of the accessories of the control panel
!1
, between the head section and control panel
!1
, then fix them together.
(Caution)
1. Do not use the screws supplied as accessories of control panel
!1
.
2. Be sure to mount the machine head support bar on the machine table so that its height from the table surface becomes 55 to 60 mm. For the sewing machine provided with
the AK device, be sure to mount the support bar on the table so that its height from the table surface becomes 38 to 43 mm.
8) Bundle cable clip band
!4
supplied as accessories of the machine head at the root of the cable.
9) Check to be sure that the table and the safety switch arm
!5
are engaged with each other by 2.0 mm to 3.5 mm, with the sewing machine slightly tilted.
(Caution) If the engagement between the table and the safety switch arm is 2 mm or less, Error 302 may occur at the time of startup. Or, if the aforementioned engagement is
3.5 mm or more, safety switch arm
!5
may break.
10) If the engagement between the table and safety switch arm
!5
is outside the range of 2.0 mm and 3.5 mm, loosen safety switch mounting screw
!6
and tilt safety switch
!7
in the
direction of the arrow to adjust the engagement of safety switch arm
!5
with the table.
9
7
6
4
!0
!1
!2
!2
!1
!3
!2
7
8
6),7)
C
5
!4
1
1
3
3
8
6)
9)
10)
!5
2.0 to 3.5 mm
!6
!7
Summary of Contents for DDL-9000B
Page 2: ......
Page 3: ...ENGLISH ENGLISH ...
Page 4: ......
Page 11: ...vii ENGLISH ...
Page 27: ...OTHER LANGUAGE 日本語 中文 DEUTSCH FRANÇAIS ESPAÑOL ITALIANO TÜRKÇE РУССКИЙ OTHER LANGUAGE ...
Page 130: ... 53 ...
Page 131: ......


