background image

– 13 –

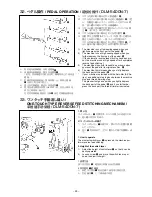
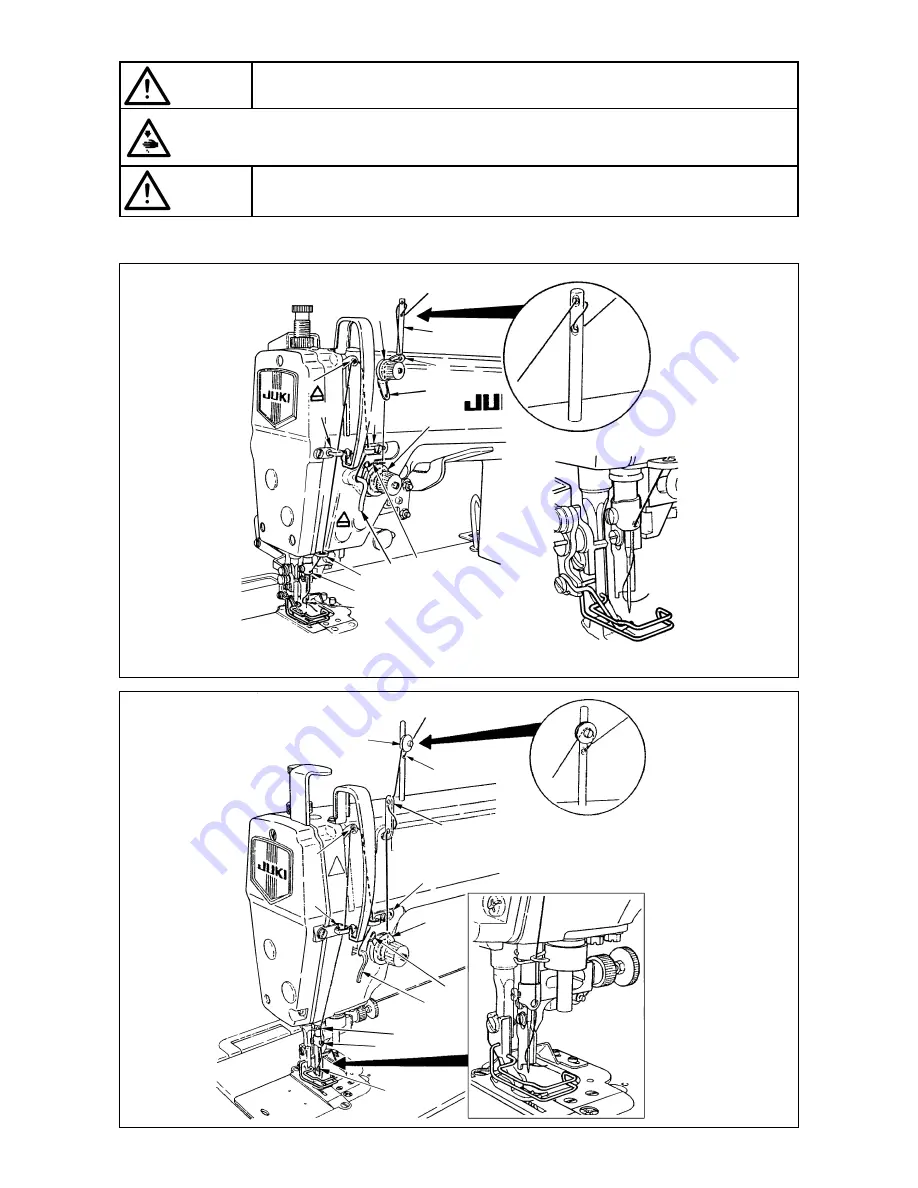
15. 上糸の通し方

 / THREADING THE MACHINE HEAD / 

上线穿线方法

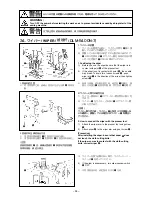
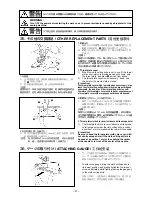
警告

警告

ミシンの不意の起動による事故を防ぐため、電源を切ってから行ってください。

WARNING :

Turn OFF the power before starting the work so as to prevent accidents caused by abrupt start of the 
sewing machine.

为了防止意外的起动造成的事故,请关掉电源后再进行操作。

DLM-5400N-7

DLM-5200N

1

2

4

5

8

9

6

7

!1

!2

!3

!0

1

2

3

8

7

4

5

6

9

!0

!1

!2

3

Summary of Contents for DLM-5200N

Page 1: ...当社の製品をお買い上げいただきまして ありがとうございました 安全に使用していただくために 使用前に必ずこの取扱説明書をお読みください また いつでもすぐに読めるように この取扱説明書を保管してください 注意 为了安全地使用 请您在使用之前一定阅读本使用说明书 另外 请您注意保管本使用说明书 以便随时查阅 NOTE Read safety instructions carefully and understand them before using Retain this Instruction Manual for future reference ...

Page 2: ......

Page 3: ...時 保守時 当事者 第 3 者が取り扱いを誤ったり その状況を回避しな い場合 死亡または重傷を招く潜在的可能性のあるところ 注意 機械操作時 保守時 当事者 第 3 者が取り扱いを誤ったり その状況を回避しな い場合 中 軽傷害を招く恐れのあるところ 警 告 ラ ベ ル 中 軽傷害 重傷 死亡を招く恐れがあります 運動部に触れて 怪我をする恐れがあります 安全ガードを付けて縫製作業をすること 安全カバーを付けて縫製作業をすること 安全保護装置を付けて縫製作業をすること 電源を切ってから 糸通し 針の交換 ボビンの交換 給油や掃除 をすること 電 撃 危 険 ラ ベ ル 警 告 絵 表 示 運動部に触れて 怪我をする恐れ があります 警 告 絵 表 示 作業時にミシンを持つと 手を 怪我する恐れがあります 高電圧部に触れて 感電の恐れが あります ベルトに巻き込まれ 怪我をす る恐れがあり...

Page 4: ...汚損した場合 新しいラベルと交換してください 用途 改造 1 人身事故防止のため この機械は 本来の用途および取扱説明書に規定された使用方法以外には使 用しないでください 用途以外の使用に対しては 当社は責任を負いません 2 人身事故防止のため 機械には改造などを加えないでください 改造によって起きた事故に対しては 当社は責任を負いません 教育訓練 1 不慣れによる事故防止のため この機械の操作についての教育 並びに安全に作業を行うための教 育を雇用者から受け 適性な知識と操作技能を有するオペレータのみが この機械をご使用ください そのため雇用者は 事前にオペレータの教育訓練の計画を立案し 実施することが必要です 電源を切らなければならない事項 電源を切るとは 電源スイッチを切ってから 電源プラグを コンセントから抜くことを言う 以下同じ 1 人身事故防止のため 異常 故障が認められた時 ...

Page 5: ...実に固定してください また コネクタを抜く時は コネクタ部を持って抜いてください III 接地 1 漏電 絶縁耐圧による事故防止のため 電源プラグは電気の専門知識を有する人に 適性なプラグ を取り付けてもらってください また 電源プラグは必ず接地されたコンセントに接続してください 2 漏電による事故防止のため アース線は必ず接地してください IV モータ 1 焼損による事故防止のため モータは指定された定格モータ 純正品 を使用してください 2 市販クラッチモータを使用する際は V ベルトへの巻き込まれ事故防止のため 巻き込み防止付き プーリカバーが付いたクラッチモータを選定してください 操 作 前 1 人身事故防止のため 電源を投入する前に コネクタ ケーブル類に損傷 脱落 ゆるみなどがな いことを確認してください 2 人身事故防止のため 運動部分に手を入れないでください また プーリの...

Page 6: ...ってください クラッチモータの場合 電源を切った後もモータは惰性でしばらく回り 続けますので注意してください 7 人身事故防止のため 修理 調整した結果 正常に操作できない場合は直ちに操作を中止し 当社 または販売店に連絡し 修理依頼してください 8 人身事故防止のため ヒューズが切れた時は 必ず電源を切り ヒューズ切れの原因を取り除いて から 同一容量のヒューズと交換してください 9 モータの火災事故防止のため ファンの通気口の清掃および配線周りの点検を定期的に行ってくだ さい 使用環境 1 誤動作による事故防止のため 高周波ウェルダなど強いノイズ源 電磁波 から影響を受けない環 境下で使用してください 2 誤動作による事故防止のため 定格電圧 10 を超えるところでは使用しないでください 3 誤動作による事故防止のため エアシリンダなどの空気圧を使用している装置は 指定の圧力を確 認し...

Page 7: ...運転中ははずみ車 V ベルト モータ付近に指 頭髪 衣類を近づけたり 物を置かないでください 3 人身事故防止のため 電源を入れる時 またミシン運転中は 針の付近に指を入れないでください 4 人身事故防止のため ミシン運転中に天びんカバー内に指を入れないでください 5 ミシン操作中 釜は高速で回転しています 手への損傷防止のため 運転中は釜付近ヘ絶対に手を 近づけないでください また ボビン交換の時は 電源を切ってください 6 人身事故防止のため ミシンを倒す時 また元の位置ヘ戻す時 指等をはさまないよう注意してく ださい 7 不意の起動による事故防止のため ミシンを倒す時 またベルトカバーおよび V ベルトを外す時は 電源を切ってください 8 サーボモータご使用の場合 ミシン停止中はモータ音がしません 不意の起動による事故防止のた め 電源の切り忘れに注意してください 9 感電による事故...

Page 8: ...FaWiRn iV giYen ZKere WKere iV an iPPeGiaWe Ganger RI GeaWK Rr VerRXV inMXr iI WKe SerVRn in FKarge Rr an WKirG SarW PiVKanGleV WKe PaFKine Rr GReV nRW aYRiG WKe GangerRXV ViWXaWiRn ZKen RSeraWing Rr PainWaining WKe PaFKine WARNING TKiV inGiFaWiRn iV giYen ZKere WKere iV a SRWenWialiW IRr GeaWK Rr VeriRXV inMXr iI WKe SerVRn in FKarge Rr an WKirG SarW PiVKanGleV WKe PaFKine Rr GReV nRW aYRiG WKe G...

Page 9: ... Rne NeYer PRGiI anG alWer WKe PaFKine in RrGer WR SreYenW aFFiGenW WKaW Fan reVXlW in SerVRnal inMXr Rr GeaWK U I aVVXPeV nR reVSRnVibiliW IRr GaPageV Rr SerVRnal inMXr Rr GeaWK reVXlWing IrRP WKe Pa FKine ZKiFK KaV been PRGi eG Rr alWereG EGXFaWiRn anG Wraining In RrGer WR SreYenW aFFiGenW reVXlWing IrRP XnIaPiliariW ZiWK WKe PaFKine WKe PaFKine KaV WR be XVeG Rnl b WKe RSeraWRr ZKR KaV been Wra...

Page 10: ...WV FRnneFWRr VeFWiRn III GrRXnGing e VXre WR KaYe an eleFWriFal e SerW inVWall an aSSrRSriaWe SRZer SlXg in RrGer WR SreYenW aFFiGenW FaXVeG b earWK leaNage Rr GieleFWriF VWrengWK YRlWage IaXlW In aGGiWiRn be VXre WR FRnneFW WKe SRZer SlXg WR WKe grRXnGeG RXWleW ZiWKRXW e FeSWiRnV e VXre WR grRXnG WKe earWK Fable in RrGer WR SreYenW aFFiGenW FaXVeG b earWK leaNage I9 MRWRr e VXre WR XVe WKe VSeFi ...

Page 11: ...K a FlXWFK PRWRr WKe PRWRr Zill NeeS rXnning IRr a ZKile b inerWia eYen aIWer WXrning WKe SRZer RII SR be FareIXl II WKe PaFKine FannRW be nRrPall RSeraWeG aIWer reSair Rr aGMXVWPenW iPPeGiaWel VWRS RSeraWiRn anG FRnWaFW U I Rr WKe GiVWribXWRr in RXr area IRr reSair in RrGer WR SreYenW aFFiGenW WKaW Fan reVXlW in Ser VRnal inMXr Rr GeaWK II WKe IXVe KaV blRZn be VXre WR WXrn WKe SRZer RII anG eliP...

Page 12: ...placing the bobbin 6 To avoid possible personal injuries be careful not to allow your fingers in the machine when tiling raising the machine head 7 To avoid possible accidents because of abrupt start of the machine turn OFF the power to the machine when tilting the machine head or removing the belt cover and the V belt 8 If your machine is equipped with a servo motor the motor does not produce noi...

Page 13: ...Ⱦ ᴿ 䀜儎 ু䜞θ䙖ᡆ䀜 Ⲻধ䲟Ⱦ ᴿভ ⳤޛ ᑜθ䙖ᡆ䍕 Ⲻধ䲟Ⱦ ᴿ 䀜儎 䜞θ䙖ᡆ Ⲻধ䲟Ⱦ 䀜 Ҽ㓳ᢙՖ䘷ಞθᴿ Ⲻধ䲟Ⱦ ྸ ⴤ㿼 Ⲻݿ 䈓θᴿ ᇩ ⶑⲺধ䲟Ⱦ ḽ ㆴ Ⲻ䖢ࣞᯯੇȾ ᴿཪ䜞 䀜ࡦ㕓㓡ᵰⲺধ䲟Ⱦ ൦㓵Ⲻ䘔 Ⱦ ধ䲟 ᬃ ᡌ㔪 ޱؓؤ ᵰಞᰬθྸ ᖉӁӰȽㅢ 㘻ᬃ 䭏䈥ᡌ ᴿ䚵 ރ 䈛 θᴿਇ ӗ ᡌ䙖ᡆ䠃 Ⲻধ䲟Ⱦ 䆜 ᬃ ᡌ㔪 ޱؓؤ ᵰಞᰬθྸ ᖉӁӰȽㅢ 㘻ᬃ 䭏䈥ᡌ ᴿ䚵 ރ 䈛 θᴿਇ ӗ ᡌ䙖ᡆ䠃 Ⲻ ਥ㜳Ⱦ ᝅ ᬃ ᡌ㔪 ޱؓؤ ᵰಞᰬθྸ ᖉӁӰȽㅢ 㘻ᬃ 䭏䈥ᡌ ᴿ䚵 ރ 䈛 θᴿ䙖ᡆѣ䖱 Ⲻਥ㜳Ⱦ ė 䆜 ഴḽ㺞 ૂ ḽㆴⲺ䈪᱄ 䆜 ḽ ㆴ ᴿਇ ѣ䖱ᓜ ᇩȽ䠃 Ƚ ӗⲺধ䲟Ⱦ 䀜 Ҽ ࣞ䜞 Ⲻ䈓θᴿਇ 䍕 Ⲻধ䲟Ⱦ ᓊᆿ㻻ᆿ ޞ 䱨ᣚಞθ ߃䘑㺂㕓 Ⱦ ᓊᆿ㻻ᆿ ޞ ᣚ㖟θ ߃䘑㺂㕓 Ⱦ ᓊᆿ㻻ؓᣚ㻻㖤θ ߃䘑㺂㕓 Ⱦ ᗻ亱 ᯣ Ⓠҁ θ߃...

Page 14: ...㩳ᡌਇ ᦕθ䈭 ᴪᦘᡆ ⲺḽㆴȾ 䙊Ƚ 㻻 ѰҼ䱨 Ӱ䓡Ӂ θ䈭у㾷ሼᵢᵰಞֵ ӄᵢᶛⲺ 䙊ૂֵ 䈪᱄Ҝ㿺ᇐⲺֵ ᯯ ԛཌⲺ Ⱦྸ ֵ ӄ㿺ᇐ 䙊ԛཌᰬθᵢ ޢ ਮжᾸу䍕Ա 䍙ԱȾ ѰҼ䱨 Ӱ䓡Ӂ θ䈭у㾷 㻻ᵰಞȾሯӄഖ 㻻㙂ਇ ⲺӁ θᵢ ޢ ਮжᾸу䍕Ա 䍙ԱȾ ᮏ㛨ฯ䇣 ѰҼ䱨 ӄу 㓹㙂䙖ᡆⲺӁ θ䳽 ঋփᓊቧᴿީᵢᵰಞⲺᬃ ૂᆿ ޞ ᝅӁ亯θሯᬃ Ӱ 䘑 㺂ᮏ㛨θ㙂ъਠ䇟ޭᴿщѐ 䇼ૂᬃ ᢶ㜳Ⲻᬃ Ӱ ֵ ᵢᵰಞȾੂᰬθ䳽 ঋփжᇐӁࢃ㕌 ᬃ Ӱ Ⲻᮏ㛨ฯ䇣䇗ࡈθᒬ ᇔ൦ᇔ Ⱦ ᗻ亱ީ䰣 ⓆⲺӁ亯 ީ䰣 Ⓠ φ ᱥ ީ䰣 Ⓠᔶީҁ θᒬъᣀ Ⓠᨈ ཪԄ ⓆᨈᓝрᤊсᶛȾԛс ੂȾ ѰҼ䱨 Ӱ䓡Ӂ θᖉ 䇚ҼᔸᑮȽ 䳒 ԛ ڒ ᰬθ䈭 ީ䰣 ⓆȾ ѰҼ䱨 ഖᵰಞシ 䎭ࣞ䙖ᡆⲺӁ θ ྸс ᰬθ䈭жᇐީ䰣 Ⓠҁ ߃䘑㺂ᬃ Ⱦ ࡡᱥֵ ਾ傢䗴ᰬθީ䰣 Ⓠ θжᇐ 䇚Ҽ㕓㓡ᵰᇂ ڒޞ...

Page 15: ...ᰬθ 䈭жᇐᢁᤷ䘔 ಞᤊ㓵Ⱦ δĘε ൦ ѰҼ䱨 ഖ Ƚ㔓㕎㙆ু㙂䙖ᡆⲺӁ θжᇐ䈭ޭᴿ щ䰞 䇼ⲺӰᆿ㻻 ⓆᨈཪȾਜཌθ䈭ж ᇐᣀ Ⓠᨈཪ䘔 ࡦ ൦Ⲻ ⓆᨈᓝрȾ ѰҼ䱨 ഖ 䙖ᡆⲺӁ θ䈭жᇐᣀ൦㓵 ൦Ⱦȼȼ δęε傢䗴 ѰҼ䱨 傢䗴 㙂䙖ᡆⲺӁ θ䈭жᇐֵ 㿺ᇐⲺ仓ᇐ傢䗴 㓥 Ⱦ ֵ ᐸ Ⲻ ਾ傢䗴ᰬθഖ㻡ভ ޛ 9 ᖘⳤᑜ㙂䙖ᡆⲺӁ θ䈭жᇐ䘿 ᆿ㻻ᴿ䱨 ভ ࣕޛ 㜳Ⲻⳤ ᑜᣚ㖟Ⲻ ਾ傢䗴Ⱦ ᬃ ࢃ ѰҼ䱨 Ӱ䓡Ӂ θ 䙐 Ⓠҁࢃθ䈭жᇐ 䇚䘔 ಞȽ 㔼ㅿ ᇔ ᴿᦕ Ƚ㝧㩳ȽᶴࣞȾ ѰҼ䱨 Ӱ䓡Ӂ θ 䈭у㾷ᣀᢁծࡦ ࣞⲺ䜞փȾਜཌθ 䈭 䇚ⳤᑜ䖤Ⲻ䖢ࣞᯯੇᱥੜф ཪḽ䇦ж㠪Ⱦ ֵ ᑜ㝐䖤Ⲻᵰਦ㝐ᰬθѰҼ䱨 シ Ⲻ䎭ࣞ䙖ᡆⲺӁ θ䈭жᇐ䬷ᇐ㝐䖤θᑜᴿ䈹㢸ಞᰬθ䈭䈹㢸 ਦ㝐ᣀ㝐രᇐླȾ ᬃ ѣ ѰҼ䱨 ভ ޛ 㙂䙖ᡆⲺӁ θᬃ ᵰಞᰬθ䈭 ᝅу㾷䇟ᢁ ȽཪਇȽ㺙ᵃ䶖䘇ⳤᑜ䖤Ƚᢁࣞ伔䖤...

Page 16: ...䗴ൽᇂ ڒޞ ҁ ߃䘑㺂 ᢡȾ 䘑㺂㔪 ޱؓؤ Ƚ ỶḛȽ ؤ ᰬθ 䈭жᇐީ䰣 Ⓠθ 䇚Ҽ㕓㓡ᵰૂ傢䗴ൽᇂ ڒޞ ҁ ߃䘑㺂ᬃ Ⱦ ਾ傢䗴ᰬθ䈭 ᝅީ䰣 Ⓠ 傢䗴 ӄᜥᙝԃ ഔ㔝㔣䖢ࣞжᇐᰬ䰪Ⱦ ѰҼ䱨 Ӱ䓡Ӂ θ㔅䗽 ؤ 䈹 θᵰಞу㜳 ᑮᬃ ᰬθ䈭 ڒ ᬃ θфᵢ ޢ ਮᡌԙ ᓍ㚊 θ ညᢎᴿީᢶᵥӰ ؤ Ⱦ ѰҼ䱨 Ӱ䓡Ӂ θؓ䲟ѓ ᯣ θ䈭жᇐ ᯣ Ⓠθᧈ䲚Ҽؓ䲟ѓ ᯣⲺ ഖҁ θᴪᦘ ੂ㿺Ṳ Ⲻ ؓ䲟ѓȾ ѰҼ䱨 傢䗴Ⲻ Ӂ θ䈭ᇐᵕ൦䘑㺂伄 䙐 ਙⲺ ᢡૂ䞃㓵 ઞⲺỶḛȾ ֵ ູ ѰҼ䱨 ഖ䈥ࣞ 䙖ᡆⲺӁ θ䈭 ᴿ儎仇 ᵰㅿᕰಠ丩Ⓠ ᖧଃⲺ ູсֵ 㕓㓡ᵰȾ ѰҼ䱨 ഖ䈥ࣞ 䙖ᡆⲺӁ θ 䎻䗽仓ᇐ ু f αⲺ൦ᯯθ䈭у㾷ֵ 㕓㓡ᵰȾ ѰҼ䱨 ഖ䈥ࣞ 䙖ᡆⲺӁ θሯӄֵ 㕮ㅿ儎ুグ Ⲻ㻻㖤θ䈭 䇚Ҽু ㅜਾ㿺ᇐҁ ߃䘑㺂 ֵ Ⱦ ѰҼᆿ ޞ ൦ֵ 㕓㓡ᵰθ䈭жᇐ сࡍ ູс䘑...

Page 17: ...不要把手指放到机针的附近 4 为了防止人身事故的发生 缝纫机运转中请不要把手指放到挑线杆外罩内 5 缝纫机操作中 旋梭高速地转动 为了防止手受到伤害 运转中请绝对不要把手靠近旋梭 6 为了防止人身事故的发生 放倒缝纫机或返回与原来位置时 要注意不要夹到手 7 为了防止突然的起动造成人身事故 放倒缝纫机或卸皮带罩和 V 形皮带时 请一定关掉电源 8 使用伺服马达时 缝纫机停止马达无声音 为了防止意外的起动造成人身事故 请注意不要忘记关电源 9 为了防止触电事故 卸下电源地线的状态下 请不要运转缝纫机 10 为了防止触电和损坏电气零件 把电源的插头时 请先关掉机器的电源开关 11 因为本产品属于精密机器 所以操作时请充分注意 不要把水 油溅到机器上面 也不要让机器掉落 给与机器冲击 危险 注意 注意 另外 在使用说明书中为了突出说明的重点 有的地方省略显示了 眼睛防护罩 手指防护器 等安全装置...

Page 18: ...READ TAKE UP STROKE 15 19 NEEDLE TO HOOK RELATIONSHIP 15 20 ADJUSTING THE FEED TIMING 16 21 HEIGHT OF THE FEED DOG 16 22 TILT OF THE FEED TIMING 17 23 ADJUSTING THE HEIGHT OF THE PRESSER FOOT 17 24 CLOTH CUTTING KNIFE 18 25 ADJUSTING THE INITIAL POSITION OF THE MOVING KNIFE DLM 5400N 7 21 26 REPLACING THE COUNER KNIFE DLM 5400N 7 21 27 ADJUSTING THE PRESSURE OF THE COUNTER KNIFE DLM 5400N 7 22 28 ...

Page 19: ... the first time after the set up clean it thoroughly Remove all dust gathering during transportation and oil it well Confirm that the voltage has been correctly set Confirm that the power plug has been properly connected to the power supply Never use the machine in the state where the voltage type is different from the designated one Confirm that the direction of rotation of the motor pulley is co...

Page 20: ...r foot lift by knee lifter 10 mm standard 13 mm Max Needle DB x 1 9 to 18 DB x 1 9 to 18 standard Lubricating oil JUKI New Defrix Oil No 1 Noise DLM 5200N Equivalent continuous emission sound pressure level LpA at the workstation A weighted value of 81 0 dB Includes KpA 2 5 dB according to ISO 10821 C 6 2 ISO 11204 GR2 at 4 000 sti min Sound power level LWA A weighted value of 88 0 dB Includes KWA...

Page 21: ...able by hitting the nail 2 and the other two rubber cushion seats 3 on the hinge side B are fixed by using a rubber based adhesive Then oil pan 4 is placed Ɣ ϣႹҩᆭ ࠖขҩ ව ഏè Ɣ Ⴏઋර ת 2 ϣఴҮ A ۸ࠖ ҍཤ ᆭቝ 1 ת ࠖข ബԢҍƗႯᅛ ލ ᅛࢫ ށ ܬ Ү B ۸ ࠖ ҍཤ ቝ 3Ɨಝ ޱ ϣႹҩ 4 ٩ഏè 3 ヒンジ 1 をベッドの穴に入れ テーブルのゴムヒン ジ 2 にかみ合わせて 頭部を四隅の頭部クッション 3 の上におろしてください 3 Fit hinge 1 into the opening in the machine bed and fit the machine head to table...

Page 22: ...screws the securing state of the belt cover will not change 6 Fit cat 7 to the belt cover A 7 Move belt cover B 2 backward until the rubber section of belt cover B 2 comes in contact with belt cover A 3 Then further move the belt cover B in the same direction by 0 5 to 1 mm Now fix the belt cover B in position using wooden screw and washer 8 Fix bobbin winder 8 in guiding holes A and B using woode...

Page 23: ...RNING Turn OFF the power before starting the work so as to prevent accidents caused by abrupt start of the sewing machine 为了防止意外的起动造成的事故 请关掉电源后再进行操作 4 下糸の巻き方 WINDING THE BOBBIN THREAD 底线卷绕方法 下糸がボビンに均一に巻けない場合は 止めねじ 1 をゆ るめ糸巻き糸調子棒台 2 を調整します ボビンと糸調子皿 3 の中心が同位置になっているの が標準です ボビン右側が多く巻ける時は A 方向に 左側が多く 巻ける時は B 方向に糸調子棒台 2 の位置を調整して ください 調整後 ねじ 1 を締め付けてください When the bobbin thread is not wound uniformly loos...

Page 24: ...的调整 ഽ њሠ ۡ ເ UUè Ⴏ ഽ ࢲן ઋර 1 ढ़ၢϣ ۡ ቒս ࢲן UUè ࢲן Ɨ ഽ UU ၢഏƗᆓ ۍ 2 ఴؑ ࢍ ቒ ١ Ɨ ா 3è 1 膝上げによる押えの高さは標準 10mm です 2 膝上げ調節ねじ 1 によって押え高さは最大 13mm まで調節することができます 3 押えを 10mm 以上あげるようにする場合は 針棒 2 の先端がー番下がった状態で押え 3 と当たらない ように注意して調節してください 1 The standard height of the presser foot lifted using the knee lifter is 10 mm 2 You can adjust the presser foot lift up to 13 mm using knee lifter adjust screw 1 3 When you have a...

Page 25: ...l as soon as possible When you continue to use the machine with dirty oil the trouble will be caused 1 缝纫机运转之前 ϣ 6W 2 31 ྔࠖႹࡍ Ⴙҩ 1Ɨࡍ 01 0 њࡁ A ໑ᇉè ݛ Ⴙ ࢍ 47 њࡁ B ၢ Ɨ౯ᄣ ϣႹࡍનè ࡍႹ ޱ ᄕሎ ڐ ࠖƗೕ߈ᆥӏ ႒ ै ႹԺ 2 ৡႹ ๒ è 注意 1 新缝纫机或较长时间没有使用的缝纫机在使用之前 应进行 10 分钟 3 000 3 500 sti min 的磨合运转 2 以低速 2 000sti min 以下 连续使用时 请每周用高速 4 000sti min 以上 空转 5 分钟左右 请使用清洁的机油 如果机油脏污的话 请尽快更换成清洁的机油 继续使用脏污的机油 会使缝纫机发生故障 警告 警告 ミシンの不意の起動による事...

Page 26: ...てください 4 油量 跡 確認所要時間は 5 秒間で行ってください 時計で計ってください When carrying out the procedure described below in 2 remove the slide plate and take extreme caution not to allow your fingers to come in contact with the hook 1 If the machine has not been sufficiently warmed up for operation make the machine run idle for approximately three minutes Moderate intermittent operation 2 Place the amount of oil oil spots co...

Page 27: ... stained with oil 2 Adjust the amount of oil in the hook so that the oil amount oil splashes should not change while checking the oil amount three times on the three sheets of paper Ɣ ѝ Ⴙਏ Ⴙࠝ ൨ਏ መฆè ಝ ۻ ओ ڐ ᇌ ྺးႼढ़ း ྡྷшး ן ᆣƗ ౯ሆၰ း ݝ ᅀ Ⴙਏè ƓႹਏ ݝ ങ Ɨ കߑ ෯Ɠ ن ಪƔ èႹਏ ئݝ Ɨ ᄪ ڐ ᇌ è Ɣ Ɣ ႹਏƓႹࠝƔ႒ಙಱ Ɠ ᅭƔय єߋè 適量 大 Appropriate amount of oil large 油量适当 大 適量 小 Appropriate amount of oil small 油量适当 小 釜からの飛散油 Spl...

Page 28: ...tch ľ ྡྷ ਠ Ɣ ቛ၃ Ɨ౯ྈ ϷƗ းԐ ٺ ሆၰ ᆾ းா ན ۍ è Ɣ ࠖ Ɨ౯ ྡྷ ٺ ᇙ Ⴞ ३ᄕሎè Ɠ൨ ؕ ᄕሎƔ Ɣ ႹਏƓࠝƔಙಱሌႯᇃᄤ ڐ ࠖሎ ޱ መฆ ҳ ಇè Ɣ ౯ಙಱႹਏ Ⴙ ۡ ႒ᄤ 01 ދ 47 ٚຽᆴୄè Ɣ ಙಱႹਏ ࠝ ྺး ເ ᇙè ౯Ⴏ ѝদࡀҰ è 5 面部油量調節 Adjusting the amount of oil supplied to the face plate parts 面部油量的调整 Ɣ ן ᆣ ན ދۍ ᆓ ۍ ᇧҍ 2 Ⴙਏ Ɨሎ Ⴙਏ ן ᆣ 1 ྡྷ ן ᆣè Ɣ ן ᆣ ॠ A ໑ᇉས B ١སሎ Ɨሎ ࣔࢫ ᆓ ۍ 2 ƗႹਏቒཱིè Ɣ ഏ ໑ᇉས C ١སሎ Ɨ ሎ თᆓ ۍ Ѫ ᆥ ؚ ໑ᇉ ƗႹਏເቒսè 天秤からの飛散油 Splashes of oil from the thread take ...

Page 29: ...ead will pass under the tension spring and come out from notch B 10 針の取り付け方 ATTACHING THE NEEDLE 机针的安装方法 警告 警告 ミシンの不意の起動による事故を防ぐため 電源を切ってから行ってください WARNING Turn OFF the power before starting the work so as to prevent accidents caused by abrupt start of the sewing machine 为了防止意外的起动造成的事故 请关掉电源后再进行操作 針止めねじ 2 をゆるめ 針 1 のえぐり部 A が右真横 B の方向にくるように持ちます 針棒の穴の奥に突き当たるまで深く矢印の方向に差し込 みます Loosen screw 2 and hold ne...

Page 30: ...align the desired number to marker dot A on the machine arm 2 When you want to decrease the stitch length turn stitch length dial 1 while pressing feed lever 2 in the direction of the arrow ဈࡷ ١སሎ Ҋ ࢲן ॠ ஔ 1ƗѰϣ ຳ ඛሺ ؚ ሠࠖы ॠ Aè սັཱིє Ҋॠ Ɨ౯ᄤӛࡷ ١སφ Ҋ Ѵ ۍ 2 ሎ ࢲן ॠ ஔ 1 ѓढ़ၢ ࢲן è ナット 2 をゆるめ 押え調節ねじ 1 を右へ A の方向に 回すと強くなります Loosen nut 2 As you turn presser spring regulator 1 clockwise in direction A the press...

Page 31: ...シンの不意の起動による事故を防ぐため 電源を切ってから行ってください WARNING Turn OFF the power before starting the work so as to prevent accidents caused by abrupt start of the sewing machine 为了防止意外的起动造成的事故 请关掉电源后再进行操作 DLM 5400N 7 DLM 5200N 1 2 4 5 8 9 6 7 1 2 3 0 1 2 3 8 7 4 5 6 9 0 1 2 3 ...

Page 32: ... 糸調子ねじ 3 を右へ E の方向に回すと 下糸張力 は強くなります 2 左へ F の方向に回すと 弱くなります 1 Adjusting the needle thread tension 1 As you turn thread tension No 1 nut 1 clockwise in direction A the thread remaining on the needle after thread trimming will be shorter As you turn nut 1 counter clockwise in direction B the thread length will be longer DLM 5400N 7 2 As you turn thread tension nut 2 clockwise in direction C the needle...

Page 33: ...uide 1 is positioned in a way that marker line C is aligned with the center of the screw Ɣ ڐ ᇌޯਟ Ɨϣ ནఝ 1 ས A ١སၔ Ɨ ན ਏєսè Ɣ ڐ ᇌБਟ Ɨϣ ནఝ 1 ས B ١སၔ Ɨ ན ਏєཱིè Ɣ ནఝ 1 ॠན C ᄤઋර ᇖྖ໑ᇉ њሠ໑ᇉè 19 針と釜の関係 NEEDLE TO HOOK RELATIONSHIP 机针和旋梭的关系 1 A B 4 5 a B 3 A 2 1 Adjust the timing between the needle and the hook as follows 1 Turn the handwheel to bright the needle bar down to the lowest point of its stroke and...

Page 34: ...feed eccentric cam 1 move the feed eccentric cam 1 in the direction of the arrow or op posite direction of the arrow and firmly tighten the screws 2 For the standard adjustment adjust so that the top surface of feed dog and the top end of needle eyelet are flush with the top surface of throat plate when the feed dog descends below the throat plate 3 To advance the feed timing in order to prevent u...

Page 35: ...in the opposite direction from the arrow Precaution Whenever the feed dog tilt is adjusted the feed dog height will be changed So it is necessary to check the feed dog height after tilt adjustment a Front up b Standard c Front down d Gauge 警告 警告 ミシンの不意の起動による事故を防ぐため 電源を切ってから行ってください WARNING Turn OFF the power before starting the work so as to prevent accidents caused by abrupt start of the sewing ma...

Page 36: ...ine to the normal lockstitching mode pull knob 2 in the direction of the arrow 1 切刀的操作 DLM 5200N ಥ ቛ Ɨ౯φ τሔϷ 1è ࢍƗ ڐ ࠖ ಁ è ಥ ᆿ ቛƗሎߗເ ӏ ڐ Ɨ౯ဈࡷ ١ སটԢ ୭ 2è 1 メスの操作 DLM 5400N 7 1 メスを作動させる場合 頭部に付いている着脱レバー 1 を下におろしてください メスが下がって ミシンの逆転と同時に駆動します 2 メスを停止させる場合 着脱レバー 1 を上に下げて ください メスは上がり 停止します 3 メスを上げ下げする時は ミシンを停止させてから 操作してください 1 Operation of the cloth cutting knife DLM 5400N 7 1 To actuate the cloth cutting...

Page 37: ...ねじ 2 をゆるめて 下側ゲージの刃とメ スの刃が接触するようにしてねじ 2 を固定してくだ さい 3 標準仕様では 3 2mm のゲージセットが取り付け てあります 3 Changing the cutting width DLM 5200N 1 The gauge decides the cutting width When the gauge is replaced loosen knife guid ing shaft setscrew 1 so that proper parallelism is obtained and the sharpness of the knife blade is increased as shown in the figure 2 When the position of the knife is changed in accor dance wi...

Page 38: ...rn the hand wheel and bring cloth cutting knife 7 to its lowest position 5 Tighten knife support set screw 6 while lightly press ing the top end of cloth cutting knife 7 to face A of the gauge To increase the sharpness of the knife tighten gauge set screw 8 while pressing the gauge set screw onto the side of the cloth cutting knife with your fingers 6 Loosen waste cloth cover setscrews 9 of the th...

Page 39: ...ಥၔ ቝ 2 ॠན ދ ഏᇧఴؑॽ 3 ॠ ؚ è ᄤ ໑ᇉƗ୩ ಁ Ѫ ܬ ઋර 5Ɨϣ ܬ ಁ ᇧ 4è 1 中釜押え 1 の止めねじ 2 をゆるめて 中釜押えを 外します 2 固定メス 3 を止めねじ 4 をゆるめて 外します 3 固定メス 3 を取り付ける時は 逆の順序で行います 4 中釜押えを取り付ける時は A の方向に押しながら ねじを締めてください 糸の切れ味が悪くなった時 固定メス 3 を B 図の ように研いでください 注意 固定メスを研ぎ直しする際は 取り扱いに注意し てください 1 Loosen set screw 2 of bobbin case opening lever 1 and remove the bobbin case opening lever 2 Loosen set screw 4 and remove counter knife 3 3 To i...

Page 40: ...ving knife ୩ළ ܬ ઋර 2Ɨྈ ࡸ 1è ሎ ܬ ઋර 3Ɨःढ़ၢ ן ᆣ èསႾሎ ઋරƗၔ єృƗས ሎ Ɨᄼ є è 1 メス着脱レバーを上げて メスを上げます 2 止めねじ 1 を外して 針板 2 を外します 3 はずみ車を回して 針俸を最高点付近に上げます 4 メス駆動腕 5 を押して動メスを回転させ 動メス止 めねじ 3 が上になる位置で保持します 5 付属の六角レンチを使って 3 の止めねじを外し 動メス 4 を取り外してください 6 動メスを取り付ける時は 逆の順序で行ってくださ い 1 Lift the knife attaching removing lever so that the knife is raised 2 Remove set screw 1 and remove throat plate 2 3 Turn the handwheel un...

Page 41: ...1 The needle stop timing is advanced if you move the screw in direction C 2 The needle stop timing is delayed if you move the screw in direction D 1 切线后的停止位置 њሠ ࠖᆓ ᆿ໑ᇉ ࠖࡖॠ A ދ ϩॠ B ၉ᇈ ໑ᇉè ಥࠖᆓഏ ᆿƗ୩ළઋර 1ƗᄤӐ५ ٚຽୄ ן ᆣè 1 ས C ١སၔ Ɨࠖᆓ ᆿєᄱè 2 ས D ١སၔ Ɨࠖᆓ ᆿєລè A B D C 1 1 B A 2 2 下停止位置 ぺダルを前踏みから中立にした時の針の下停止位置は 上 停止同様 針 1 を下停止させてから ねじ 2 をゆるめて 長穴との範囲で調整でき A の方向に動かすと針停止が 早くなり B の方向では遅くなります 2 Lower stop posit...

Page 42: ...l This pressure can be adjusted using regulator screw 2 3 Adjusting the pedal stroke The pedal stroke decreases when you insert connecting rod 3 into the left hole 1 踏板踩踏压力的调整 ߗן Ϸ ࢲן ઋර 1 ढ़ၢ ࢲן è 2 踏板回踩力的调整 ႯߴҖ ࢲן ઋර 2 ढ़ၢ ྡྷ ࢲן è 3 踏板踩踏行程的调整 ϣ ࢹ ۍ 3 ߗן Ү ५ ྡྷޱ Ӹєཱིè 1 連結棒の取り付け モータ制御レバー 1 と連結棒 2 がまっすぐになるよ う 踏板調節板 3 を矢印の方向に動かしてください 2 ペダルの角度 1 ペダルの傾きは 連結棒の長さを調節することによ り 自由に変えられます 2 調節ねじ 4 をゆるめ 連結棒 2 を出し...

Page 43: ...d with the Auto lifer AK Se ries an additional step is given between the machine stop and thread trimming step The presser foot goes up when you lightly depress the back part of the pedal D and if you further de press the back part the thread trimmer is actuated སఴҖ ϷƗເֵ ڐ ᇌ Bè ᄣࡆ སఴҖ ϷƗᄼເۡ ڐ ᇌ Aè Ɨሸ ڐ ाܸЫന Ɨ ࢹڐ ඖᆴ ޱ ᄣۡ ڐ ᇌè ϣ ٩ ϷഏഔഔߴҖ၉ Ɨᄼ ᆿ ڐ ᇌ C ࠖᆓഏ ᆿࠎ ᆿ è ృ ས ޱ Җ ϷƗ ྡྷ ན ቛ Eè ľ ൗႯሸ ഽሔᇉ 3 ༩ਠ Ɨᄤ ᆿ...

Page 44: ... 5400N 7 ࢫ ݛ ԯƗःႼؕᆓ ູཉƗ౯୩ළ 2 ઋරƗӛ ࡷ ١སφ 1 Ѵན ۍ ѪƗಝ ޱ ୩ 2 ઋරè 1 拨线杆的位置 ൗႯѴན ۍ ᆴఴƗ౯ಙಱѴན ۍ ڕ თ A ҍཔࢫ ԯè 2 ワイパーと押えの結合方法 1 ワイパー腕段ねじ 3 にてワイパー腕を押えに取り付 けます 2 ワイパー 4 をワイパー止めねじ 5 にてワイパー腕 に取り付けます 注意 ワイパー取り付け後 ワイパー 4 と布切メスが接触しな いか確認し 接触している場合にはワイパー 4 を矯正し てください 2 How to connect the wiper with the presser foot 1 Attach the wiper arm to the presser foot using screw 3 2 Attach wiper 4 to the wiper arm using set ...

Page 45: ...idth should be used 1 针板盖 ൗႯҊ Ɨ౯ϣ ڿ ඒ ᆓϷ ۉۉ ᆓϷഏƗ౯ ϣ A Ҋ ഏ١φ è ϣᆓϷ ۉ ী ށۉ ܬ Ɨः ህҊྎ ႫԢè 注意 使用布切刀 如果布屑不落到下面时 附属的针板盖有时会 碰到布切刀 这时请削小针板盖或选用比标尺大的针板盖 A 2 針板布くずカバー メス逃げ穴なし 1 布切りメスを針心よリ 1mm 以上の後位置で使用す る場合に限り 針板布くずカバー メス逃げ穴なし を使用します 注意 布切りメスを針心より 1 mm 以内の後位置 または針心 より手前で使用する場合 必ず針板布くずカバー メス逃 げ穴あり を使用してください 2 Throat plate cloth chip cover without a knife escape hole 1 The throat plate cloth chip cover without ...

Page 46: ......

Page 47: ......

Page 48: ...r area for further information when necessary The description covered in this instruction manual is subject to change for improvement of the commodity without notice ؚ Юӈ Ⴜ ଃᆴ Ɨ౯སքয় ࠎג Ю ය႖၃ҍ è 本使用说明书中的规格因改良而发生变更 请订货时确认 12 12 Printed in Japan SEWING MACHINERY BUSINESS UNIT 2 11 1 TSURUMAKI TAMA SHI TOKYO 206 8551 JAPAN PHONE 81 42 357 2371 FAX 81 42 357 2380 http www juki com 縫製機器ユニット 206 8551 東京都...

Reviews: