25
ENGLISH
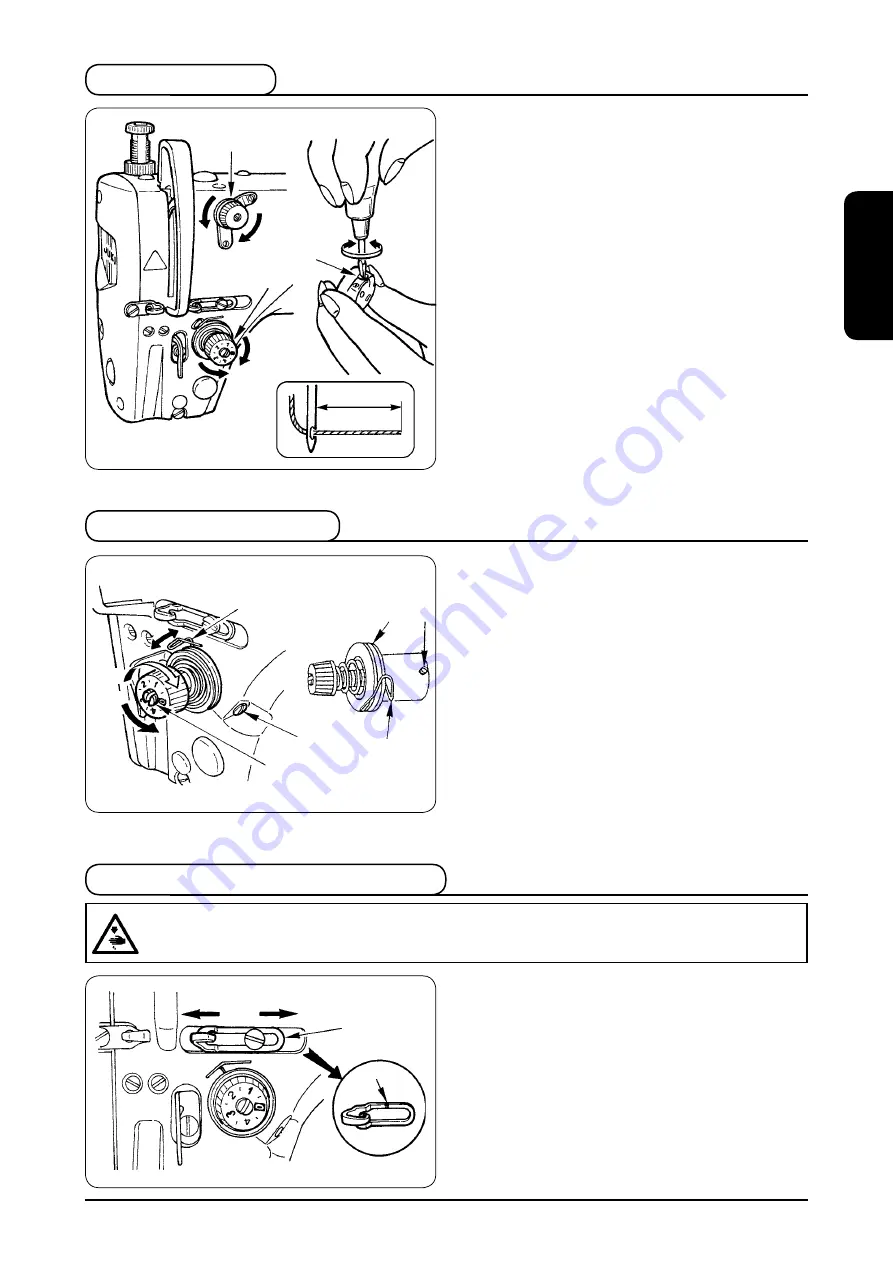
(1) Adjusting the needle thread tension
*
) and 2) are for DLN-6390-7 only.
) As you turn thread tenson No. nut
1
clockwse (n
drecton
A
), the thread remanng on the needle after
thread trmmng wll be shorter.
2) As you turn nut
1
counterclockwse (n drecton
B
),
the thread length wll be longer.
*
Adjust so that the length of the thread remanng on the
needle should be 45 to 50 mm wthn the range where
the thread between the thread tenson No.
1
and the
thread tenson
2
does not move volently.
3) As you turn thread tenson nut
2
clockwse (n drecton
C
), the needle thread tenson wll be ncreased.
4) As you turn nut
2
counterclockwse (n drecton
D
),
the needle thread tenson wll be decreased.
(2) Adjusting the bobbin thread tension
) As you turn tenson adjust screw
3
clockwse (n drecton
E
), the bobbn thread tenson wll be ncreased.
2) As you turn screw
3
counterclockwse (n drecton
F
),
the bobbn thread tenson wll be decreased.
*
Commendable value of bobbn thread tenson s 0.2N.
1
C
2
D
A
B
F
3
E
(1) Changing the stroke of thread take�up spring
1
) Loosen setscrew
2
.
2) As you turn tenson post
3
clockwse (n drecton
A
), the stroke of the thread take-up sprng wll be
ncreased.
3) As you turn the knob counterclockwse (n drecton
B
),
the stroke wll be decreased.
(2) Changing the pressure of thread take�up spring
1
) Loosen setscrew
2
, and remove thread tenson (asm.)
5
.
2) Loosen setscrew
4
.
3) As you turn tenson post
3
clockwse (n drecton
A
),
the pressure wll be ncreased.
4) As you turn the tenson post
3
counterclockwse (n
drecton
B
), the pressure wll be decreased.
) When sewng heavy-weght materals, move thread
gude
1
to the left (n drecton
A
) to ncrease the
length of thread pulled out by the thread take-up.
2) When sewng lght-weght materals, move thread gude
1
to the rght (n drecton
B
) to decrease the length of
thread pulled out by the thread take-up.
3) Normally, thread gude
1
s postoned n a way that
marker lne
C
s algned wth the center of the screw.
7. Theead take�up spring
8. Adjusting the thread take�up stroke
WARNING :
To protect against possible personal injury due to abrupt start of the machine� be sure to start the
following work after turning the power off and ascertaining that the motor is at rest.
6. Thread tension
45 to 50 mm
1
5
4
3
2
1
A
B
1
A B
C
Summary of Contents for DLN-6390
Page 2: ......
Page 3: ... 日本語 日本語 ...
Page 4: ...ii 日本語 ...
Page 21: ...10 日本語 3 ひざスイッチの取り付け 1 付属のひざスイッチ 1 をテーブル下面のお好み の位置に木ねじ 2 で固定してください 配線は 2 コードの配線を参照ください 1 2 ...
Page 55: ... ENGLISH ENGLISH ...
Page 56: ...ii ENGLISH ...
Page 63: ...vii ENGLISH ...
Page 109: ... DEUTSCH DEUTSCH ...
Page 110: ...ii ...
Page 117: ...vii DEUTSCH ...
Page 163: ... FRANÇAIS FRANÇAIS ...
Page 164: ...ii ...
Page 171: ...vii FRANÇAIS ...
Page 217: ... ESPAÑOL ESPAÑOL ...
Page 218: ...ii ...
Page 225: ...vii ESPAÑOL ...
Page 271: ... ITALIANO ITALIANO ...
Page 272: ...ii ...
Page 279: ...vii ITALIANO ...
Page 325: ... 中 文 ...
Page 326: ...ii ...
Page 333: ...vii 中 文 ...
Page 344: ...10 1 用木螺丝 2 把附属的膝动开关 1 安装机台下 面的适当位置 配线请参照 2 电缆线的配线的内容 1 2 3 膝动开关的安装 ...
Page 378: ... 44 ...
Page 379: ......


