background image

From the library of: Superior Sewing Machine & Supply LLC

Summary of Contents for LK-980 Series

Page 1: ... LK 980Series High Speed 1 Needle Cylinder Bed Lockstitch Bar Tacking Industrial Sewing Machine ENGINEER S MANUAL TOKYO JOKI INOOSTRIAL CO LTD FOREIGN TRADE BUSINESS DIV From the library of Superior Sewing Machine Supply LLC ...

Page 2: ...stment The Standard Adjustment explained in simple terms with illustrations will facilitate quick access to the practical services for service engineers in the field The columns Possible problems or phenomena caused by improper adjustments and Corrections are added for inexperienced service engineers To make optimum use of this booklet we advise you to refer to PARTS BOOK for the LK 980 series If ...

Page 3: ...sive play of the feed cam roller 21 4 Excessiveplay in the shuttle driver shaft 21 5 Cork linings ia the clutch components 21 V DETAILS OF ADJUSTMENT 22 1 Adjustment for starting and stopping 22 2 Adjustment of the pedal pressure decreasing unit 27 3 Adjustment ofthe thread trimmer components 29 4 Feed cam components 30 5 Adjustment of the shuttle race 31 6 Height of the work clamp foot 32 7 Heigh...

Page 4: ...he top end of the shuttle driver prevents the needle from bending as shown In Fig 1 b 5 Clearance between the top end of the shuttle driver and the shuttle must be 0 3 to 0 5 mm about 1 64 When the needle has reached its lowest position When the needle thread is taken up by the shuttle Upper engarved line Lower engraved line Fig 1 a Fig 1 b 0 05 0 Inim Fig 1 c Onim Shuttle driver Fig 1 d Note Adju...

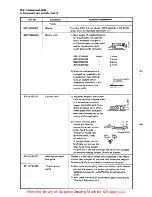
Page 5: ...rface of the material and forming an idle loop on the first stitch No special care is needed for sewing heavy weight material Corrections See 3 Needle Bar Components in the Parts Book Remove the face plate and adjust the needle bar height by loosening screw SS 6090670 TP of needle bar connection See 5 Shuttle Driver Shaft Components in the Parts Book Loosen screw SS 6121212 TP and adjust the shutt...

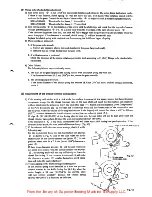
Page 6: ...n is determined by the position of the stop motion notch Provide the stop motion notch with a proper position by moving it up or down according to the sewing speeds as listed below when the last stitch is sewn and the top edge of the stop motion hook touches the stop motion cam Position of the stop motion hook At 1 700 s p m Center of the 2nd screw At 2 000 s p m Between the 1st and the 2nd screws...

Page 7: ...eft the adjusting bolt which fastens the driving pulley pressing plate Stop the machine turn by hand the driving pulley and ensure that It does not rotate the low speed cork ring and the brake cork ring If they are rotated the friction surfaces in the brake components may wear away during operation Corrections Loosen nut NS 6150430 SP and adjust the position of stop motion regulating cam shaft B26...

Page 8: ...n the work clamp foot lifting lever is up the safety adjusting plate has a clearance of 0 3 mm Low speed cork ring Brake cork ring 9 Position of the shuttle race spring 1 Crosswise position The center of the slit must align with the needle point 2 Lengthwise position The edges of the spring must align with the rear face of the needle 5 Fig 8 a Stop motion connecting pin Fig 7 a Driving pulley f 0 ...

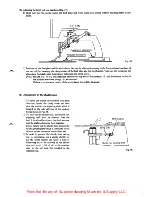
Page 9: ... allow the needle to pass through the above mentioned point the needle thread will snag in the sewing hook If the needle drops too far to the rear the moving knife may fail to hook the needle thread Corrections See 2 Main Shaft Components in the Parts Book Loosen screw SS 6151920 TP and adjust the position of the stop motion connecting pin 82623 980 000 in the direction shown by the arrow After ad...

Page 10: ... bar tacking machine 42 stitches The 26th stitch must be aligned with the center slit in the work clamp foot 2 Large bar tacking machine 28 stitches The 18th stitch must be aligned with the center slit in the work clamp foot Fig 10 Center slit in the work clamp foot 26thstitchof42stitches bar tack machine fISth stitch of 28stitches bar tack machine Fig 11 Z Iwm m i i 12 Position of the wiper The w...

Page 11: ... the wiper Corrections See 3 Needle Bar Components in the Parts Book Loosen screw SS 7110740 TP and adjust the position of the moving knife driving lever B2415 280 0A0 to front or rear See 6 Feed Cam Components in the Parts Book Loosen nut NS 6660511 SP which fastens feed cam roller shaft and adjust the position See also page 30 See 4 Thread Tension Release Components in the Parts Book Loosen scre...

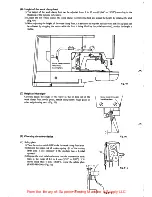
Page 12: ...e rotating feed cam Tension release lever Tension release link latch r Thread take up i lever 1 Tension release linkj tripping segment Fig 13 a 14 V belt tension When the middle point of the V belt is pressed with the finger pressure of about 1 kg it should have a slack of 10 to 15 mm in depth 25 64 to 19 32 15 Position of the bobbin winder When the bobbin winder is not operated the bobbin winder ...

Page 13: ...bobbin winder wheel is positioned too close to the V belt it may be accidentally turned or rubbed by the V belt If it is too far from the V belt it may fail to wind the bobbin Fig 15b Bobbin winder base 10 Corrections See 4 Thread Tension Release Components in the Parts Book Loosen screws SS 7090520 TP and adjust tension release link tripping segment 82304 980 000 Next to thread guide No 1 there i...

Page 14: ...Hz idler pulley B7801 280 0A0 must be used 18 Needle sizes and needle plate needle hole guides suitable for different types of material Material type Needle size Needle plate needle hole guide Garments Fine DPx5 11 D2426 282 C00 Knits tricot underwears Synthetic DPx5 14 Super needle B2426 280 000 Small large and buttonhole bar tacking D2426 284 M00 Shape bar tacking Men s suits Ladies suits Casual...

Page 15: ...nt of the driving pulley pressing plate Fig A B 1 Turn the driving pulley byhand inthe direction ofanarrow given in Fig Awhen the outerperiphery of the brake ring 0 fits the first white line of stop motion hook 9 adjust thescrew sothat theclutch starts operation and the machine begins running adjust the greasebox in the direction of in Fig B and then fasten it with the nut Note that timing after v...

Page 16: ...apping finish so that it rotates smoothly in the shuttle race Thoroughly clean the inside surface of the shuttle race and remove all fibrous dust and lints D Prevent the material under the work clamp foot from fluttering A special set of work clamp com ponents by which the material can be securely clamped in a U shape as shown in Fig 17 preventsthe material from fluttering whilestitching Large siz...

Page 17: ...1 16 away from the nearest end of the needle hole in the needle plate If the distance is greater than 1 5 mm 1 16 a shorter needle thread will be left in the needle 3 To adjust the thread take up spring Fig 21 A If the stroke of the thread take up spring is too great it may draw in the needle thread immediately after the thread is cut Thus the thread left in the needle eye will be too short and wi...

Page 18: ...Corrective measures 1 Scratched shuttle Fig 25 A If the needle hits the shuttle the blade point will be worn to a knife edge Carefully polish it with an oilstone and abrasives and keep it slightly away from the needle point However do not push it back too far from the needle to prevent stitch skipping Also take care not to provide too much clearance between the front face of the shuttle driver and...

Page 19: ... hand if the clearance is too large the shuttle race will make a noise Fig 29 B Since there may be some cases where the above mentioned clearance is slightly different for hooking in and releasing the thread provide the correct clearance for release 12 0 3 0 5 R Fig 27 Fig 28 Fig 29 5 Needle plate needle hole guide Every time a needle is broken the needle plate needle hole guide is scratched Remov...

Page 20: ...E on the moving knife are scratched they may break the needle Remove such scratches by applying abrasives Fig 31 3 Height of the counter knife If the counter knife position is too high the thread may touch it and break before the moving knife arrives in the cutting position Correct the counter knife height by referring to the standard adjustment 4 Scratched shuttle race spring If surface A is scra...

Page 21: ...eedle plate needle hole guide Fig 34 b c Difference in height between the moving knife and the needle plate needle hole guide The lowest point of the moving knife is 0 15 mm lower than the highest point of the needle plate needle hole guide Fig 34 b This adjustment can be made by inserting a washer of suitable thickness Part No Description Thickness B2423 280 00A Washer for moving knife 0 4 mm B24...

Page 22: ...he needle is not protected by the front end oftheshuttle driver asshown in Fig 1 d it will touch therotating shuttle while it is being warped to stick in the material andmay break Adjust the shuttle driver to give the correct needle position 2 Feed timing is not correct If the cloth feed action is not completed before the needle comes down to stick the material the needle will be forced to bend an...

Page 23: ...es of the shuttle driver are scratched Synthetic threads tend to scratch the thread path surface when it is released Remove suchscratches by buffing the surfaces 5 Smoothness of the thread paths All the thread paths on the following components must be smooth enough to allow the thread to pass without friciton Shuttle driver B1813 980 000 Shuttle B1818 280 000 Shuttle race spring B1815 980 000 Need...

Page 24: ...sa brassrod againstface and tap it so that the main shaft comesout Fig 38 IV ELIMINATION OF EXCESSIVE PLAY 1 Excessive play In the main shaft Rear bushing setscrew Feed cam Thrust collar setscrew Fig 38 2 Excessive play of the feed cam driving worm against the feed cam driving worm wheel 1 Thisplay willaffect the timingof cloth feed 2 Remove the cover from the machine arm and loosen the 4 screwswh...

Page 25: ... 000 If the brake cork ring slips while operating at low speed make sure that it is not caused by oil leakinginto the mechanism and then replace the stop ring intermediate B1230 980 000 with a thinner one as mentioned below B1230 980 00A 0 8 mm thick Stop ring intermediate If evenafter having replaced the stop ring slipping continues to occur replacethe brake cork ringitself Note When replacing th...

Page 26: ...ing cam and the stop motion regulating cam roller Fig 40 when operatingat low speed B If unusual load is produced in the machine it may suddenly stop when changing running speed from low to high Adjust the machine by removing the cause of such a mechanical load 3 When the machine will not run at lowspeed A If it is due to excessive friction produced by the machine mechanism remove the cause B If o...

Page 27: ...hit the needle point F Do not let the pressing plate pressthe driving pulley too much becauseit rotates the driving pulleywhilethe machine is in stop motion the driving pulley rotates the low speed cork ring and the brake cork ring together and they overheat the ball bearings and make a noise As the result of this the clutch spring S p 25 and the clutch brackets and p 25 may wear away G Make sure ...

Page 28: ...heir bottom surfaces are flush with each other 1 Fill one half of each of 6 oval openings In stop motion cam with grease 2 Insert each ball D Into Its opening Note Take care to keep the balls and the mating surface clean Dust or foreign bodies on the surfaces will cause noise 1 Apply grease to the outer surface of the ball bearing cage I e the surfaces between stop ring g thrust needle 14 and poin...

Page 29: ...nsert them into shaft 3 Apply grease evenly to the end face of and fix it together with using C ring 4 When inserting C ring take care not to open it too much Otherwise the ring will come off during operation Do it in the following way 4 1 Slightly open C ring using tool and insert it to position from 3 4 2 Gently push it to position from using two screw drivers 4 3 Ensure that C ring rests in the...

Page 30: ...STRUCTURAL DRAWING OF THE CLUTCH COMPONENTS 5 91 5 3 9 5 4 n mm dbytjbt QQQQ I 6 100 6 From the library of Superior Sewing Machine Supply LLC ...

Page 31: ... grease both to the inside and outside faces of the spring 1 Align hole with recession d in the inner sleeves 2 Temporarily fix outer sleeve to the inner sleeve by pressing it against face Q and tightening screw 1 Press the top end of the spring against the pin of outer sleeve and insert the outer sleeve 2 Apply grease to the inner surface and both sides of pulley ring 3 Apply grease to the inner ...

Page 32: ...tion Since this screw tends to become loose during operation tighten it carefully Note When replacing the clutch spring make sure that there is a clearance of 0 1 to 0 2 mm at the tip of latch when clutch stops rotating as you turn driving pulley D in the direction of the arrow If this clearance is too great or too small select a suitable replacement part from the ones listed below B3009 980 00A S...

Page 33: ...e is running at low speed remove the thread trimmer components except for the thread trimmer cam on the main shaft and insert the stop motion cam assembly without tightening thesetscrews Insert bed hook See page 1 1 Frame andMiscellaneous Cover Components in the Parts Book into gap between the stop motion hook and the closest point of the stop motion cam at the point where the radius of the stop m...

Page 34: ...nthe lock nut 2 Positioning the feed across driving arm connecting rod The connecting rod should be positioned at a distance of 8 mm 5 16 from the nearest end of the driving arm as shown in Fig 46 so that the crosswise feed pitch of the bar tack is adjusted by means of the feed across scale and the wing nut within the regular adjust ing range The adjusting range can to some extent be increased to ...

Page 35: ...the shuttle race 1 To adjust the shuttle race position in its axial direction loosen the clamp screw and then turn the shuttle race adjusting shaft which is located on the right side face of the machine bed as shown in Fig 48 2 To take out the shuttle race the shuttle race adjusting shaft must be removed from the bed It is advisable to insert the shaft setscrew into the shaft and remove them toget...

Page 36: ...t lowering fork 7 Height of the wiper Carefully adjust the height of the wiper so that it does not hit the work clamp foot needle point needle clamp screw finger guard or other neighbouring parts Fig 50 8 Checking the safety device 1 Safety plate 1 Turn the motorswitch OFFwhile the work clamp footisup 2 Remove the upper end of tension spring g of thestarting lever this is not necessaiy if the mach...

Page 37: ... by mistake remove the cap from the machine arm cover by using the blade of a screw driver take out the cylinder shape silicon oil tank felt and squeeze the oil out of the naked part of the felt strip by using blotting paper or cloth Neverpull out the felt strip because it cannot be inserted again 12 Application of lock tight paint In order to prevent the screws from loosening during operation loc...

Page 38: ...sing Fig 59 Low speed cam hing screw and nut Nuts Stop motion hook Fig 60 1 Grease up the partsshown by Fig 61 to 69 oncein every 2 yearsand whenever they are disassembled 2 Type of grease Lithium base grease cone penetration 2 Manufacturers Trade name ESSO Listan 2 Beacon 2 SHELL Albania 3 Methodof greasing and the parts to be greased Use a grease gun If it is not available usea plastic oileror a...

Page 39: ...speed cork ring Clutch I Main shaftthrustwasher bracket small C ring Driving pulley pressing plate of the stop motion mechanism Fill up the grease box Remove the screw and fill the screw hole in the stop motion lever with the grease Stud of the stop motion regulating lever 0 Fig 67 Remove the screw from the stud shown by arrow and fill the screw hole with the grease Fig 68 Oil felt on top of the s...

Page 40: ...0 15 mm above the lowest point of the needle plate needle hole guide when the protruded part of the moving knife is passing by 0 4 mm 0 5 mm 0 6 mm 0 7 mm Remove this part by an oilstone 1 I l l I mzL 2 In order to evenly cut 2 threads at a time the counter knife has a slanted blade Pass 2 threads through the needle hole guide and check if they are evenly cut If the right thread can not be sharply...

Page 41: ...e A has worn out to allow the moving knife to A shake with a click when the machine runs at the low speed 82613 280 000 Stop motion regulat ing cam roller At the same time renew the stop ring 82615 280 000 because the old one can not be used any longer 81255 980 000 81256 980 000 Clutch bracket large Clutch bracket small Replace them referring to page 25 C Replacement parts tending to be lost or a...

Page 42: ...45 246 247 248 249 250 25 1 252 253 254 255 256 257 258 259 260 261 262 263 264 I 265 266 267 268 269 270 271 272 273 274 275 276 277 278 279 280 281 282 283 284 285 286 287 288 M 289 290 291 292 293 294 295 296 297 298 299 300 301 302 303 304 305 306 307 308 309 310 3 1 1 3 1 2 N 313 314 315 316 3 1 7 318 3 1 9 320 32 1 322 323 324 325 326 327 328 329 330 331 332 333 334 335 336 P 337 338 339 340...

Page 43: ...t Blank plate is available See VII 6 Stop motion regulating cam Different cam is used depending on the number of stitches See VI 4 Tension release link tripping segment Different segment is used depending on the number of stitches See VK4 Feed cam driving worm Different worm is used depending on the number of stitches See VI 4 Work wheel Different wheel is used depending on the number of stitches ...

Page 44: ...2612M6CP00 B2304980000 LK 988 84 D2204L8BF00 D2205M8BF00 D2612M8WB00 B2304980000 42 D2204L8BF00 D2205M8BF00 D2612M9BL00 B2304980000 LK 989 96 D2204L9SB00 D2205M9SB00 D2612M8WB00 B2304980000 48 D2204L9SB00 D2205M9SB00 D2612M9BL00 B2304980000 LK 990 108 D2204LKBG00 D2205MKBG00 D2612M8WB00 B2304980000 54 D2204LKBG00 D2205MKBG00 D26I2M9BL00 B2304980000 LK 991 116 D2204LLBH00 D2205MLBH00 D2612M8WB00 B2...

Page 45: ...t pull out the cam roller B2404 280 000 See page 9 of the Parts Book push up thework clamp footlifting lever of the P type unitandposition itsnotched endover the pinon which the cam roller had been placed and lastly fasten the pedal with 2 screws Notched end a Fig 70 a Fig 70 b 3 Components for the low speed machine Sewing speeds and necessary parts 1 A suitable combination of the motor pulley and...

Page 46: ...B B00 When increasing the space on the needle plate Needle plate 110mm or 4 wide D2425 L9S B00 Needle plate 200mm or 7 7 8 wide D2425 L7V V00 When the right work clamp foot is required to be lifted up independently by hand after the both feet are lowered for inserting a separate cloth piece Work clamp foot hook D2543 284 Y00 5 Feed bracketcomponentsfor large sizebar tacking When sewing a large siz...

Page 47: ...from being skipped be cause it does not permit the cloth to flutter during sewing If cotton cloth flutters very little and is hard to form a well tightened stitches use a needle hole guide with boss and increase the pressure applied by the pressing spring on the work clamp foot mounting base Inlay type Poplin and the like 0 Needle plate needle 1rnm hole guidewithout 3 64 boss B2426 280 000 for lar...

Page 48: ... with plain surface B2552 280 0W0 Blank work clamp foot left with plain surface Applications For preventing stitch skipping when sewing light weight materials by stretching the material with the protrusion of the foot B2251 280 0Y0 Solid blank work clamp foot with plain surface Applications Solid work clamp foot to securely clamp the light weight materials with the protrusion of the foot Precautio...

Page 49: ... large size bar tacking with plain surface Applications In order to prevent stitch skipping when sewing large size bar tacking on light weight materials an adequate protrusion is made on the sole of this blank work clamp foot D2551 L9S BY0 Solid blank work clamp foot with plain surface for large size bar tacking Applications Large size bar tacking on light weight materials Precautions 1 When the b...

Page 50: ... 21 32 to 2 23 64 C Fig 71 C B A 2 Attach the blank foot 3 Cuta needle sothat its endlightly touches to leave a trace on the work clamp footsurface 4 Turn the machine by hand to allow the needle leave the necessary traces on the surface of blank work clamp foot 5 Cut out the blank work clamp foot 1 mm 3 64 outside of the traces left by the needle and bevel theedges at 30 6 It is advisable to provi...

Page 51: ...e changed Management No Month year Description IV 8 1 Aug 1983 1 Stop motion notch positions have been increased The hook positions for sewing speedsof 1700 s p m 2000 s p m and 2200 s p m have been added P 3 2 The method of installing the driving pulley presser plate has been added P 12 48 From the library of Superior Sewing Machine Supply LLC ...

Page 52: ...STRIAL CO LTD Address 23 3 Kabuki cho 1 chome Shinjuku ku Tokyo 160 Japan Cable JUKI TOKYO Telex J22967 23 2301 Phone 031205 1188 1189 1190 AUGUST 1983 Printed in Japan T From the library of Superior Sewing Machine Supply LLC ...

Reviews: