– 97 –
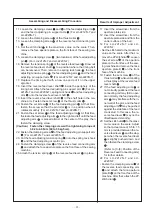
1. Remove the sliding plate (right) and (left) and the needle. Then, tilt the machine head.
2. Loosen the clamping screw of the hook driving shaft set collar.
3. Loosen the set screws (2 pcs.) of the hook driving shaft coupling (left) and pull out the hook driving shaft B.
4. Remove the throat plate, feed dog, presser foot (assembly) and walking foot (assembly).
5. Fix temporarily the hook shaft saddle (left)
on the bed. To attach the hook shaft saddle (left)
, screws
(2 pcs.) and washers (2 pcs.) are necessary, but an eccentric pin is not necessary.
6. Loosen the set screws (2 pcs.) to the extent that the hook shaft saddle (right)
moves to the right and left.
7. Attach both the feed dog and the throat plate for 2-needle.
8. Remove the face plate, presser adjusting screw and thread take-up lever cover, and loosen the clamping
screw of the needle bar connecting stud to pull out the needle bar.
9. Temporarily attach the needle bar for 2-needle.
10. Attach the needle clamp (assembly).
11. Attach the hook driving shaft coupling (left) through the hook driving shaft C
.
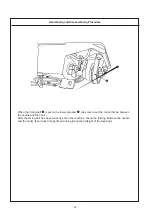
12. Attach the needle and adjust the [Height of the needle bar], [Clearance between the needle and the blade
point of hook], [Timing between the needle and the hook], and [Clearance between the throat plate and the
inner hook stopper]. The adjustment for the left and right needles is the same.
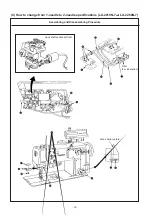
13. Remove the return oil pipe A (for 1-needle)
. Then connect the lubricating pipe C (for 2-needle)
from
the pipe joint on the upper side of the hook shaft saddle (right)
to the pipe joint on the lower side of the
hook shaft saddle (left)
. Then, connect the return oil pipe A (for 2-needle)
from the pipe joint on the
lower side of the hook shaft saddle (left)
to the filter (for return oil)
. Attach the cable band
to the
respective pipe joints to fix the pipes.
14. Attach the lead
for the right and left thread trimmer solenoids. At that time, be sure to insert two solenoid
leads
in one hole of the terminal base
.
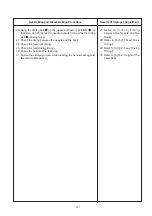
15. Adjust the right and left of the [Thread trimmer] and [Opener].
16. Replace the presser adjusting spring with a new one for 2-needle.
17. Loosen the thread tension (assembly) set screws (2 pcs.)
and replace the thread tension controller
(assembly) with a new one for 2-needle.
18. Set the stitch dial
to [0] on the scale. In this state, loosen the stitch dial set screw
and replace the
stitch dial with a stitch dial for 2-needle. At that time, make sure that the stitch dial pin
and the spring
are placed in position.
19. Remove the thread guide B
in the arm and attach the felt thread guide
and felt
. At that time, the set
screw
of the thread guide should be replaced as well.
20. Attach the face plate, presser adjusting screw, thread take-up lever cover and slide plates (left) and (right).
(Caution)
Refer to the List of the Parts to be changed (next page)
Assembling and Disassembling Procedure


