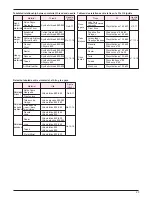
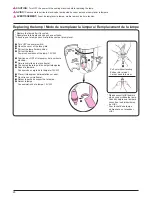
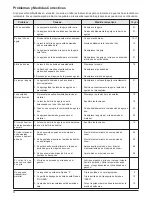


· Replace the needle.
· Attach the needle properly to the needle bar.
· Correct the threading.
· Properly adjust the thread tension.
· Replace the needle.
· Replace the needle by the one suited to the
thread used.
· Decrease the tension.
· Replace the bobbin case.
· Replace the throat plate.
· Replace or correctly attach the needle.
· Correctly position the needle, throat plate, or
presser foot.
· Decrease the pressure of the presser foot.
· Balance the tension.
· Properly correct the combination of needle and
the thread.
· Replace the needle by the one suited to the
material.
· Balance the tensions.
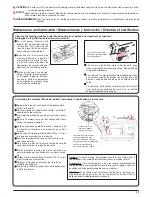
· Carry out maintenance of your sewing machine.
· Carry out maintenance of your sewing machine.
· Apply the proper sewing machine oil.
· Clean up the sewing machine.
· Lubricate the hook, strongly turn the handwheel
clockwise and counterclockwise several times,
then remove the thread caught in the hook.
· Set the stitch length to an appropriate amount.
· Set the drop-feed knob to “FEED”.
· Turn the presser foot pressure regulator to in
crease the pressure properly.
1. The needle is bent or the needle point is
blunted.
2. The needle has not been attached to the
needle bar properly.
1. The machine head has been threaded
incorrectly.
2. The needle thread tension is too high or low.
3. The needle is bent or the needle point is
blunted.
4. The needle is not suited to the thread used.
1. The bobbin thread tension is too high.
2. The rubbing of the bobbin case spring has
produced a slot.
3. Scratches on the needle hole in the throat
plate.
1. The needle is bent or has been installed
improperly.
2. The needle hits the throat plate or the presser
foot.
1. The presser foot applies too much pressure to
the material.
2. The tension of the needle thread is not
balanced with that of the bobbin thread.
3. When the combination of the needle and the
thread is improper.
4. The needle is too thick for the material.
1. The tension of the needle thread is not
balanced with that of the bobbin thread.
1. Dust accumulates in the feed dog
2. The oil in the machine has run out due to a
long period of usage.
3. The oil other than the exclusive sewing
machine oil is used.
4. Thread wastes accumulate in the hook.
1. The thread is entangled and caught in the
hook.
1. The stitch length is set “0”.
2. Drop-feed knob is set to “NOT FEED”.
3. The pressure of the presser foot is too low.
30
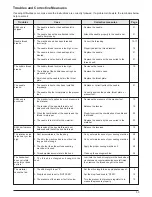
Troubles and Corrective Measures
If sewing difficulties occur, make sure the instructions are correctly followed. If a problem still exists, the reminders below
help to solve it.
Troubles
Case
Corrective measures
Page
Stitches are
skipped.
Needle thread
breaks.
The bobbin thread
breaks.
The needle
breaks.
Stitches are
puckered.
Stitch performance
is bad.
The rotation noise
is too heavy or too
high.
The handwheel
does not rotate
smoothly or does
not turn.
The material
cannot be fed.
21
21
15-17
19
21
21
19
-
-
21
-
10
19
20
20
19
28
28
28
28
-
9
10
10