background image

ENGLISH 


19 

TECHNICAL DATA 

Min. operating air pressure 

4,2 kg/cm²


Max. operating air pressure 

7 kg/cm²


Staple length 

1/4" 

– 5/8" 

Staple size 

21 gauge 

Staple capacity 

150 

Air intake 

1/4" NPT 

Air consumption 

1.6 CFM 


Sound power level, LwA 

95 dB(A) 

Sound pressure level, LpA 

82 dB (A) 

Vibration level 

61 m/s

2


Weight 

0.9 kg 


Always use hearing protection! 

 
The declared vibration value, which has been measured by a standardised test method, can be used to 
compare different tools with each other and for a preliminary assessment of exposure. 
 

WARNING!

  The  actual  vibration  level  when  using  power  tools  may  differ  from  the  specified  maximum 

value, depending on how the tool is used. It is therefore necessary to determine which safety precautions 
are required to protect the user, based on an estimate of exposure in actual operating conditions (taking 
into account all stages of the work cycle, e.g. the time when the tool is switched off and when it is idling, 
in addition to the start-up time). 

DESCRIPTION 

When unpacking, use the list below to check that all the parts are included. Contact Customer Services if 
any parts are missing or damaged. 


Staple gun 


S3 hex key 


S4 hex key 


Manual 

ILLUSTRATIONS 


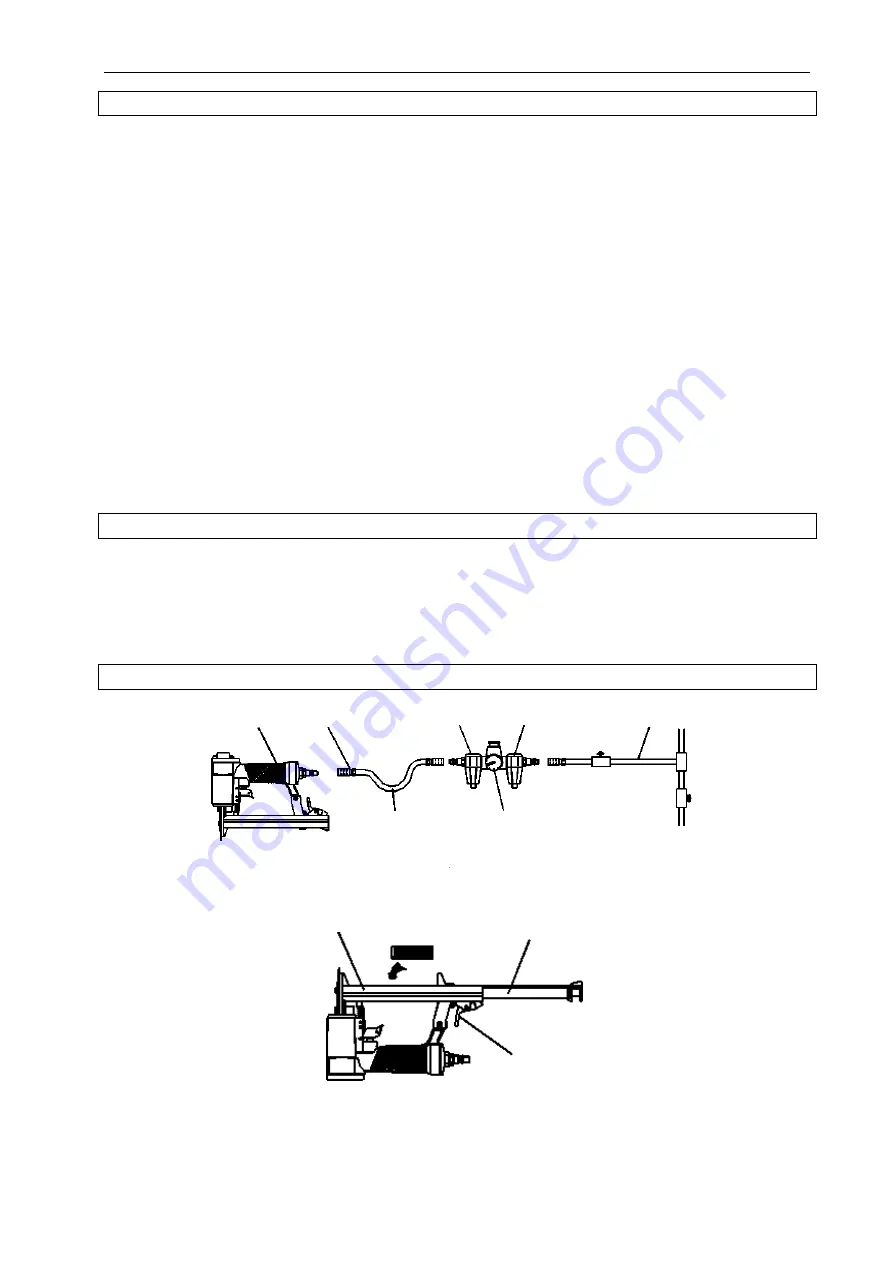
Fig. 1 


Fig. 2 

Staple gun 

Lubricating unit 

Filter 

Compressed air supply 

Quick coupling 


Regulator 

Air hose 

Fixed magazine 

Movable magazine 

Lock 

Summary of Contents for 071-017

Page 1: ...tsdrevet stiftepistol Instrukcja obsługi takera pneumatycznego Installation Instructions for Compressed Air Staple Gun 071 017 SV Bruksanvisning i original NO Bruksanvisning i original PL Instrukcja obsługi w oryginale EN Installation instructions in original 20 08 2015 Jula AB ...

Page 2: ...t til lufttilførsel 10 Sette inn stifter 10 BRUK 10 VEDLIKEHOLD 10 FEILSØKNING 11 POLSKI 13 ZASADY BEZPIECZEŃSTWA 13 DANE TECHNICZNE 14 OPIS 14 RYSUNKI 14 MONTAŻ 15 Podłączanie narzędzia do dopływu sprężonego powietrza 15 Ładowanie magazynku 15 OBSŁUGA 15 KONSERWACJA 15 WYKRYWANIE USTEREK 16 ENGLISH 18 SAFETY INSTRUCTIONS 18 TECHNICAL DATA 19 DESCRIPTION 19 ILLUSTRATIONS 19 ASSEMBLY 20 Connect the...

Page 3: ...get mot hårda eller sköra material som betong stål eller kakel Stå rätt när du använder verktyget Ha hela tiden säkert fotfäste och god balans för att undvika skador Kontrollera skadade delar Kontrollera noga att inga delar är skadade innan du använder verktyget Byte av delar och tillbehör Använd endast godkända reservdelar och tillbehör vid service Var uppmärksam Var hela tiden försiktig Tillämpa...

Page 4: ...ån under användning av elverktyg kan skilja sig från det angivna totalvärdet beroende på hur verktyget används Identifiera därför de säkerhetsåtgärder som krävs för att skydda användaren baserat på en uppskattning av exponering i verkliga driftförhållanden som tar hänsyn till alla delar av arbetscykeln såsom tiden när verktyget är avstängt och när den körs på tomgång utöver igångsättningstiden BES...

Page 5: ... 1 Anslut verktyget till tryckluftsförsörjningen Kontrollera att lufttrycket ligger inom rätt intervall se tekniska data 2 Ladda fästelement enligt anvisningarna ovan i avsnittet ladda fästelement 3 Håll i huset och tryck drivningsstyrningen mot arbetsytan Kontrollera att verktyget är rakt och tryck sedan mjukt på avtryckaren för att avfyra ett fästelement 4 Lyft verktyget från arbetsytan UNDERHÅL...

Page 6: ...ig tryckluftsförsörjning 3 Trasig fjäder i cylinderlocket 4 Utblåset i cylinderlocket blockerat 1 Smörj enligt anvisningar 2 Kontrollera tryckluftsförsörjningen 3 Byt fjäder 4 Byt ut skadade interna delar Verktyget hoppar över fästelement 1 Sliten stötdämpare eller skadad fjäder 2 Smuts i drivningsstyrningen 3 Otillräcklig tryckluftsförsörjning 4 Sliten eller torr O ring på kolv 5 Skadad O ring på...

Page 7: ...SKA 7 Med reservation för tryckfel och konstruktionsändringar som vi inte kan råda över Vid eventuella problem kontakta vår serviceavdelning på telefon 0200 88 55 88 Jula AB Box 363 532 24 SKARA www jula se ...

Page 8: ...aler som betong stål eller fliser Når du bruker verktøyet Sørg for godt fotfeste og god balanse for å unngå skader som følge av at du mister balansen Kontroller skadede deler Før du tar i bruk verktøyet må du kontrollere nøye om noen av delene er skadet Skift d eler og tilbehør Bruk bare originale reservedeler ved service Det finnes godkjente reservedeler og tilbehør å få kjøpt Vær oppmerksom Se h...

Page 9: ...bruk av el verktøy kan skille seg fra den angitte totalverdien avhengig av hvordan verktøyet brukes Finn derfor ut hvilke sikkerhetstiltak som er nødvendig for å beskytte brukeren på grunnlag av en vurdering av eksponering under reelle driftsforhold som tar hensyn til alle delene av arbeidsprosessen som tiden når verktøyet er avslått og når det kjøres på tomgang utover igangsettingstiden BESKRIVEL...

Page 10: ...k 1 Koble verktøyet til lufttilførselen Kontroller at lufttrykket er riktig som angitt i avsnittet tekniske data 2 Sett inn stifter som angitt i avsnittet sette inn stifter 3 Hold i hoveddelen og trykk drivføringen mot arbeidsflaten Kontroller at verktøyet er rett og trykk varsomt på avtrekkeren 31 for å skyte ut stiften 4 Løft verktøyet vekk fra arbeidsflaten VEDLIKEHOLD Hyppig men ikke overdreve...

Page 11: ...e 2 For liten lufttilførsel 3 Ødelagt fjær i sylinderlokket 4 Utblåsingsåpningen i sylinderlokket er blokkert 1 Smør som anvist 2 Kontroller lufttilførselen 3 Skift fjær 4 Skift innvendige deler som er skadet Verktøyet hopper over en stift 1 Slitt støtdemper eller skadet spennfjær 2 Smuss i drivføringen 3 For liten luftstrøm til verktøyet 4 Slitt eller tørket O ring på stempelet 5 Skadet O ring på...

Page 12: ... Med forbehold om trykkfeil og konstruksjonsendringer utenfor vår kontroll Ved eventuelle problemer kontakt vår serviceavdeling på telefon 67 90 01 34 Jula Norge AS Solheimsveien 6 8 1471 LØRENSKOG www jula no ...

Page 13: ...zymuj wyprostowaną postawę ciała podczas pracy z narzędziem Zachowuj stabilną postawę by nie stracić równowagi i uniknąć obrażeń Sprawdzaj uszkodzone części Przed użyciem narzędzia sprawdź dokładnie czy żadna z części nie jest uszkodzona Wymiana części i akcesoriów Naprawiając urządzenie korzystaj wyłącznie z zatwierdzonych części i akcesoriów Zachowuj czujność Przez cały czas zachowuj ostrożność ...

Page 14: ...lektronarzędzia w zależności od sposobu posługiwania się nim może różnić się od podanej wartości całkowitej Dlatego należy zidentyfikować te środki zabezpieczające które w oparciu o ocenę narażenia na oddziaływanie szkodliwych czynników w warunkach rzeczywistych przy wzięciu pod uwagę wszystkich części cyklu roboczego jak również czasu w którym narzędzie jest wyłączone lub pracuje na biegu jałowym...

Page 15: ...trza Upewnij się czy ciśnienie powietrza ma wartość mieszczącą się w zakresie podanym w danych technicznych 2 Załaduj magazynek zgodnie ze wskazówkami w rozdziale Ładowanie magazynku 3 Trzymając za obudowę przyciśnij prowadnicę napędową do obrabianej powierzchni Upewnij się czy narzędzie jest ustawione prostopadle do powierzchni następnie miękko pociągnij za spust aby wystrzelić element mocujący 4...

Page 16: ...or 2 Zbyt wysokie ciśnienie 1 Wymień amortyzator 2 Wyreguluj ciśnienie powietrza Narzędzie pracuje powoli lub ociężale 1 Za mało oleju 2 Niedostateczny dopływ sprężonego powietrza 3 Zepsuta sprężyna w pokrywie cylindra 4 Zablokowany wydmuch w pokrywie cylindra 1 Nasmaruj narzędzie zgodnie ze wskazówkami 2 Sprawdź dopływ sprężonego powietrza 3 Wymień sprężynę 4 Wymień uszkodzone wewnętrzne części N...

Page 17: ...za 3 Sprawdź czy zamontowana jest odpowiednia i nieuszkodzona sprężyna pokrywy cylindra Sprawdź czy wydmuch powietrza w pokrywie cylindra jest zablokowany Z zastrzeżeniem prawa do błędów w druku i zmian konstrukcyjnych które są od nas niezależne W razie ewentualnych problemów skontaktuj się telefonicznie z naszym działem obsługi klienta pod numerem 801 600 500 Jula Poland Sp z o o ul Malborska 49 ...

Page 18: ...crete steel or tiles Stand correctly when using the tool Always maintain a firm footing and good balance in order to avoid injuries Check for damaged parts Carefully check that none of the parts are damaged before using the tool Replacement of parts and accessories Only use approved spare parts and accessories for servicing Pay attention to what you are doing Always be careful when using the equip...

Page 19: ...l when using power tools may differ from the specified maximum value depending on how the tool is used It is therefore necessary to determine which safety precautions are required to protect the user based on an estimate of exposure in actual operating conditions taking into account all stages of the work cycle e g the time when the tool is switched off and when it is idling in addition to the sta...

Page 20: ...nect the tool to the compressed air supply Check that the air pressure is within the correct interval see Technical Data 2 Load fasteners as instructed above in the Loading fasteners section 3 Hold the housing and press the drive control against the work surface Check that the tool is straight and then gently squeeze the trigger to fire a fastener 4 Lift the tool from the work surface MAINTENANCE ...

Page 21: ...maged spring in the cylinder head 4 Blow off in the cylinder head blocked 1 Lubricate in accordance with instructions 2 Check the compressed air supply 3 Replace the spring 4 Replace damaged internal parts The tool skips over fasteners 1 Worn shock absorber or damaged spring 2 Dirt in the drive control 3 Insufficient compressed air supply 4 Worn or dry O ring on the piston 5 Damaged O ring on the ...

Page 22: ...ENGLISH 22 Subject to printing errors and design changes over which we have no control In the event of problems please contact our service department www jula com ...

Page 23: ......

Reviews:

Related manuals for 071-017