4
May we congratulate you on your new greenhouse
GB
USA
Congratulations On Your Choice Of Greenhouse
Juliana Drivhuse A/S is a privately owned Danish
company established in 1963. At Juliana Drivhuse we
design, develop and manufacture our greenhouses
based on principles of simplicity, aesthetics,
functionality and quality. Over the years, Juliana
Drivhuse has acquired several competing companies,
so that today we offer three brands: Halls, Juliana and
Gabriel Ash. Each brand contains products with unique
designs and functionalities, but where the common
feature is a correlation between quality and price.
All products are designed and manufactured to last
for many years and form the framework for people
and the good life, whether it is primarily for cultivation
or as an oasis in the garden. On www.juliana.com you
can read more about the company, the individual
brands, and the wide range of accessories available
for our greenhouses.
This Installation Manual
When assembling your new greenhouse, you need to
follow these instructions step by step. You will find all
bolts, nuts and fittings in a separate box.
NOTICE:
These instructions might be designed for
several sizes of the same greenhouse model.
All illustrations are marked with the following symbol:
Seen from the inside: Seen from the outside:
If a component from a box is to be used at a later
time in the assembly it is indicated by the following
symbol:
Safety Precautions
• Only carry out assembly in dry and calm weather.
• Make sure you have an assistant to help you.
• Always wear work gloves while glazing. Greenhouse
glass has sharp edges, especially if it breaks.
• Assistants, and especially children, must be warned
that broken glass presents a safety hazard. Pick up all
broken glass at once and remove it with care.
• Any ladders used must be placed on a level surface.
Location
The right location of the greenhouse is important
to create the best growth conditions for plants and
ensure the longevity of the greenhouse.
The greenhouse must be placed in as sunny a position
as possible and shielded from strong winds. As far as
possible, avoid positioning the greenhouse under
trees as the shade will encourage algae growth.
Likewise, fallen branches and leaves can damage the
greenhouse and clog up the gutters.
We recommend that you locate the greenhouse on
your favourite spot in your garden, especially if you
want to use the greenhouse for purposes other than
growing plants.
IMPORTANT:
Before installing the greenhouse you
must create a flat and true surface at least as big as
the external dimensions of the greenhouse - this will
ease the setup of the greenhouse.
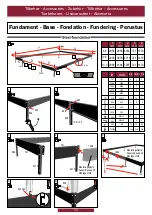
Base
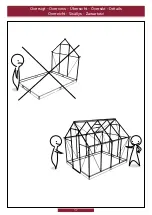
There is not a base included with this product.
However, one of our pre-fabricated bases can be
purchased separately. If you purchase our pre-
fabricated base anchor holes must be deep enough
to extend below the frost line. Follow measurements
shown on the following pages. All measurements are
external measurements.
If our pre-fabricated base is used this is attached to
the greenhouse at every vertical glazing bar as shown
on drawing A/B.
The best assembly order:
1.
Ensure level ground.
2.
Assemble base and ensure measurements as show
on drawing. Make sure diagonal measurements are
identical.
3.
Mark holes and move the base.
4.
Dig holes to extend below the frost line. Follow
local recommendations.
5.
Add a bend on the end of the ground anchors as
shown on the drawing.
6.
Place base with ground anchors above holes.
7.
Make sure that the base is 100% level and at a
straight angle. Make sure diagonal measurements are
identical.
8.
Fill up the holes with concrete.
Example: a hole with dimensions ø150 mm and
900mm in depth needs approximately 16 liters of
concrete.
9.
Make sure that the base is still 100% level and at a
straight angle. Make sure diagonal measurements are
still identical.
Upon recommended time of curing you may start
assembling your greenhouse.
Locating The Greenhouse On A Solid Base
If the greenhouse is not going to be concreted down,
it must be secured using suitable brackets. Brackets/
bolts are not part of this purchase. If a pre-fabricated
base is used ground anchors should be cut off with a
hacksaw at the same height as the base.
Pre-fabricated base is designed for casting and
therefore additional drilling and purchase of materials
for this purpose is to be expected. Be aware that most
insurance companies do not cover greenhouses that
do not have a cast base.
Order of Assembly
Follow the assembly order as shown on the following
pages.
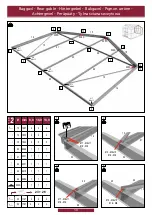
Place components as shown on the drawing and
then assemble the section in the order shown in the
pictures. Do not tighten the nuts completely until the
entire section is assembled.
When all sections are complete the body of the
greenhouse can be assembled.
NOTICE:
In several places the assembly instruction
shows that extra bolts must be inserted in the profiles.
These are to be used for attaching other parts later in
the process.
Doors and Windows
Add grease on the screws for the door to ease
assembly. Doors and vents should be glazed during
the initial assembly.
IMPORTANT:
Before glazing make sure that the
gables and sides are level and straight, and that
door(s) and window(s) work perfectly.
A greenhouse should never be left partially glazed.
Glazing
1.
Clean glass and profiles with ethanol.
2.
Fit one pane at a time – add a 3 mm silicone bead
on vertical profiles marked with dotted lines.
3.
Fit the pane and finish with cappings (#M).
NOTICE:
cappings must be be fitted on both sides
of the pane simultaneously so that the glass remains
central.
Recommended order of glazing: roof – sides – gables.
A 3 mm bead of silicone is sufficient to ensure
maximum adhesion. If you use more silicone than
recommended, extra tubes can be purchased.
If you accidentally break a pane, carefully pull the
broken glass outwards and loosen the silicone using a
sharp craft knife. Clean the profile completely before
fitting a new pane of glass.
Polycarbonate Installation
The illustrations show how to fit the sheets and strips.
If adjustment is necessary use a fine-tooth saw.
NOTICE:
To avoid the growth of algae, do not allow
the polycarbonate sheets to come into contact with
the ground.
If desired, the sheets may be sealed against insects.
Seal the top using aluminium tape or silicone. The
bottom should only be sealed with air-strip tape to
allow condensation to escape.
Tools
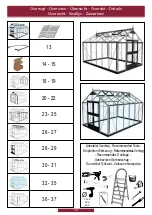
The tools needed to assemble the greenhouse are
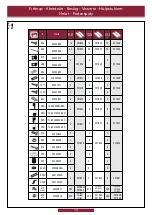
shown on the following pages.
Tips and Tricks
See www.juliana.com for more tips on assembly of
your greenhouse.
Maintenance
• Grease the hinges of the doors, lock and
– if included – sliders approximately every 6 months.
• Tighten bolts/nuts.
• Clean the gutters from leaves etc.
• Adjust windows if necessary.
• Replace broken glass.
• Clean the greenhouse before and after the growing
season.
Winter and Storm Protection
If you anticipate snow and/or a storm we recommend
the following:
• Support the roof section.
• Remove larger amounts of snow from the roof.
• Take precautions to prevent snow falling from e.g.
a tree or roof.
• Remove the cylinders from the automatic window
openers (accessory).
• Secure door(s) and window(s) to prevent wind
damage to the greenhouse.
Please note that not all insurance companies
automatically cover greenhouses.
12-year Guarantee
A full description of the guarantee can be found on
www.juliana.com.
Provided that the greenhouse is assembled and
maintained according to the requirements, the
greenhouse is covered by a 12-year guarantee. In
case of missing parts/defects this must be reported
immediately.
General maintenance of the greenhouse such
as cleaning, lubrication, post-tensioning of nuts/
screws must be complied with, as this may affect the
structural quality of the greenhouse and its resistance
to wind and snow load.
Please note that the guarantee does not cover;
• Damage and functional problems due to lack of
lubrication and maintenance.
• Any paintwork is covered by a 2-year guarantee.
• Nuance differences in colour may occur and there
may be small marks on the profiles due to the painting
process. This is not covered by the guarantee.
• Glass, polycarbonate, freight, assembly, possible
removal, possible consequential damage, labour
costs, etc.
• Parts damaged by external influences, such as:
other building parts, climate impacts, vandalism,
force majeure or other external conditions. E.g.
remember to remove snow from the roof to avoid
possible breakage due to excessive weight.
• Wear parts (such as handles, wheels, sliders,
cylinders and locking devices). Wear parts must be
replaced on a regular basis depending on use and
operation.
• Product defects arising from incorrect/inappropriate
use of parts.
NOTICE:
a greenhouse is a single-skin, dry-build
construction that is not 100% dense. Depending
on weather conditions, leaks may occur at roofs,
windows, doors and corners.
Complaints
All our greenhouses are built according to the
highest quality standards. However, should you
experience any problems, please contact your dealer
at once. When describing the defect, please state the
greenhouse model and component number.
Congratulations on your new greenhouse, which we
hope will bring you great joy for many years to come.
Summary of Contents for Premium 10,9 m2
Page 1: ...28062022 2 08 41...
Page 17: ...17 Oversigt Overview bersicht versikt D tails Overzicht Sis llys Zawarto...
Page 38: ......


