background image

48 

49

GB

OPERATION

                  
                  Since the appliance and its heating elements are slightly greased when
                  delivered, there might be a slight development of smoke and odor when first 
                  time it is used. This is harmless and it will stop after a short while. Be sure to 
                  provide sufficient ventilation during such time.

WARNING!


This heater is not equipped with a device to control the room temperature. Do 

not use this heater in rooms when they are occupied by persons not capable of leaving the 
room on their own, unless constant supervision is provided.

INSTALLING 

Remove all package material and check the appliance, supply  cord and the plug for signs 
of damage.

●          

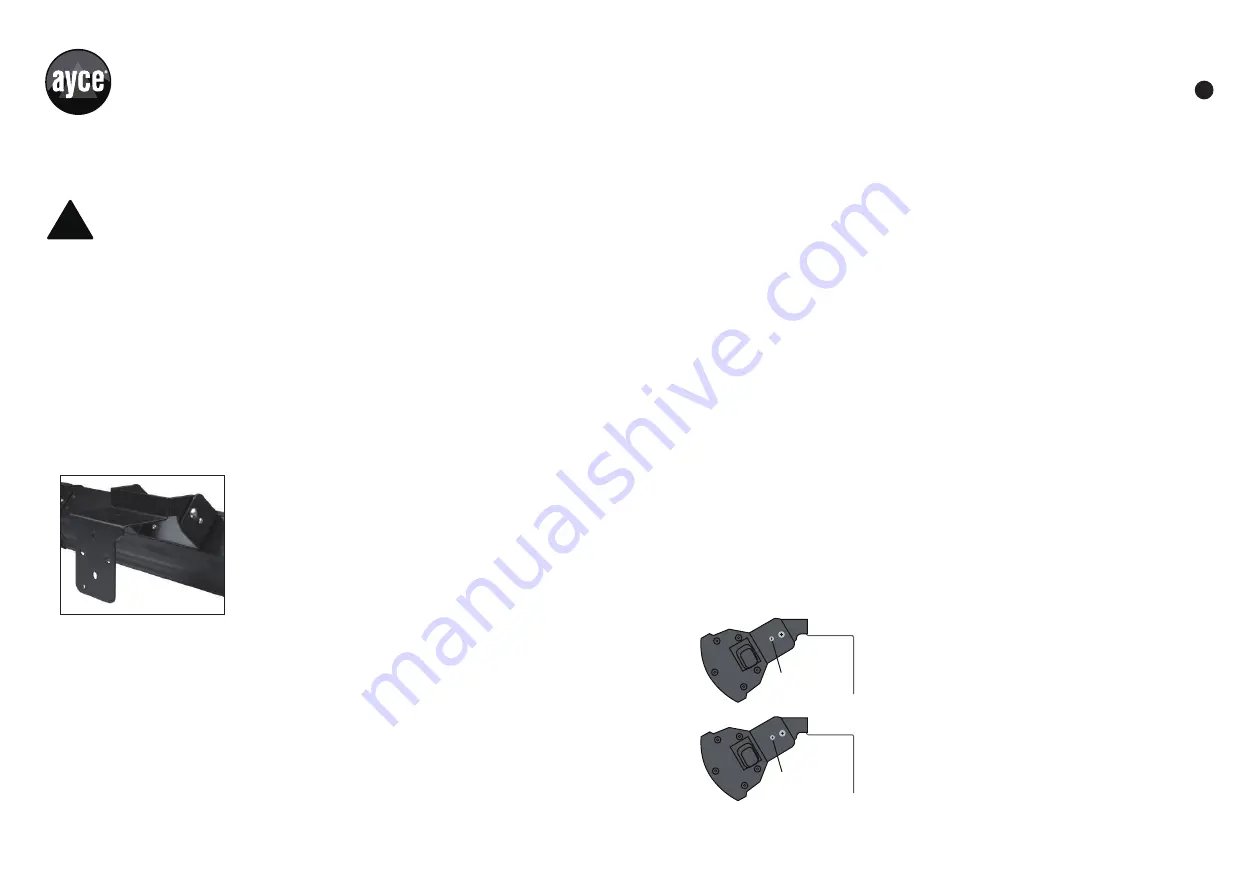
Attach the suspension bracket to the device. To that end, put the round parts of the 

      suspension bracket in between the bracket of the device. Screw and tighten
      both sides using the large screws, nuts and washers (included in the delivery) through 
      the large holes (see the illustration).

●          

Pay attention to the mounting place for your heater. The appliance has to be mounted

      on an incombustible foundation. That foundation has to be vibration free, exact vertical
      and stable enough for lastingly holding the appliance free of problems. Check or the 
      provided (anchor bolts) are suitable, strong enough and qualified for the foundation.
      The material provided is identified for a brick wall; for another foundation please ask 
      the specialist for suitable material.

●          

Check before mounting or the minimum safe mounting distances between heater and 

      environment are strictly followed. The distance between the bottom edge of the 
      appliance and the floor must be at least 1,8 meter. There must be a distance of at least 
      0,5 meter between the appliance and the ceiling, roof or other cover. There must be a 
      distance of at least 1,5 meter at each side between the appliance and walls or the like.
      When you install the appliance outside, pay attention that it doesn’t catch excessive 
      wind load.

Attach the heater to the wall. The heater can be attached to the wall in two ways:
A. Semi-permanently by means of the wall support.
B. Permanently by attaching it directly to the wall.

A – Attaching to the wall using the wall support:

●          

Attach the wall support horizontally to the wall using the four cotter bolts included in

      the delivery. 

●         

Hang the terrace radiator in the wall support using the suspension bracket. Slide the

      suspension bracket as far as possible through the wall bracket so that the small hole
      in the suspension bracket winds up under the wall support. Secure the terrace radiator
      by turning the wing nut (included in the delivery) as far as possible in the small hole of 
      the suspension bracket (see the illustration).
B – Directly attaching to the wall:

●          

Attach the suspension bracket horizontally to the wall using the four  cotter bolts.

●          

Adjust the device to the required radiation angle. The radiator has three positions: 

      straight ahead, downwards under an angle (directed far away) and downwards under
      an angle (directed nearby). Secure the device in the required position by screwing the 
      small screws (X) into the suspension bracket and radiator bracket.

●         

Fasten all screws another time firmly and check or the heater is firmly mounted. Now 

      your infra red heater is ready for use.

●         

For personal protection the installation, to which the heater is connected, has to be 

      equipped with an earth fall device (max. 30 m Amp). Under some circumstances it may
      be attractive to make a fast connection between the heater and the main supply, and to 
      operate the heater with a switch. Because the heater has a high water tightness (IP65)
      and for safety reasons, such a connection has to be made by a qualified electrician.

X

X

B

A

!

 NOTE!


Summary of Contents for Ayce 7613164559364

Page 1: ...RE PER TERRAZZA LGH 02 2 GOLDEN BEACH CARBON GOLDEN PATIO HEATER LGH 02 2 GOLDEN BEACH V190305 GEBRAUCHSANWEISUNG I MANUEL D UTILISATION I MANUALE D ISTRUZIONI I ORIGINAL INSTRUCTIONS CH Import Distri...

Page 2: ...rfen nicht mit dem Produkt spielen Reinigung und Benutzerwartung d rfen nicht durch Kinder ohne Beaufsichti gung durchgef hrt werden Kinder unter 3 Jahren d rfen sich dem Produkt nicht n hern wenn sie...

Page 3: ...m chten mit der auf dem Typenschild des Produktes vermerkten Spannung bereinstimmt Stellen Sie das Produkt und das Kabel nicht in die N he von W rmequellen Achten Sie darauf dass das Produkt oder das...

Page 4: ...erlegscheiben durch die grossen L cher siehe Bild W hlen Sie sorgf ltig den richtigen Patz f r die Installation Ihres Infrarotstrahlers Das Ger t muss auf einem feuerfesten Untergrund montiert werden...

Page 5: ...t Ihr Infrarotstrahler ist jetzt betriebsbereit Das Diese Heizung muss zum pers nlichen Schutz an eine elektrische Anlage angeschlossen werden die mithilfe eines Erdungsschalters von max 30 mAmp gesic...

Page 6: ...ie zu diesem Zweck auf den Hauptschalter I jedes Mal wenn Sie jetzt den Handbedienungsschalter bet tigen schaltet das Ger t von Standby halbe Leistung volle Leistung Standby halbe Leistung usw Die ent...

Page 7: ...n GARANTIEURKUNDE Bitte schicken Sie folgende Dokumente bei der R ckgabe Ihres Produktes zur Reparatur mit 1 Kassenzettel Kaufnachweis 2 Diese Garantieurkunde mit Ihrem Namen Ihrer Adresse und Ihren K...

Page 8: ...tliche Abdeckung Seitlicher Reflektor Feste Platte Aluminiumgeh use U Winkel L Winkel 1 2 3 4 5 6 7 8 9 10 11 12 13 14 15 16 17 18 19 TEILEBEZEICHNUNG Endkappe mit Gewinde Fernbedienungsfeld Wasserdic...

Page 9: ...ttoyage et l entretien par l utilisateur ne doivent pas tre effectu s par des enfants sans surveillance Les enfants de moins de 3 ans doivent tre tenus l cart moins d tre surveill s en continu Les enf...

Page 10: ...utilisez pas de pesticides ni d autres pulv risateurs inflam mables autour du produit cela pourrait endommager l appareil ou causer un incendie Ne pas ins rer ou permettre des objets trangers de p n...

Page 11: ...par les grands trous voir image Choisissez avec pr caution l endroit o votre chauffage doit tre install L appareil doit tre plac sur un support ininflammable Ce support doit galement tre exempt de vib...

Page 12: ...tenant pr t l emploi Pour la s curit des personnes l Cet appareil de chauffage doit tre raccord une installation lectrique prot g e par un interrupteur courant diff rentiel r siduel de maximum 30 mAmp...

Page 13: ...ois que vous appuyez sur le bouton commande manuelle l appareil passera de standby demi r gime plein r gime standby demi r gime etc Les LED correspondantes s allument Vous d sactivez l appareil d fini...

Page 14: ...tre rapport s dans tous les magasins jumbo A l expiration de la p riode de garantie les produits seront repris dans tous les magasins Jumbo pour contr le CH Import Distribution exklusiv durch Jumbo M...

Page 15: ...cteur lat ral Plaque fixe Corps en aluminium trier en U trier en L 1 2 3 4 5 6 7 8 9 10 11 12 13 14 15 16 17 18 19 D NOMINATION Bouchon d extr mit filet Capteur de t l commande Silicone tanche l eau C...

Page 16: ...ricoli correlati I bambini non devono giocare con l apparecchio Le operazioni di pulizia e di manuten zione non devono essere effettuate dai bambini senza sorvegli anza I bambini di et inferiore a 3 a...

Page 17: ...erruttore sia in posizione OFF prima di collegare l apparecchio a una presa di corrente Per scollegare l apparecchio spegnerlo off quindi staccare la spina Non tirare il cavo per non danneggiarlo Speg...

Page 18: ...rniti in dotazione nei fori grandi vedi figura Valutare attentamente il punto scelto per l installazione dell apparecchio L apparecchio deve essere montato su di una base non combustibile Questa base...

Page 19: ...effettua il montaggio l impianto al quale il radiatore viene collegato deve essere dotato di un salvavita differenziale max 30 m Amp In alcune circostanze pu risultare conveniente realizzare un allac...

Page 20: ...tal fine regolare l interruttore principale su I ad ogni pressione del pulsante di azionamento manuale il dispositivo effettuer la commu tazione da standby a mezza potenza quindi a piena potenza poi s...

Page 21: ...zia gli apparecchi difettosi possono essere restituiti presso qualsiasi punto vendita jumbo Dopo la scadenza del periodo di garanzia i prodotti ayce vengono accettati presso tutte le filiali jumbo aff...

Page 22: ...ra laterale Piastra fissa Corpo in alluminio Staffa a U Staffa a L 1 2 3 4 5 6 7 8 9 10 11 12 13 14 15 16 17 18 19 DESCRIPTION Cappuccio con estremit filettata Finestrella telecomando Silicone a tenut...

Page 23: ...ion has to be given where children and vulnerable people are present The heater must not be located immediately below a socket outlet In order to avoid overheating do not cover the heater Do not use t...

Page 24: ...removed regularly by disconnect the appliance and vacuum cleaning air vents and grilles Do not place the heater on carpet don t place the cable under carpets Arrange cord away from traffic areas so th...

Page 25: ...e must be a distance of at least 1 5 meter at each side between the appliance and walls or the like When you install the appliance outside pay attention that it doesn t catch excessive wind load Attac...

Page 26: ...tandby modus The device can also be used without the remote control by using the manual opera tion button 7 To that end press the main switch to I each time you now press the manual operation button t...

Page 27: ...Y CERTIFICATE Please include the following when returning your product for repair 1 The receipt proof of purchase description completed overleaf 2 This warranty certificate you re your name address co...

Page 28: ...te Side cover Side reflector Fixed plate Aluminum body U bracket L bracket 1 2 3 4 5 6 7 8 9 10 11 12 13 14 15 16 17 18 19 DESCRIPTION Threaded end cap Remote control window Waterproof silicone Heatin...

Reviews: