background image

If the fire is at the BBQ, turn the gas off at the cylin-

der. 

Smother  the  flames  with  a  wet  cloth,  fire blanket

This BBQ is an outdoor appliance only. Under no 

circumstances should it be used indoors.

READ ALL OPERATING INSTRUCTIONS BEFORE 

LIGHTING

Do not perform any servicing on the BBQ yourself. 

This includes internal adjustment of the regulator 

and gas valves. Servicing can only be carried out by 

authorised technicians.

When gas cylinder is replaced or reconnected, check 

for leaks.

Do not store chemicals or flammable materials near 

this appliance. 

Unsupervised children should not be near a BBQ 

while cooking or during warm up or cool down.

Do not wear long loose flowing chothing around the 

BBQ. Long flowing hair is also easily ignited, espe-

cially by unexpected flare-ups.

Do not leave food unattended on the BBQ.

In case of fat fire turn gas cylinder off. 

Particular care must be taken when removing 

grease cup. Hot oil can cause serious injury.

or extinguish using a fire extinguisher. 

If you cannot safely reach the valve to turn off 

because the fire is at the cylinder, contact the fire 

brigade immediately. 

Cool the gas cylinder by directing water from the 

garden hose to its centre. 

If gas is burning try to not extinguish it, having the 

gas burn off is better than letting the pressure 

build up and potentially lead to an explosion.

Do not ignite BBQ with the lid closed. 

Always open the lid before igniting the burner. 

This BBQ should not be located under overhead 

combustible construction and proper clearances 

must be maintained at all times from combusti-

ble construction and/or materials, with 

MINI-

MUM

 clearances as follow:

Turn all gas valves off including gas cylinder after 

use.

Never leave burner on high for more than 10 min-

utes unless actually cooking. If the burner makes 

a hissing sound when lit, it may be burning inside. 

Turn burner off, allow it to cool and try again. 

Do not allow build up of unburned gas.

Grease cup needs to be cleaned regularly to 

prevent excessive fat or grease build up that 

might contribute to a fire. 

This appliance must only be used in an above ground 

open-air situation with natural ventilation, without 

stagnant areas, where gas leakage and products of 

combustion are rapidly dispersed by wind and natural 

convection.

SAFETY INSTRUCTIONS

IMPORTANT: READ THE ASSEMBLY INSTRUCTIONS IN THIS BOOKLET BEFORE REMOVING 

THE CONTENTS OF THIS CARTON

IMPORTANT SAFETY INSTRUCTIONS

DO NOT 

DO NOT 

DO NOT 

DO NOT

DO NOT 

DO NOT 

DO NOT     

OPERATE THIS APPLIANCE BEFORE READING THE INSTRUCTION BOOKLET

PLACE ARTICLES ON OR AGAINST THIS APPLIANCE

STORE  CHEMICALS  OR  FLAMMABLE  MATERIALS  OR  SPRAY AEROSOLS

NEAR THIS APPLIANCE

OPERATE THIS APPLIANCE INDOORS

ENCLOSE THIS APPLIANCE

LIGHT OR OPERATE WITH A COVER ON (COVER NOT INCLUDED)

MODIFY THIS APPLIANCE

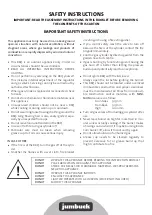
IN CASE OF FIRE

 From Sides       915mm

 From Back        915mm

 High                   1000mm

Summary of Contents for 0173343

Page 1: ...t Plate Solid steel construction Removeable side shelves included Temperature gauge Cooking surface 470W x 356D mm Enamel coated cast iron grill and hot plate Universal LPG only Hose regulator included Dimensions 1 02L x 0 46W x 0 37H m Burner Material S Steel Dial Ignition Burner Grill Hot Plate 2 ...

Page 2: ... or any other appliance For outdoor use only Improper installation adjustment alteration service or maintenance can cause property damage injury or death Read the installation operating and maintenance instructions thoroughly before installing or servicing this equipment Warning accessible parts may be very hot Keep young children away Do not move the appliance during use Turn off the gas supply a...

Page 3: ...lead to an explosion Do not ignite BBQ with the lid closed Always open the lid before igniting the burner This BBQ should not be located under overhead combustible construction and proper clearances must be maintained at all times from combusti ble construction and or materials with MINI MUM clearances as follow Turn all gas valves off including gas cylinder after use Never leave burner on high fo...

Page 4: ...icles and or boats INSTALLATION COMPLIANCE WARNING Shut off gas supply to the gas BBQ Put out any flame with a fire extinguisher Get away from the gas cylinder Do not try to fix the problem yourself A strong gas smell or the hissing sound of gas indicates a serious problem with your gas BBQ or the gas cylinder Failure to immediately follow the steps listed below could cause serious bodily injury d...

Page 5: ...and no more than two walls See example 2 3 Outdoor area example 2 Outdoor area example 3 Outdoor area example 4 Outdoor area example 5 both ends open open side at least 25 of total wall area 30 or more in total of the remaining wall area is open and unrestricted open side at least 25 of total wall area 30 or more in total of the remaining wall area is open and unrestricted Wrongful installation ad...

Page 6: ...contact your BBQ supplier for a list of approved replacement parts The gas hose must comply to Australian gas standards Gas cylinder not in use is to be stored outdoors in a well ventilated place out of reach from children Make sure that the gas cylinder is placed in an upright position and on an evenly surfaced ground Additional gas cylinders are not to be stored under neath or in proximity to th...

Page 7: ...echeck for leaks If the gas leakage persists turn off the gas supply and contact your supplier or place of purchase Do not use the appliance until the gas leak has been rectified We also recommend use of a gas safety gauge follow ing the manufacturer s instructions This provides a convenient way to detect gas leaks while providing automatic shut off of the gas supply in the event of a gas leak or ...

Page 8: ...e lighting 2 If ignition does not occur in 5 seconds turn the burner control s off wait 5 minutes and repeat the lighting procedure LIGHTING MANUAL IGNITION If necessary this BBQ can be lit manually 1 Open the lid before lighting 2 Light a 90mm BBQ match and hold it adjacent to the left hand side of the burner 3 Turn the burner control knob to the HI position The burner will light from the match 4...

Page 9: ...our BBQ is a fairly low mainte nance appliance Below are a couple of things worth looking at though Remember to turn off and discon nect the gas before any maintenance is carried out IMPORTANT INFORMATION This product is for outdoor use only Do not use indoors Do not use below ground level Do not store gas cylinders below ground level LP gas is heavier than air so if a leak occurs the gas will col...

Page 10: ...forced air should pass debris or obstruc tions through the burner and out the ports IMPORTANT INFORMATION Inspect burner after installation and check to ensure it is securely tightened to the base and injector is centred inside the burner as you found it Regardless of which burner cleaning procedure you use we recommend you also complete the following steps to help prolong burner life You should c...

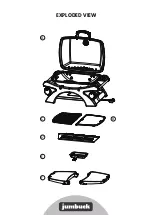
Page 11: ...A B C E F D EXPLODED VIEW ...

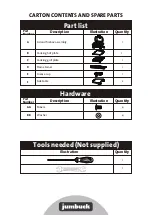
Page 12: ... plate Cooking grill plate Grease cup Flame tamer A B E 1 1 1 1 Side table F 2 1 Part Number Description Illustration Quantity Part list C D M6x12 AA 4 Washer BB 4 Part Number Description Illustration Quantity Hardware Illustration Quantity 1 1 Tools needed Not supplied ...

Page 13: ...BB x4 Secure the fire box to the leg stand using the 4 M6 x 12 screws AA and washers BB Insert a washer and screw into the 4 holes from the inside of the fire bowl and use a phillips head screw driver to secure Do not over tighten as this may cause damage to the surface of the fire bowl ...

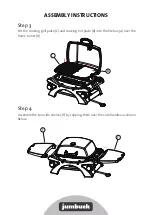
Page 14: ... INSTRUCTIONS Step 3 Put the cooking grill plate C and cooking hot plate B into the firebox A over the flame tamer D Step 4 Assemble the two side shelves F by clipping them over the side handles as shown below C B ...

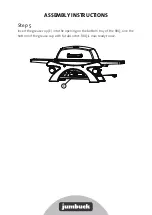
Page 15: ...ASSEMBLY INSTRUCTIONS Step 5 Insert the grease cup E into the opening on the bottom tray of the BBQ Line the bottom of the grease cup with fat absorber BBQ is now ready to use E ...

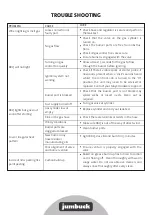
Page 16: ...ons are secure Ensure burner is engaged with the valve Allow at least 5 seconds for the gas to flow through the burner before igniting Check if there s visible spark at starter probe if no spark is present when a click sound is heard whilst the control knob is turned to the HI position the unit may need to be serviced or replaced Contact your Mayo Hardware support Check that the burner port is not...

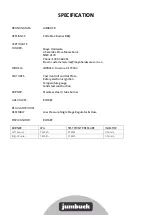
Page 17: ...omerservice mayohardware com au ROTARY ROTARY Low Pressure Single Stage Regulator Hose Cast Iron Grill and Hot Plate Rotary electronic ignition Temperature gauge Solid steel construction Stainless steel U tube burner JBPB219 Fineline 0173343 BURNER BRAND NAMES APPLIANCE CERTIFICATE HOLDER MODELS FEATURES BURNER GAS VALVES REGULATOR HOSE ASSEMBLY PIEZO IGNITOR LPG TEST POINT PRESSURE INJECTOR ...

Page 18: ...he warranty covers domes tic use only and does not apply to commercial applica tions Any claim under this warranty must be made within 12 months of the date of purchase of the product To make a claim under the warranty contact Mayo Hardware customerservice mayohardware com au or take the product with proof of purchase to any Bunnings store see www bunnings co nz for store locations The warranty co...

Page 19: ...neglect misuse accidental or improper installation of this appliance Scratches dents corrosion or discolouration caused by heat abrasive chemicals cleaners Corrosions or damage caused by exposure to elements such as insects weather hail or grease and fat fires Rusting of hotplate and burner Commercial use of this product Unauthorised repairs or modification during warranty period Refer to the troubl...

Reviews: