background image

5

ASSEMBLY INSTRUCTIONS

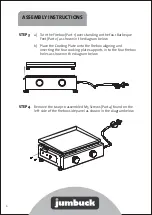
   STEP 3   

a)   Turn the Firebox (Part 1) over standing on the four Barbeque       


       Feet (Part 2) as shown in the diagram below 


b)   Place the Cooking Plate onto the Firebox aligning and    


       inserting the four cooking plate supports in to the four firebox  


       holes as shown in the diagram below

   STEP 4   

Remove the two pre-assembled M5 Screws (Part 4) found on the    


left side of the firebox side panel as shown in the diagram below

6

Summary of Contents for BG2039B2

Page 1: ... cooking surface Powerful 20 MJ hr stainless steel burners Powder coated steel frame fascia Adjustable feet for all surface stability Hose and regulator included Universal LPG only Important Please retain these instructions for future use THIS BARBEQUE IS INTENDED FOR OUTDOOR USE ONLY Model BG2039B2 Dimensions 618 W x 430 D x 213 H mm ...

Page 2: ... water Turn off the gas cylinder when the barbecue is not in use Always allow the barbecue to completely cool down before covering For safety reasons it is advisable to keep a fire extinguisher and fire blanket close to hand Unsupervised children elderly and infirm should not be allowed close to the barbecue during pre heat cooking burn off or cooling down of the unit Please remove dispose of all ...

Page 3: ...page 9 under Section 4 PRECAUTIONARY LEAK TEST Naked flames matches or other open flames must not be used to check for leaks this is a dangerous practice to be avoided Flammable liquids of any description including petrol lighter fluid oils etc must not be stored close to the barbecue Spare or extra gas cylinders must NOT be stored within close proximity of this barbecue or any other gas or electr...

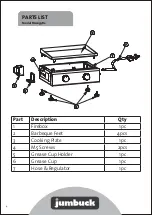
Page 4: ...TS LIST Model BG2039B2 3 3 1 1 7 7 2 2 5 5 4 4 6 6 Part Description Qty 1 Firebox 1pc 2 Barbeque Feet 4pcs 3 Cooking Plate 1pc 4 M5 Screws 2pcs 5 Grease Cup Holder 1pc 6 Grease Cup 1pc 7 Hose Regulator 1pc 4 ...

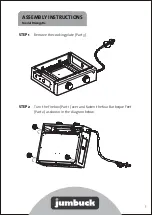
Page 5: ...4 ASSEMBLY INSTRUCTIONS Model BG2039B2 STEP 1 Remove the cooking plate Part 3 STEP 2 Turn the Firebox Part 1 over and fasten the four Barbeque Feet Part 2 as shown in the diagram below 5 ...

Page 6: ...n in the diagram below b Place the Cooking Plate onto the Firebox aligning and inserting the four cooking plate supports in to the four firebox holes as shown in the diagram below STEP 4 Remove the two pre assembled M5 Screws Part 4 found on the left side of the firebox side panel as shown in the diagram below 6 ...

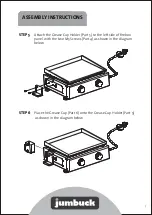
Page 7: ... Attach the Grease Cup Holder Part 5 to the left side of firebox panel with the two M5 Screws Part 4 as shown in the diagram below STEP 6 Place the Grease Cup Part 6 onto the Grease Cup Holder Part 5 as shown in the diagram below 7 ...

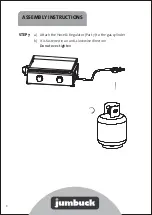
Page 8: ...7 ASSEMBLY INSTRUCTIONS STEP 7 a Attach the Hose Regulator Part 7 to the gas cylinder b It is fastened in an anti clockwise direction Do not over tighten 8 ...

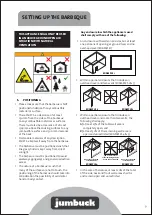
Page 9: ...lease make sure that the barbecue is NOT positioned underneath any combustible material or surface There MUST be a clearance of at least 250mm from the sides of the barbecue to any combustible materials or surfaces There must also be a clearance of at least 1500mm above the cooking surfaces to any combustible surface and 500mm clearance at the back Flammable materials of any description MUST be ke...

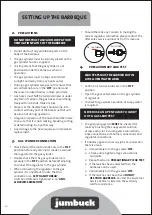
Page 10: ... in the OFF position before attempting to connect the regulator to the gas cylinder When connecting the regulator to the gas cylinder it is important to note that this connection is a LEFT HAND THREAD A left hand thread is tightened in an ANTI CLOCKWISE DIRECTION SETTING UP THE BARBEQUE POL FITTING 5 8 SAE THREAD Should there be any concern in making the correct regulator connection please contact...

Page 11: ...to a fire beneath the appliance Ensure there is no excess grease and other cooking residue to prevent fat fire Ensure that all the controls are in the OFF position before attempting to light the barbecue Turn on the gas supply at the gas cylinder Select burner to light Push and turn the selected control knob to HIGH If ignition does not occur within 5 seconds turn burner control knob to OFF Wait 2...

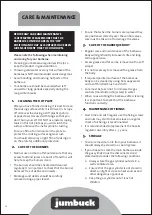
Page 12: ...at the burner holes are free of debris and insects Blockages and debris should be carefully removed using a pipe cleaner CARE MAINTENANCE Ensure that when the burners are replaced they are positioned correctly over the control valves care must be taken not to damage the valves 3 CARE OF THE BARBEQUE BODY Regular care and maintenance of the barbecue body will significantly increase its life and lon...

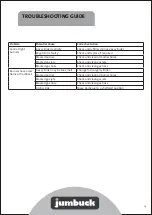
Page 13: ...ed burner Check and clean all burner holes Blocked gas jets Check and clean gas jets Blocked gas hose Check and clean gas hose Burners have a low flame or flashback Gas cylinder may be too small Change to a larger cylinder Blocked burner Check and clean all burner holes Blocked gas jets Check and clean gas jets Blocked gas hose Check and clean gas hose High winds Move barbecue to a sheltered posit...

Page 14: ...he use of inappropriate regulators and valves valves will void the warranty This warranty does not cover claims arising from fat fires This warranty does not cover rust as we connot control the enviroment in which the barbecue is stored TECHNICAL SPECIFICATIONS IF AT ANY TIME YOU ARE IN ANY DOUBT ABOUT THE CORRECT COMPONENTS TO BE USED WITH THIS BARBECUE OR ANY OTHER ASPECT OF THE BARBECUE S USE A...

Reviews: