7
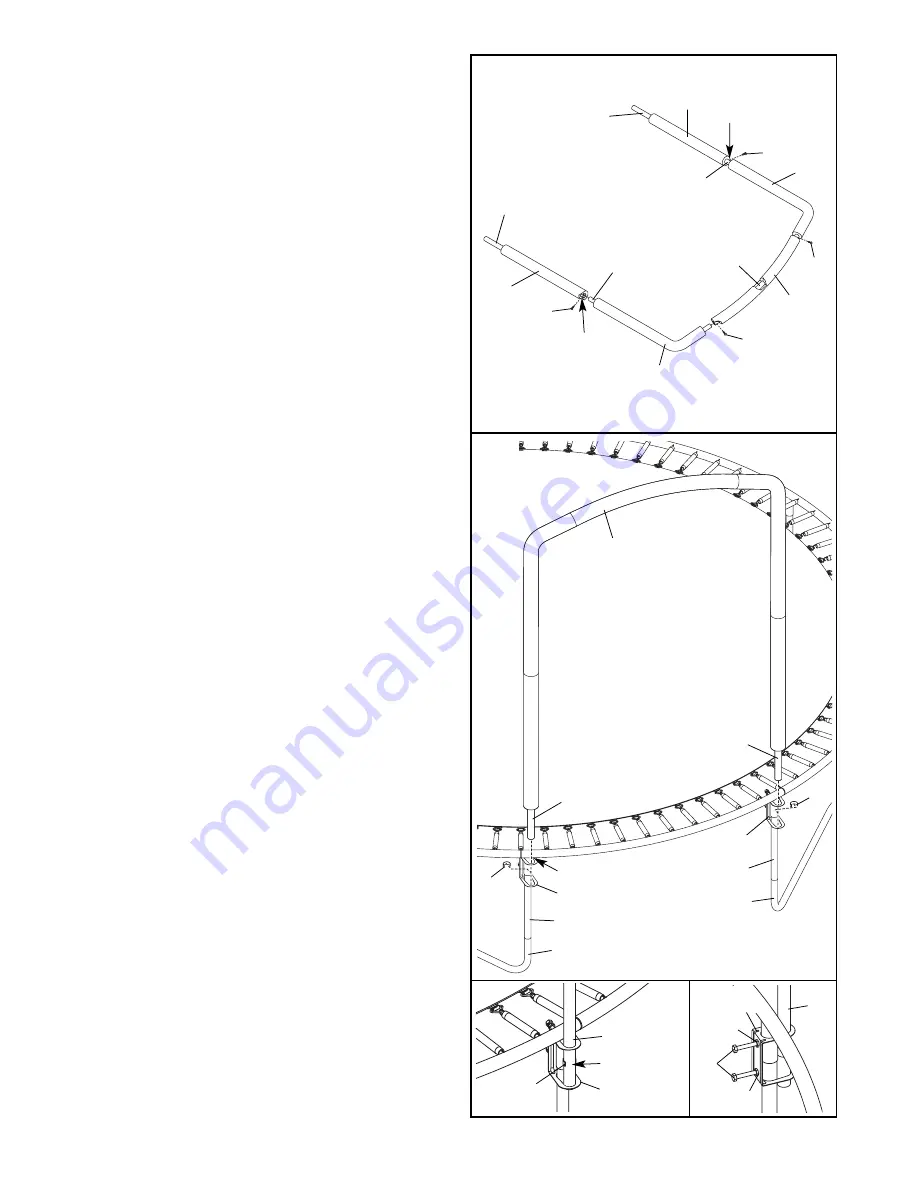
2. Lay two Straight Tubes (6), two L-tubes (7), and a
Curved Tube (8) on the ground so they form an
arch. Make sure that the Straight Tubes are orient-
ed so the small holes are in the positions shown.
Slide a Foam Sleeve (9) onto each of the five
Tubes; note that the ends of the Straight Tubes
should not be covered.
Insert the two L-tubes (7) into the two Straight
Tubes (6). Next, insert the two L-tubes into the
Curved Tube (8).
Tighten four Self-tapping Screws (5) into the small
holes in the Straight Tubes (6) and the Curved
Tube (8). Note: The small holes may be on the
opposite side the Curved Tube.
Assemble the remaining Straight Tubes,
L-tubes, Curved Tubes, and Foam Sleeves in
the same way.
3. Locate two Clamps (3) that are next to each other
but are attached to two different bases (see the
drawing). Slide the two Clamps up until they touch
the sockets above them. Hold the Clamps in this
position.
Lift one of the arches assembled in step 2, and
insert the two Straight Tubes (6) into the tops of
the two Clamps (3) as shown. Next, slide a Black
C-clip (4) onto the lower end of each Straight
Tube. Then, insert the Straight Tubes into the bot-
toms of the Clamps. The lower ends of the
Straight Tubes should extend 1/4” to 1/2” below
the Clamps. Note: If the Black C-clips do not fit
between the Straight Tubes and the legs of
your trampoline, do not use the Black C-clips.
See inset drawing A. If you have attached Black
C-clips (4) to the Straight Tubes (6), turn each
Black C-clips so the opening faces away from the
trampoline. Slide the Black C-clips up until they
touch the tops of the Clamps (3).
See inset drawing B. Firmly tighten the Clamp
Screws (2) in the two Clamps (3). Then, firmly
tighten the Jam Nuts (1) against the Clamps.
Attach the other three arches in the same way
(not shown).
2
Small
Hole
Small
Hole
3
8
5
5
5
5
6
6
6
Arch
6
9
9
9
9
9
7
7
Leg
4
4
3
3
Leg
Base
Socket
Base
3
4
6
Opening
2
1
1
3
6
A
B


