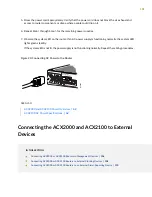
To install the router in the rack (see
CAUTION:
Before front mounting the router in a rack, have a qualified technician
verify that the rack is strong enough to support the router's weight (about 7 lb (3.2 kg))
and is adequately supported at the installation site.
NOTE:
One person must be available to lift the router while another secures it to the rack.
CAUTION:
If you are mounting multiple units on a rack, mount the heaviest unit at
the bottom of the rack, and mount the other units from the bottom of the rack to the
top in decreasing order of the weight of the units.
1. Ensure that the rack is in its permanent location and is secured to the building. Ensure that the installation
site allows adequate clearance for both airflow and maintenance.
2. Position the router in front of the rack or cabinet.
3. Hold onto the bottom of the chassis, and carefully lift it so that the mounting brackets contact the rack
rails.
WARNING:
To prevent injury, keep your back straight and lift with your legs, not
your back. Avoid twisting your body as you lift. Balance the load evenly and be sure
that your footing is solid.
4. Align the mounting brackets with the holes in the rack rails.
5. Install a mounting screw into each of the open mounting holes aligned with the rack, starting from the
bottom.
6. Visually inspect the alignment of the router. If the router is installed properly in the rack, all the mounting
screws on one side of the rack should be aligned with the mounting screws on the opposite side, and
the router should be level.
98
Summary of Contents for ACX2000
Page 1: ...ACX2000 and ACX2100 Universal Metro Router Hardware Guide Published 2020 09 07 ...
Page 91: ...Front Panel of an ACX2000 Router 47 LEDs on ACX2000 and ACX2100 Routers 57 91 ...
Page 116: ...4 CHAPTER Maintaining Components Maintaining ACX2000 and ACX2100 Components 117 ...
Page 125: ...5 CHAPTER Troubleshooting Hardware Troubleshooting ACX2000 and ACX2100 126 ...
Page 139: ...139 ...
Page 144: ...Restricted Access Warning 144 ...
Page 148: ...148 ...
Page 161: ...Jewelry Removal Warning 161 ...
Page 164: ...Operating Temperature Warning 164 ...
Page 174: ...DC Power Disconnection Warning 174 ...
Page 178: ...DC Power Wiring Sequence Warning 178 ...


