background image

108

  Archer 2 Rugged Handheld Owner’s Manual

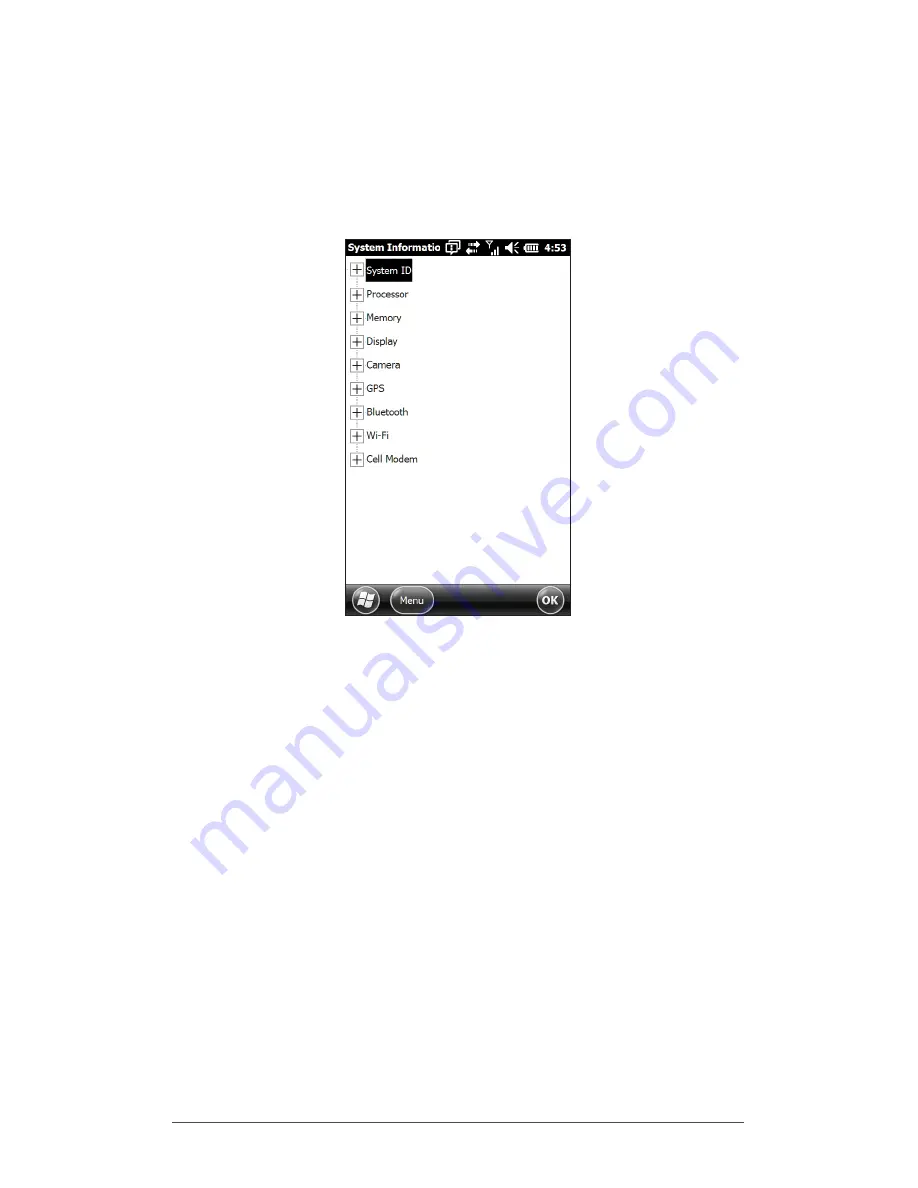
System Information for your Archer 2

When you contact a repair center you need some unique 

system ID information for your Archer 2 (serial number, 

model number, etc.). Tap 

Start

 > 

Settings > System > System 

Information 

to view the following menu. Select 

System ID

.

Specifications on the processor, memory, display, camera 

(Geo models), GPS/GNSS (Geo models), Bluetooth, Wi-Fi, 

and cell modem (optional accessory) are also located on 

the 

System Information

 screen. 

You can also create a system information file to send to the 

repair center by pressing the 

Menu

 soft key and selecting 

Create Info File

. The file is located at: \My Documents\

JSInfo.txt.

Summary of Contents for Archer 2

Page 1: ...o w n e r s m a n u a l...

Page 2: ...logo are trademarks or registered trademarks of Microsoft Corporation in the United States and or other countries The Bluetooth word mark is owned by the Bluetooth SIG Inc and any use of such marks b...

Page 3: ...I O Module 27 Audio Features 27 3 Programs and Settings Home Screen 30 Windows Start Menu 35 On Screen Keyboard 36 Suspend Reset Power Off and Restore Defaults 38 Subdued Lighting Tactical Mode 40 Co...

Page 4: ...art Easily Scan a Barcode Now 84 Barcode Connector Utility 85 Barcode Troubleshooting 94 A Storage Maintenance and Recycling Storing the Archer 2 and Battery Pack 100 Protecting the Touchscreen 101 Cl...

Page 5: ...1 Getting Started...

Page 6: ...nd barcode scanner are options The Anatomy of the Archer 2 Front and Back Features 1 5 2 4 6 7 1 Bumper Top 2 Touchscreen 3 Keypad 4 Sensor option 5 Microphone 6 Power Button 7 Led Indicators charging...

Page 7: ...n English French German Spanish and Brazilian Portuguese Other documents like release notes are available in English These documents are located on our website at www junipersys com Archer 2 support V...

Page 8: ...battery pack Install and charge the battery pack as follows 1 The battery compartment is accessed from the back of the handheld Loosen the four captive screws holding the battery compartment door in...

Page 9: ...symbols inside the compartment 4 Replace the door and tighten the screws 5 Plug the AC wall power charger that came with the Archer 2 into a wall socket Plug the other end into the DC power jack on t...

Page 10: ...teps 1 Pull the free tether loop through the tether ring on the hand strap Insert the stylus with the attached tether through this loop and tighten the loop 2 Place the stylus into the holder on the h...

Page 11: ...hours While the battery pack is charging the red LED blinks When it is fully charged the red LED is solid Install the Operating System in Other Languages The operating system is provided in English by...

Page 12: ...ou have and can be customized It is automatically shown when the Archer 2 is turned on You can get to it from any other screen by pressing and releasing the Home screen button on the keypad Windows St...

Page 13: ...itioning touch hold and move the screen up or down Use the scroll bar if it is available Use the shifted up down right and left keys to move around on a screen A horizontal scrolling menu is located o...

Page 14: ...control panel for selected actions on the Home screen Updates to the Operating System and Documents Updates to the operating system and technical documents are located on our website at www junipersys...

Page 15: ...2 Hardware Components...

Page 16: ...ion Pictures and Videos function take a picture or start and stop video Photo and video library for units without a camera Notes application P1 P3 Hold to Zoom function press and hold Display brightne...

Page 17: ...ys Return Take picture or start video Perform highlighted action use default action or select using arrow keys Shift Function Use specific shift function Press and release first then press and release...

Page 18: ...dheld does not have a barcode scanner If you have a barcode scanner or the target button has been reassigned select the Settings icon on the Home screen and then Personal Buttons You can also go to th...

Page 19: ...button to display a list of programs and functions Select the item you want to reassign to the selected button Keypad Backlight Make keypad brightness adjustments through the Backlight control panel l...

Page 20: ...dims or the Archer 2 is suspended Display and Touchscreen The Archer 2 has a bright color display and capacitive touchscreen with a diagonal viewing area of 4 3 inches 109 mm It is easy to view outdo...

Page 21: ...ance of an application Note Capacitive touchscreens do not need to be aligned Ignore the Align Screen option Touchscreen Modes The touchscreen is optimally designed for finger use The default touchscr...

Page 22: ...preferred mode and tap Load Do not interrupt the loading process You can try different modes to see which one works best for you Zooming in on the Display Zooming in on the display increases the view...

Page 23: ...you find the information you want Select the magnifying glass symbol in the upper right corner of the screen to return the view to the regular size Display Backlight Brightness Settings The default se...

Page 24: ...the previous screen for battery and or external power Dimming the display backlight saves battery power To bring the backlight back up to the full brightness setting tap on the dimmed display Note The...

Page 25: ...save battery power Disabling and Enabling the Touchscreen You can disable the touchscreen This is useful when you are running an application and you want to see the screen while avoiding accidental to...

Page 26: ...eks When you plug the handheld into the wall charger that comes with it the batteries are prevented from being overcharged The Li Ion battery pack is charged most efficiently at room temperature 68 F...

Page 27: ...harging cycles before they need to be replaced This is impacted by applications and environmental factors Depending on the current charge on the battery you may see different displays when turning on...

Page 28: ...power with battery installed The unit is not designed to run on external power without a battery Doing so can damage internal components of your unit and void the warranty Summary of Options to Reduce...

Page 29: ...associated with notifications When the operating system has something to notify you of this LED behaves accordingly For example if you turn on GPS GNSS the green LED blinks periodically Blue LED on th...

Page 30: ...SD card located in the battery compartment To insert or remove a card follow these steps 1 Power off the handheld by holding the power button until the Power Button menu appears and selecting Power Of...

Page 31: ...ack 12 to 24 VDC for power input and battery charging The connector module is user replaceable Contact our sales department or your supplier for details Note The connectors are sealed and do not requi...

Page 32: ...o icon from the list of applications that drops down Or press Start Settings System Audio The Audio control panel Output screen is shown From the Output screen you can adjust the speaker options Selec...

Page 33: ...3 Programs and Settings...

Page 34: ...unit is shown below Different functions are shown depending on which model you have You can customize the Home screen You can get to the Home screen from any screen by pressing the Home button on the...

Page 35: ...adjust them as desired Dashboard The dashboard consists of a background image and up to six dashboard gadgets that serve as functional indicators and control buttons You can switch between two color...

Page 36: ...gated from all accounts Calendar Shows the next appointment Tasks Shows the current number of tasks GPS GNSS Status Geo model Shows the current state of GPS GNSS reception and the state of the GPS GNS...

Page 37: ...f Wi Fi is red when an access point is available but not connected Favorites Bar The favorites bar consists of shortcuts to specific applications It is located below the dashboard when the screen is i...

Page 38: ...e tile bar at the bottom of each screen Up to five tiles are shown depending on which screen you are on For example the Home screen tile bar shown below consists of 1 the Microsoft start tile that tak...

Page 39: ...ou can get to the Start menu from any screen by tapping the Windows tile soft key on the display or pressing the shift Home buttons on the keypad On the touchscreen tap the application icon you want t...

Page 40: ...n the on screen keyboard off press the keyboard tile Mega Keys and Mega Keys Night Keyboard Features Pressing on a character with a finger or stylus highlights it Releasing the key prints the characte...

Page 41: ...ide to the character you want then release the key The character is printed and you are returned to the screen you started from Some keys have an extra character bar that includes items like accented...

Page 42: ...ded you should attach it to a wall charger when it is not in use Suspending the handheld is different from powering it off When the device is suspended it goes into a very low power mode Some battery...

Page 43: ...method is useful if your Archer 2 locks up Powering Off and On the Archer 2 To preserve battery power we recommend you power off the Archer 2 if it will not be used for two weeks or longer CAUTION Be...

Page 44: ...handheld 5 Tap Exit The boot process continues Subdued Lighting Tactical Mode In some environments subdued lighting is preferred The display backlight LEDs and keypad illumination can be subdued durin...

Page 45: ...ources Changes affect all operations Compass Calibration The Archer 2 has a built in compass and accelerometer The compass is used for embossing GPS GNSS information on pictures taken with the camera...

Page 46: ...s that are using true north use this value to adjust the readings from the compass To calibrate the compass press Calibrate Compass Rotate the handheld around all three axis several times in every ori...

Page 47: ...for and select ActiveSync software to download If it is running Windows Vista Windows 7 or Windows 8 search for and select Windows Mobile Device Center software 3 Follow the download instructions on t...

Page 48: ...rted screen provides information on current settings help for setting up features and applications and shortcuts to set up screens To see a list of topics press Start Getting Started Information for S...

Page 49: ...4 Bluetooth Wireless Communication...

Page 50: ...of Bluetooth devices Devices such as headphones keyboards and modems to connect to the Internet with an external cell phone Serial devices that use a Bluetooth COM port such as GPS GNSS receivers bar...

Page 51: ...ngs Connections Note If the Bluetooth radio is turned on and then the handheld is suspended wireless Bluetooth turns off to save battery power When the Archer 2 resumes turns on the radio turns on aut...

Page 52: ...Bluetooth control panel Devices screen is shown 3 Tap Add New Device The Archer 2 searches for other devices with wireless Bluetooth technology and displays them in a list Select the device you want...

Page 53: ...s already been assigned to the device see the user documentation that came with the device 5 You can adjust the Bluetooth settings as needed Serial Device COM Control Panel To set up a Bluetooth COM p...

Page 54: ...50 Archer 2 Rugged Handheld Owner s Manual 3 The Archer 2 automatically tries to discover the PIN You might be required to enter a PIN You should now be connected to the COM device...

Page 55: ...5 Wi Fi Wireless Networking...

Page 56: ...e following steps 1 From the Home screen turn Wi Fi on by tapping the Wi Fi gadget The Archer 2 automatically starts scanning the area for available Wi Fi networks If the Wi Fi gadget is not on the Ho...

Page 57: ...formation may not be required or will appear automatically When you are finished with the set up screens press Finish 5 Select Network Adapters from the horizontal scrolling menu near the top of the s...

Page 58: ...thout opening the Wi Fi control panel Tap on the screen outside of the dialog box to remove it temporarily You can also disable it to keep it from appearing in the future When this dialog box is shown...

Page 59: ...6 GPS GNSS...

Page 60: ...ap on the GPS GNSS status gadget to turn it on The GPS GNSS starts looking for satellites to use for a fix The green LED on the keypad blinks periodically and a satellite icon is placed on the title t...

Page 61: ...to retain its almanac When you resume it takes a few seconds to get a fix GPS GNSS Settings To view or make changes to the GPS GNSS settings or set up an external GPS GNSS receiver press and hold the...

Page 62: ...n a way that allows multiple programs to access the same COM port This is called the Program Port and defaults to COM2 This can be set up on the Programs screen of the GPS GNSS Settings control panel...

Page 63: ...and then the main JSNav screen appears Tap on the satellite icon in the upper right corner to turn GPS GNSS on or off A gray icon means GPS GNSS is not connected red means there is no fix yellow mean...

Page 64: ...he maximum PDOP for collecting points minimum navigation speed you need to be traveling for navigation to update properly and the navigation distance threshold This is the distance you can be from the...

Page 65: ...e being collected Audio Notifications You can turn on notifications for waypoint arrival waypoint collected and track point collected Some settings can be customized for a particular waypoint or track...

Page 66: ...aypoint you just collected tap the compass icon A rotating compass is shown Walk in the direction of the red arrow The distance shown decreases as you get closer Text saying Arrived is shown and you h...

Page 67: ...icon to add or edit the name description notes and file type for this track Managing Waypoints and Tracks To view the waypoints and tracks you have saved tap the menu icon then select Waypoints or Tra...

Page 68: ...imported track file can only contain one track if you are going to navigate to a specific track If a file contains multiple tracks a button inside of JSNav is available to extract the tracks into sepa...

Page 69: ...7 Camera...

Page 70: ...ted on the back of the Archer 2 Note The flash can also be used as a flashlight See Chapter 2 Hardware Components Flashlight Camera Settings for Still Images Press the camera button to turn the camera...

Page 71: ...ntrol panel is shown Use the horizontal scrolling menu near the top of the screen to see what the settings are and make changes as needed Geotagging When pictures are geotagged the date time latitude...

Page 72: ...he Menu soft key then select Geotag from the menu The following Emboss Options screen is shown Select the information you want to emboss on pictures the position and the color The selected information...

Page 73: ...screen This information does not appear on the images You can select Use True North Embed GPS allows you to put images into programs like Google Earth and sort them by location etc If you select User...

Page 74: ...orks best and press the camera button or the return button A square yellow line is shown indicating that the camera is in focus A screen like the following is shown for a few seconds Hold the handheld...

Page 75: ...o Options Select the Menu soft key to see a list of options for a particular photo The photo must appear on the screen To take another photo press the Camera soft key To see a library of photos and pi...

Page 76: ...eld Owner s Manual Videos Press the camera button to turn on the camera Select the Menu soft key and select Video Press Menu again to view and adjust settings as desired Note A portrait orientation is...

Page 77: ...Still see previous screen Audio You can record sound with videos From the Pictures Videos application screen tap Menu Video Menu Options From the Video screen tap Include audio when recording video f...

Page 78: ...74 Archer 2 Rugged Handheld Owner s Manual Library Menu Options Select a photo or video then the Menu soft key You can send delete edit etc the selected photo or video...

Page 79: ...8 3G Data Modem...

Page 80: ...reads Unavailable it is still a GSM unit but no SIM card is installed To set up your modem please see the appropriate section below GSM Modem The GSM modem is a cellular data modem type GSM UMTS It pr...

Page 81: ...nd remove it CAUTION Do not use a micro SIM adapter The adapter can get stuck and damage the slot 3 Remove the battery pack CAUTION The Archer 2 is not sealed against water and dust when the battery d...

Page 82: ...llowing pages Set up the GSM Modem Tap on the 3G modem gadget After about 30 seconds it turns green indicating that the modem is available Once the modem is available configure it to make a connection...

Page 83: ...n Wireless at the factory You need to contact Verizon to set up service for the CDMA modem and obtain an account If you already have a business account with Verizon your unit may be able to be added t...

Page 84: ...up your account SIM Card Use Since the Archer 2 is not an LTE device it does not use a SIM card Set up the CDMA Modem If your modem is still powered on tap on the 3G modem gadget to turn it off Ensure...

Page 85: ...and any other place where medical equipment may be in use Respect restrictions on the use of radio equipment in fuel depots chemical plants or where blasting operations are in progress Operating your...

Page 86: ...82 Archer 2 Rugged Handheld Owner s Manual...

Page 87: ...9 Barcode Scanner...

Page 88: ...r charger into a wall socket Plug the other end into the DC power jack on the Archer 2 3 The handheld powers on and a progress indicator is shown on the screen 4 The Barcode Connector utility automati...

Page 89: ...cel tap on the column you want the data to appear in Barcode Connector Utility The Barcode Connector utility is a barcode wedge program provided with the barcode scanner Depending on the configuration...

Page 90: ...Setup Use the setup screens to configure the settings of the barcode hardware and Barcode Connector utility 2 Power Down Barcode and Exit This function shuts down the barcode scanner You may want to...

Page 91: ...een The User screen has the following functions Button Control Panel The target button is the scan button by default You can change this to another programmable button from the Button control panel Se...

Page 92: ...the following functions Scan Tap Scan to test the settings and to view information about a scanned barcode The trigger button on the keypad can also be used Code Type and Scan Data After a successful...

Page 93: ...mode if barcodes are close together The scanner only decodes barcodes aligned directly under the center of the aiming crosshairs Disable this mode if only one barcode is viewable The aiming crosshairs...

Page 94: ...Screen The 1D Code Types screen has the following functions Inverse 1D Enable disable inverse 1D bar codes or select Auto Detect Enable disable the 1D code types listed Tap Options to configure 1D cod...

Page 95: ...ify four barcode lengths let A refer to the first length field and B refer to the second length field 1 One Discrete Length Set A to the discrete length and B to 0 Only barcodes with an exact length o...

Page 96: ...Manual Composite Postal Code Types Screen The Composite Postal Code Types screen has the following functions Composite Codes Enable or disable composite code types Postal Codes Enable or disable post...

Page 97: ...Profiles screen has the following functions Select a Profile to Save or Load A profile is a saved set of settings To load a profile select the profile from the drop down list and select Load Note Whe...

Page 98: ...I read a barcode the data returned is not correct Reason Solution Ensure that the configurations are set up correctly so you are given the information you need For example to read a Code 32 barcode o...

Page 99: ...the tabs for UPC EAN 1 and UPC EAN 2 Make sure the settings are correct for your application 7 My Code 39 Full ASCII barcode will not scan Reason Solution On the 1D Code Type screen select Options the...

Page 100: ...96 Archer 2 Rugged Handheld Owner s Manual Sample 1D Barcodes Code 39 Code 128 UPC A...

Page 101: ...Chapter 9 Barcode Scanner 97 Sample 2D Barcodes Aztec Maxicode MicroPDF417 QR Code...

Page 102: ...98 Archer 2 Rugged Handheld Owner s Manual...

Page 103: ...A Storage Maintenance and Recycling...

Page 104: ...further drain on the battery Note Data and programs are secure as long as they have been saved even if the battery pack becomes discharged The handheld does not depend on the battery to store the data...

Page 105: ...to a microfiber cloth and gently wipe off the touchscreen CAUTION Do not use tissues paper towels soft bristle brushes or harsh cleaning solutions on the touchscreen 4 Rinse the touchscreen with wate...

Page 106: ...of a cleaner apply a small amount to a less visible location as a test If any visual change becomes apparent promptly rinse and wash with a known mild cleaning solution Recycling the Archer 2 and Batt...

Page 107: ...B Warranty and Repair Information...

Page 108: ...set up improperly or has been improperly installed or calibrated ii the product is operated in a manner that is not in accordance with the user documentation iii the product is used for a purpose othe...

Page 109: ...defect in materials or workmanship is discovered and reported to JS within the specified warranty period JS will at its option repair the defect or replace the defective part or product Replacement p...

Page 110: ...l Sale of Goods The courts of Utah shall have exclusive personal jurisdiction in case of any disputes arising out of or in connection with this warranty Services and Materials Provided Under Warranty...

Page 111: ...enter submit a repair order check repair status view terms and conditions get shipping instructions and view lead times Before returning a unit please get permission by submitting a repair order from...

Page 112: ...System Information to view the following menu Select System ID Specifications on the processor memory display camera Geo models GPS GNSS Geo models Bluetooth Wi Fi and cell modem optional accessory a...

Page 113: ...C Warnings and Regulatory Information...

Page 114: ...s specified Only use the battery with a charging system that has been qualified with the system per this standard Use of an unqualified battery or charger may present a risk of fire explosion leakage...

Page 115: ...47 CFR 15 19 a 3 the statements that follow must appear on the device or in the user documentation This device complies with Part 15 of the FCC Rules Operation of this equipment is subject to the foll...

Page 116: ...to the Rugged Handheld that are not expressly approved by the manufacturer could void the user s authority to operate the equipment Only approved accessories may be used with this equipment In general...

Page 117: ...ure requirements There cannot be any alteration to the authorized antenna system CE Marking European Union Products bearing the CE marking comply with the 2004 108 EC EMC Directive 1999 5 EC R TTE Dir...

Page 118: ...l that this radio may transmit in excess of 10mW in the band 2454 to 2483 5 MHz outdoor operation is restricted Restrictions apply to the operation of the 802 11b g radio in this device This equipment...

Page 119: ...activating the laser aimer and LEDs please read the section on software operation Laser Wavelength 650nm nominal Emission Repetitive Pulsed Pulse Energy 7uJ Pulse Width 9 mSec Pulse Rep Rate 55Hz nomi...

Page 120: ...116 Archer 2 Rugged Handheld Owner s Manual...

Page 121: ...D Specifications...

Page 122: ...5 wide x 7 25 long x 1 5 thick 91 mm x 184 mm x 38 mm Weight standard 1 3 lbs 590g Archer 2 Geo with battery 2 34 lbs 1061g Archer 2 Geo 3G with battery and cell modem 2 36 lbs 1070 g Durable hardene...

Page 123: ...software configuration USB Host Full A USB Client Micro B 12 24 VDC jack for power input and battery charging 12V DC 1 67A 3 5mm audio jack supports speaker microphone or stereo output pin detect Wir...

Page 124: ...d Standards IP68 rating waterproof and dustproof MIL STD810G standard for water humidity sand and dust vibration altitude shock low temperature high temperature temperature shock Warranties 24 months...

Page 125: ...512MB RAM 8GB Storage Geo with Standard features plus Camera and GPS GNSS Geo with Standard features plus Camera GPS GNSS and Cell Geo with Standard features plus Camera GPS GNSS and 1D 2D Barcode Sca...

Page 126: ...C VTG ZDA GPS 32 GNSS tracking channels GPS GNSS signal quality indicator on Juniper Home screen JSNav application 3G Data Modem GSM Cell models Integrated Cinterion PH8P module Pentaband Worldwide 80...

Page 127: ...RSS TLC 39 Data matrix QR code Micro QR code Aztec MaxiCode Postal codes etc Trigger Buttons Programmable Aiming Crosshair Pattern Visible with low light illumination Barcode Connector Utility Wedge a...

Page 128: ...5A Output 12VDC 1 67A Capacitive stylus and tether Screwdriver Quick Start Guide Owner s Manual available on our website Two year warranty Optional Accessories Shoulder strap Serial cable Vehicle cha...

Page 129: ...Index...

Page 130: ...6 Wireless Safety 79 A ActiveSync 43 Anatomy of the Rugged Handheld 2 Audio Features 27 Audio Jack 27 Microphone 27 Speaker 27 B Backlight 19 Barcode Connector Utility 85 Barcode Scanner 84 114 123 Ba...

Page 131: ...nits SIM Card Use in 80 Certifications and Standards 111 Cleaning 101 Communicating With a Computer 43 ActiveSync 43 Windows Mobile Device Center 43 Compass 59 Compass Calibration 41 59 67 Sensors Con...

Page 132: ...GPS GNSS 56 122 Accuracy 58 Bluetooth COM Port Set Up 49 Camera Geotagging Pictures 67 Gadgets 32 GPS Intermediate Driver 57 58 JSNav Application 59 Tracks 62 Waypoints 61 Settings 57 GPS Intermediat...

Page 133: ...uage Installs 7 Limitation of Liability 105 LTE Device 80 M Mega Keys 36 MEID 79 Microphone 27 119 Microsoft Windows Embedded Handheld 6 5 3 118 Modem Type Determining 76 N Navigating Around Your Arch...

Page 134: ...Card Installing 77 SIM card using with CDMA 80 Soft Keys Touchable Tiles 34 Software Developers 44 Speaker 28 119 Specifications 118 125 Start Menu 8 Storing the Rugged Handheld and Battery Pack 100 S...

Page 135: ...W Warnings 110 111 Warranty 104 107 Exclusions 104 Extended Warranties 106 Limitation of Liability 105 Remedy 105 Repairs 106 Services 106 Warranty Exclusions 104 Warranty Repairs 106 Waypoints 61 Wi...

Reviews: