background image

FULL 

BATTERY

NETWORK 

CELL

NETWORK 

WIFI

ADDING YOUR GOOGLE ACCOUNT

1.  Tap Settings app.
2.  Tap Users & Accounts and then tap 

Add Account.

3.  Tap Google on the Add an Account 

screen.

4.  Follow the instructions to setup your 

Google Account. 

ACCESSING APPLICATIONS

1.  Press the Home button.
2.  Swipe up from the bottom of the 

Home screen.

3.  The Apps screen shows all 

applications installed on your device.

4.  Press and drag the icon for any 

application to create a shortcut on 
the Home screen.

5.  Tap Play Store to find and install new 

applications. 

ACCESSING WIDGETS

1.  Press the Home button.
2.  Press and hold a blank spot on the 

Home screen.

3.  Icons for Wallpapers, Widgets, and 

Settings are shown at the bottom of 
the screen.

4.  Tap Widgets.
5.  Press and hold the icon for any 

widget to install it on the Home 
screen.

INDICATORS

CONNECT TO Wi-Fi (WIRELESS LAN)

1.  Swipe down from the top of the 

screen.

2.  Press and hold the Wi-Fi icon.
3.  Tap OFF on the Wi-Fi line to turn Wi-

Fi on. The Wi-Fi indicator will appear 

at the top of the screen and Wi-Fi will 
show ON.

4.  Tap on the network you want to 

access.


CAUTION: For best performance 

only use the supplied USB Charger and 
Cable. DO NOT USE THE USB PORT IF 
IT IS WET.  Make sure to dry out the port 
completely before connecting to power.  
Failure to do so will void the warranty.

INSTALLING A SIM CARD OR SD CARD

1.  With the unit powered on, press 

and hold the power button until the 
Power Off option  
 appears on the screen.

2.  Tap Power Off. Allow the device to 

power off.

3.  Unlock and remove the battery door 

to access the SIM by sliding the 4 
locking spots to the symbol 

  unlock slots.
4.  Remove battery by sliding the 

battery lock to the left.

5.  Orient the SIM card so the contacts 

are facing away from you.

6.  Gently push the SIM card into the slot. 

The right SIM slot is the primary SIM.


CAUTION: Do not force the card into 

the slot as it may damage the device. If 
the card does not install properly, check 
the orientation and try again.

7.  To remove the SIM card, gently press 

in the card and release. It is spring 
loaded.

8.  The microSD card slot is located on 

the left side of the compartment and 
can be inserted by  
 orienting the card with connectors 
down and away from you.


NOTE:


The CT8X2 only accepts 

microSD cards.

29949-00_CT8X2_Manual.indd   4

29949-00_CT8X2_Manual.indd   4

12/17/20   2:14 PM

12/17/20   2:14 PM

Summary of Contents for cedar CT8X2

Page 1: ...USER S MANUAL 29949 00_CT8X2_Manual indd 1 29949 00_CT8X2_Manual indd 1 12 17 20 2 14 PM 12 17 20 2 14 PM ...

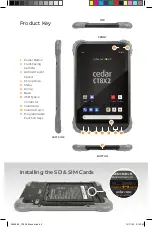
Page 2: ...ome 7 Back 8 USB Type C Connector 9 Volume Up 10 Volume Down 11 Programmable Function Keys LEFT SIDE FRONT TOP BOTTOM 4 2 8 9 10 Installing the SD SIM Cards Product Key 3 6 5 7 1 UNLOCK LOCK 11 29949 00_CT8X2_Manual indd 2 29949 00_CT8X2_Manual indd 2 12 17 20 2 14 PM 12 17 20 2 14 PM ...

Page 3: ...r 16 Battery Door Locks 17 Expansion Pod Attachment 18 External GNSS Antenna 19 Battery Door BACK RIGHT SIDE 13 12 14 14 16 16 17 18 19 15 14 14 16 16 Nano SIM 2 Micro SD Nano SIM 1 29949 00_CT8X2_Manual indd 3 29949 00_CT8X2_Manual indd 3 12 17 20 2 14 PM 12 17 20 2 14 PM ...

Page 4: ...you want to access CAUTION For best performance only use the supplied USB Charger and Cable DO NOT USE THE USB PORT IF IT IS WET Make sure to dry out the port completely before connecting to power Failure to do so will void the warranty INSTALLING A SIM CARD OR SD CARD 1 With the unit powered on press and hold the power button until the Power Off option appears on the screen 2 Tap Power Off Allow ...

Page 5: ...couraged to try to correct the interference by one or more of the following measures Reorient or relocate the receiving antenna Increase the separation between the equipment and receiver Connect the equipment to an outlet on a circuit different from that to which the receiver is connected Consult the dealer or an experienced radio TV technician for help IMPORTANT Changes or modifications to this p...

Page 6: ...R 1 YEAR WARRANTY Juniper Systems Inc Juniper warrants that the Cedar brand products shall be free from defects in materials and workmanship under normal intended use for a period of ONE YEAR from date of purchase excepting that this warranty shall not apply to battery packs media containing software or any accessories Juniper warrants the following shall be free from defects in materials and work...

Page 7: ...by law Juniper s obligation shall be limited to the repair or replacement of the product Juniper shall in no event be liable for special incidental consequential indirect special or punitive damages of any kind or for loss of revenue or profits loss of business loss of information or data or other financial loss arising out of or in connection with the sale installation maintenance use performance...

Page 8: ...Google Play YouTube and other marks are trademarks of Google LLC The Android robot is reproduced or modified from work created and shared by Google and used according to terms described in the Creative Commons 3 0 Attribution License JSPN 29949 Qualcomm Snapdragon SDM632 Octa core 4 GB RAM 64GB ROM Front 8 MP Rear 13 MP GPS GLONASS BDS Galileo 8000 mAh Removable Battery IP67 Certified Dust Water P...

Reviews: