Preparing for Router Installation
Chassis Grounding
To meet safety and electromagnetic interference (EMI) requirements and to
ensure proper operation, the router must be adequately grounded before power
is connected. A pair of threaded inserts (PEM nuts) are provided on the right
rear of the chassis for connecting the router to earth ground.
CAUTION:
Before router installation begins, a licensed electrician must attach a
cable lug to the grounding and power cables that you supply. A cable with an
incorrectly attached lug can damage the router (for example, by causing a short
circuit).
To ground the router, connect a grounding cable to earth ground and then
attach it to the chassis grounding points. The grounding points are spaced at
0.625-in. (15.86-mm) centers. The accessory box shipped with the router
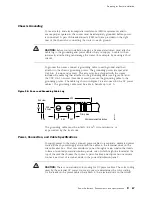
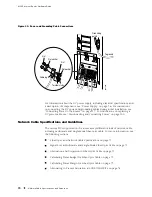
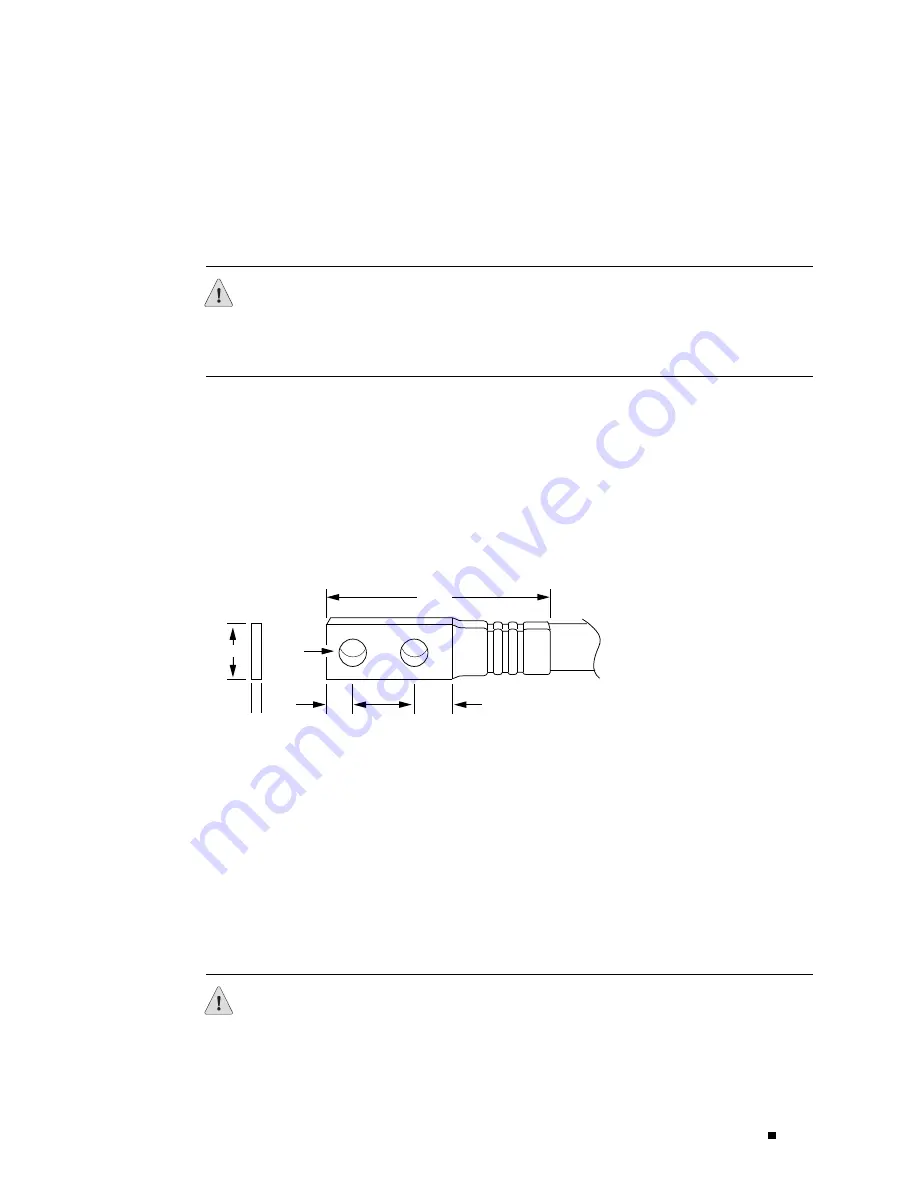
includes the cable lug that attaches to the grounding cable (see Figure 28) and
the UNC 1/4–20 screws (American) used to secure the grounding cable to the
grounding points. (The cable lug shown in Figure 28 is also used for the DC power
cables.) The grounding cable must be able to handle up to 82 A.
Figure 28: Power and Grounding Cable Lug
Crimp area
All measurements in inches
0.28
2 holes
2.25
0.25
0.37
0.63
g002137
0.55
End view
0.08
The grounding cable must be 8-AWG (8.4 m2) wire, minimum, or
as permitted by the local code.
Power, Connection, and Cable Specifications
To supply power to the router, connect power cables to a separate, dedicated power
source for each power supply and attach the cables to the terminal studs on the
circuit breaker box. Most sites distribute power through a main conduit that leads
to frame-mounted power distribution panels, one of which might be located at the
top of the rack that houses the router. A pair of cables (one input and one return)
connects each set of terminal studs to the power distribution panel.
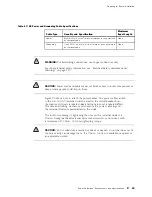
CAUTION:
There is no standard color coding for DC power cables. The color coding
used by the external DC power source at your site determines the color coding
for the leads on the power cables that attach to the terminal studs on the circuit
Power Guidelines, Requirements, and Specifications
67
Summary of Contents for Internet Router M160
Page 12: ...M160 Internet Router Hardware Guide xii Table of Contents ...
Page 16: ...M160 Internet Router Hardware Guide xvi List of Figures ...
Page 18: ...M160 Internet Router Hardware Guide xviii List of Tables ...
Page 24: ...M160 Internet Router Hardware Guide xxiv Requesting Support ...
Page 26: ...2 Product Overview ...
Page 30: ...M160 Internet Router Hardware Guide 6 Safety Requirements Warnings and Guidelines ...
Page 66: ...M160 Internet Router Hardware Guide 42 Cable Management System ...
Page 80: ...M160 Internet Router Hardware Guide 56 Routing Engine Architecture ...
Page 82: ...58 Initial Installation ...
Page 104: ...M160 Internet Router Hardware Guide 80 Unpacking the Router ...
Page 148: ...M160 Internet Router Hardware Guide 124 Configuring the JUNOS Internet Software ...
Page 150: ...126 Hardware Maintenance Replacement and Troubleshooting Procedures ...
Page 242: ...M160 Internet Router Hardware Guide 218 Troubleshooting the Power System ...
Page 244: ...220 Appendixes ...
Page 292: ...M160 Internet Router Hardware Guide 268 Packing Components for Shipment ...
Page 301: ...Part 5 Index Index 277 ...
Page 302: ...278 Index ...

