


J4300 and J6300 Services Router PIM Installation Instructions
Tools and Parts Required
To replace a component, you need the following tools and parts:
Electrostatic bag or antistatic mat
Electrostatic discharge (ESD) grounding wrist strap
Phillips (+) screwdriver, number 2
Replacing a PIM
Physical Interface Modules (PIMs) in J4300 and J6300 Services Routers are field
replaceable. The router must be powered off before the PIMs are removed or
installed. This section contains the following topics:
“Removing a PIM” on page 2
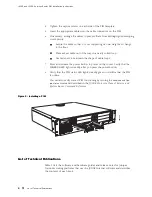
“Installing a PIM” on page 3
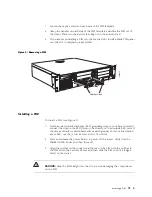
Removing a PIM
The PIMs are installed in the front of the Services Router. A PIM
weighs less than 1 lb (0.5 kg).
To remove a PIM (see Figure 1):
1.
Place an electrostatic bag or antistatic mat on a flat, stable surface to receive
the PIM.
2.
Attach an electrostatic discharge (ESD) grounding strap to your bare wrist and
connect the strap to the ESD point on the chassis, or to an outside ESD point if
the Services Router is disconnected from earth ground. For more information
about ESD, see the
J-series Services Router User Guide
.
3.
Press and release the power button to power off the router. Verify that the
POWER ON
LED blinks and then turns off.
4.
Label the cables connected to the PIM so that you can later reconnect each
cable to the correct PIM.
5.
Disconnect the cables from the PIM.
6.
If necessary, arrange the cables to prevent them from dislodging or developing
stress points:
Secure the cable so that it is not supporting its own weight as it hangs
to the floor.
Place excess cable out of the way in a neatly coiled loop.
Use fasteners to maintain the shape of cable loops.
2
Removing a PIM


