Replacing and Troubleshooting Hardware Components
power supplies are fully redundant. If one power supply fails or is removed, the
remaining power supply instantly assumes the entire electrical load. One power
supply can provide full power for as long as the router is operational.
Each J6350 power supply is hot-insertable and hot-removable.
CAUTION:
Do not leave a power supply slot empty for more than a short time while
the Services Router is operational. The power supply or a blank power supply panel
must remain in the chassis for proper airflow.
To replace power system components, use the following procedures:
Replacing an AC Power Supply Cord on page 159
Removing an AC Power Supply from a J6350 Router on page 160
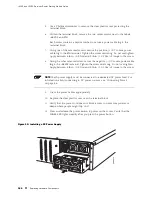
Installing an AC Power Supply in a J6350 Router on page 161
Replacing a DC Power Supply Cable on page 162
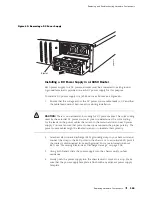
Removing a DC Power Supply from a J6350 Router on page 163
Installing a DC Power Supply in a J6350 Router on page 165
Replacing an AC Power Supply Cord
To replace the AC power cord for a redundant power supply:
1.
Locate a replacement power cord with the type of plug appropriate for
your geographical location (see “AC Power, Connection, and Power Cord
Specifications” on page 76).
2.
Attach an electrostatic discharge (ESD) grounding strap to your bare wrist and
connect the strap to the ESD point on the chassis, or to an outside ESD point if
the router is disconnected from earth ground. For more information about
ESD, see “Preventing Electrostatic Discharge Damage” on page 205.
3.
Press and release the power button to power off the router. Wait for the
POWER
LED to turn off.
NOTE:
If the power supply is a redundant power supply in a J6350 Services Router,
you can leave the router powered on and power flowing in the alternate power
supply.
4.
Unplug the power cord from the power source receptacle.
5.
Unplug the power cord from the appliance inlet on the power supply faceplate.
Replacing Hardware Components
159
Summary of Contents for J4350
Page 14: ...J4350 and J6350 Services Router Getting Started Guide xiv Table of Contents...
Page 22: ...2 J series Overview...
Page 68: ...J4350 and J6350 Services Router Getting Started Guide 48 Field Replaceable PIMs...
Page 75: ...Services Router User Interface Overview Figure 25 J Web Layout Using the J Web Interface 55...
Page 88: ...J4350 and J6350 Services Router Getting Started Guide 68 Using the Command Line Interface...
Page 90: ...70 Installing a Services Router...
Page 100: ...J4350 and J6350 Services Router Getting Started Guide 80 Site Preparation Checklist...
Page 112: ...J4350 and J6350 Services Router Getting Started Guide 92 Powering a Services Router On and Off...
Page 144: ...J4350 and J6350 Services Router Getting Started Guide 124 Verifying Secure Web Access...
Page 162: ...142 Maintaining Services Router Hardware...
Page 194: ...J4350 and J6350 Services Router Getting Started Guide 174 Troubleshooting Hardware Components...
Page 204: ...184 J series Requirements and Specifications...
Page 220: ...J4350 and J6350 Services Router Getting Started Guide 200 ISDN RJ 45 Connector Pinout...
Page 267: ...Part 5 Index Index 247...
Page 268: ...248 Index...


