Getting Started Guide
CONNECTING THE DEVICE
Using the instructions below, connect the NetScreen-5GT Wireless device and prepare
to configure the device to protect your network. Use the LEDs on the front panel of the
device to help you determine the device status.
Step 1
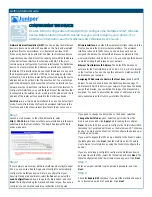
Connect an Ethernet cable from the Untrusted port of the
NetScreen-5GT Wireless device to the external router or cable or
DSL modem.
Step 2
Note:
You can only access the Initial Configuration Wizard (ICW)
through one of the Trusted Ethernet interfaces.
•
If the workstation is in a LAN (see diagram), connect an
Ethernet cable from the Trusted port to the internal switch or
hub.
•
If the workstation is a single workstation, connect an Ethernet
cable from the Trusted port directly to the Ethernet port on the
workstation. Juniper Networks recommends this connection
method.
Step 3
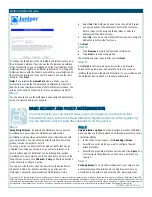
Connect the power cable between the NetScreen device and a
power source. Juniper Networks recommends using a surge
protector.
a.
Ensure that the Power LED glows green. This indicates the
device is receiving power.
b.
After the device starts (over 30 seconds), ensure that the Status
LED blinks green. This indicates the device is operating
normally.
c.
Ensure that the Link Activity LEDs glow green for the connected
interfaces. This indicates the device has network connectivity.
Step 4
Configure the workstation to access the NetScreen device via a web
browser:
a.
Ensure that your workstation is properly connected to your LAN
(see diagram).
b.
Change the TCP/IP settings of your workstation to
automatically, via DHCP, obtain its IP address from the
NetScreen device. For help, see the operating system
documentation for your workstation.
Note:
Ensure that your internal network does not already have a
DHCP server.
c.
If necessary, restart your workstation to enable the changes to
take effect.
Getting Started
Use the instructions in this guide to help you connect and configure your NetScreen-5GT Wireless
device. For additional configuration information, see the
NetScreen-5GT Wireless User’s Guide
and
the
NetScreen
Wireless Reference Guide
.
3a
3b
1
2
Internet
External Router,
Switch, or Hub
LAN
The numbers on the diagram are paired with the
steps below.
Hub/Switch
wireless2
wireless1
Trust Zone
Wzone1 Zone
3c
2
Juniper Networks
NetScreen-5GT Wireless


