3.
Switch the circuit breaker on the power supply faceplate to the
OFF
position
O
.
4.
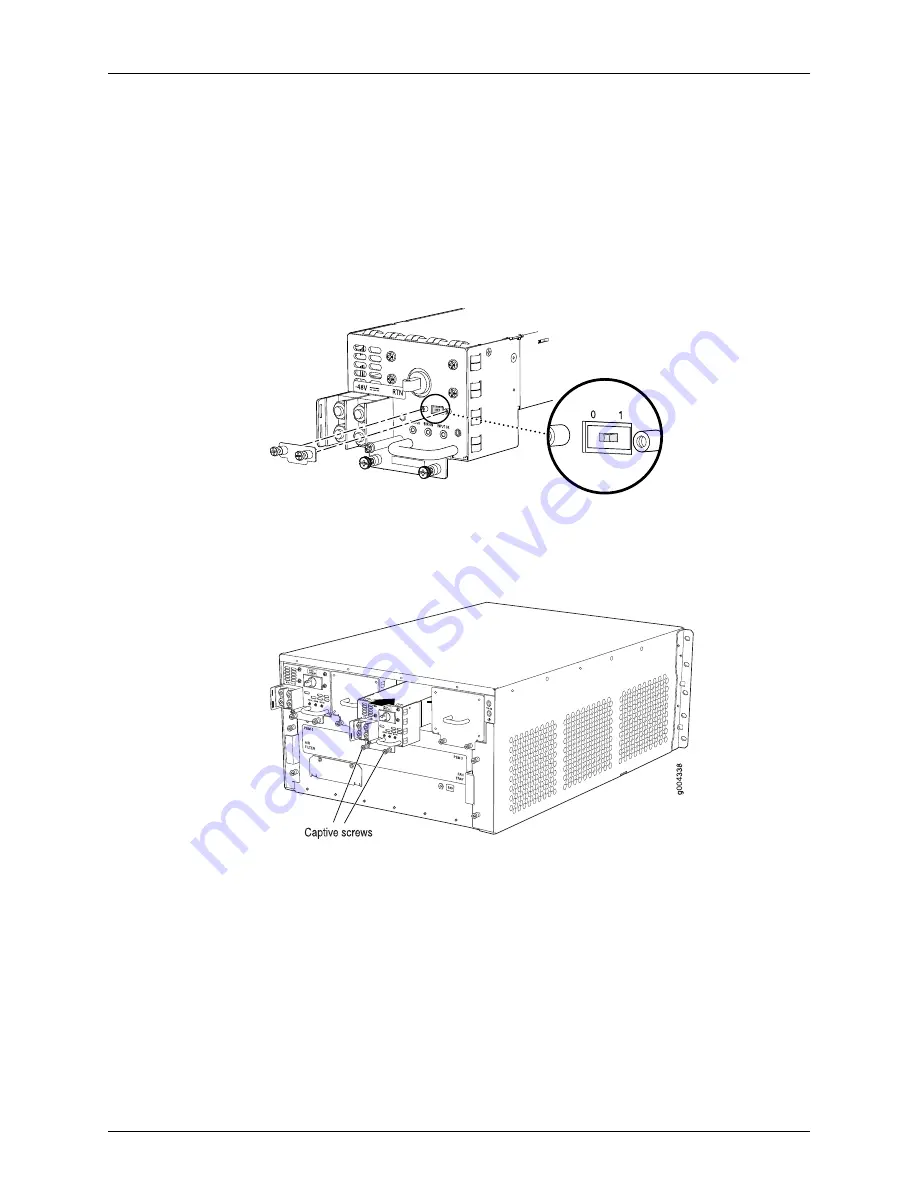
For a DC power supply, check the setting of the input mode switch. Use a sharp,
nonconductive object to slide the switch to the desired position. Set the input mode
switch to position
0
for 60-A input or position
1
for 70-A input. This setting is used by
the power management software and must be set on the power supply. See
.
Figure 73: DC Power Supply Input Mode Switch
g004725
5.
Using both hands, slide the power supply straight into the chassis until the power
supply is fully seated in the chassis slot. The power supply faceplate should be flush
with any adjacent power supply faceplate (see
Figure 74: Installing a DC Power Supply
6.
Tighten the captive screws on the lower edge of the power supply faceplate.
7.
Remove the clear plastic cover protecting the terminal studs on the faceplate.
8.
Remove the nuts and washers from the terminal studs.
9.
Secure each power cable lug to the terminal studs, first with the washer, then with
the nut. Apply between 23 lb-in. (2.6 Nm) and 25 lb-in. (2.8 Nm) of torque to each
nut. (see
).
a.
Attach the positive (+) DC source power cable lug to the
RTN
(return) terminal.
b.
Attach the negative (–) DC source power cable lug to the
–48V
(input) terminal.
159
Copyright © 2017, Juniper Networks, Inc.
Chapter 19: Installing Additional Components
Summary of Contents for SRX5400
Page 12: ...Copyright 2017 Juniper Networks Inc xii SRX5400 Services Gateway Hardware Guide ...
Page 20: ...Copyright 2017 Juniper Networks Inc xx SRX5400 Services Gateway Hardware Guide ...
Page 26: ...Copyright 2017 Juniper Networks Inc xxvi SRX5400 Services Gateway Hardware Guide ...
Page 28: ...Copyright 2017 Juniper Networks Inc 2 SRX5400 Services Gateway Hardware Guide ...
Page 52: ...Copyright 2017 Juniper Networks Inc 26 SRX5400 Services Gateway Hardware Guide ...
Page 114: ...Copyright 2017 Juniper Networks Inc 88 SRX5400 Services Gateway Hardware Guide ...
Page 132: ...Copyright 2017 Juniper Networks Inc 106 SRX5400 Services Gateway Hardware Guide ...
Page 136: ...Copyright 2017 Juniper Networks Inc 110 SRX5400 Services Gateway Hardware Guide ...
Page 146: ...Copyright 2017 Juniper Networks Inc 120 SRX5400 Services Gateway Hardware Guide ...
Page 156: ...Copyright 2017 Juniper Networks Inc 130 SRX5400 Services Gateway Hardware Guide ...
Page 168: ...Copyright 2017 Juniper Networks Inc 142 SRX5400 Services Gateway Hardware Guide ...
Page 172: ...Copyright 2017 Juniper Networks Inc 146 SRX5400 Services Gateway Hardware Guide ...
Page 208: ...Copyright 2017 Juniper Networks Inc 182 SRX5400 Services Gateway Hardware Guide ...
Page 224: ...Copyright 2017 Juniper Networks Inc 198 SRX5400 Services Gateway Hardware Guide ...
Page 234: ...Copyright 2017 Juniper Networks Inc 208 SRX5400 Services Gateway Hardware Guide ...
Page 236: ...Copyright 2017 Juniper Networks Inc 210 SRX5400 Services Gateway Hardware Guide ...
Page 268: ...Copyright 2017 Juniper Networks Inc 242 SRX5400 Services Gateway Hardware Guide ...
Page 270: ...Copyright 2017 Juniper Networks Inc 244 SRX5400 Services Gateway Hardware Guide ...
Page 274: ...Copyright 2017 Juniper Networks Inc 248 SRX5400 Services Gateway Hardware Guide ...
Page 284: ...Copyright 2017 Juniper Networks Inc 258 SRX5400 Services Gateway Hardware Guide ...
Page 296: ...Copyright 2017 Juniper Networks Inc 270 SRX5400 Services Gateway Hardware Guide ...
Page 344: ...Copyright 2017 Juniper Networks Inc 318 SRX5400 Services Gateway Hardware Guide ...
Page 352: ...Copyright 2017 Juniper Networks Inc 326 SRX5400 Services Gateway Hardware Guide ...
Page 360: ...Copyright 2017 Juniper Networks Inc 334 SRX5400 Services Gateway Hardware Guide ...
Page 366: ...Copyright 2017 Juniper Networks Inc 340 SRX5400 Services Gateway Hardware Guide ...
Page 394: ...Copyright 2017 Juniper Networks Inc 368 SRX5400 Services Gateway Hardware Guide ...


