background image

electrolux 21

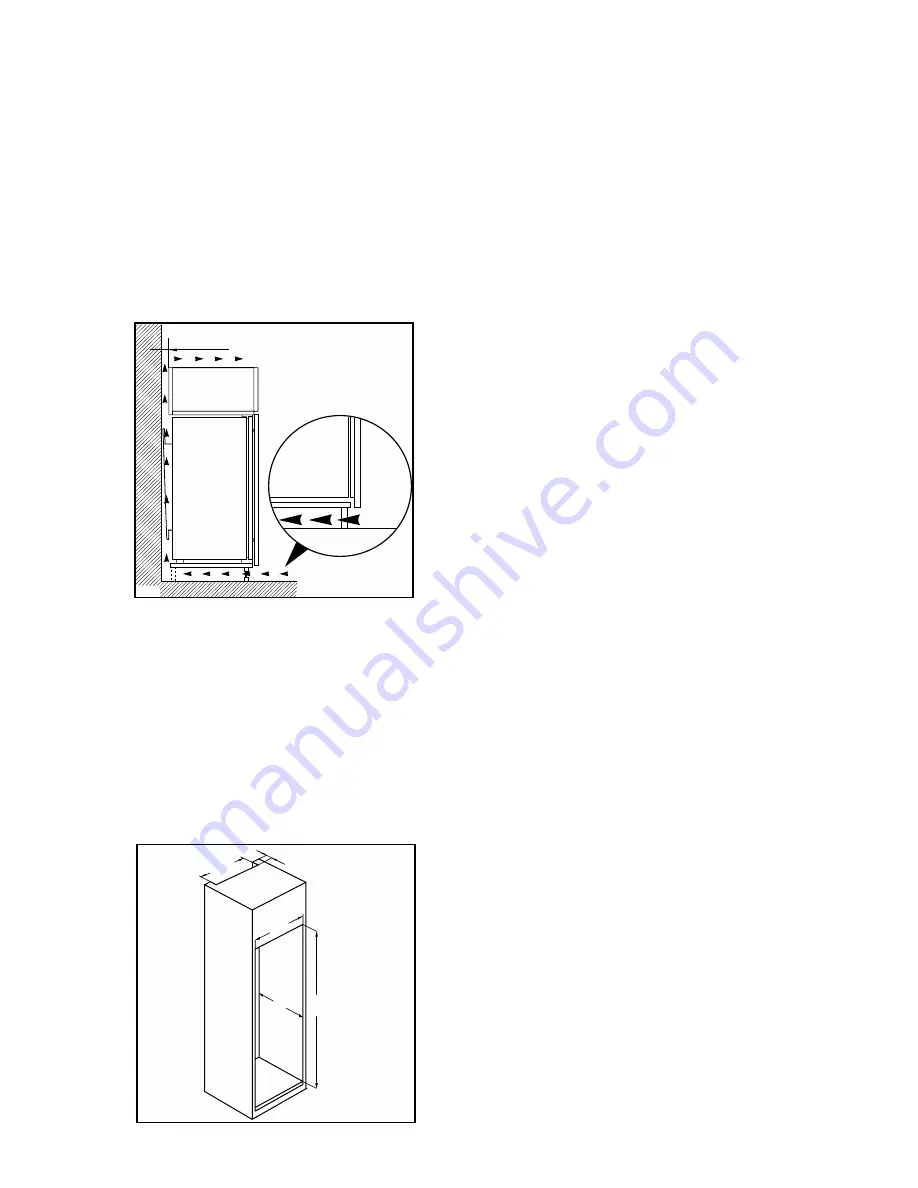
Nischenmaße

Höhe 1780 

mm

Tiefe 550 

mm

Breite 560 

mm

Aus Gründen der Sicherheit muß eine
Mindestbelüftung gesichert sein, wie
aus der Abb.hervorgeht.

Achtung: D

Die V

Ventilations - Ö

Öffnungen

müssen iimmer ssaubergehalten
werden.
Ferner ist auch am hinteren
Einbauschrankteil ein Lüftungskamin
mit filgenden Massen notwendig:

Tiefe

50 mm

Breite

540 mm

50 mm

min.

200 cm

2

200 cm

2

min.

D567

PR01

540

50

3

2 1

Summary of Contents for JCG 94185

Page 1: ...G Ge eb br ra au uc ch hs sa an nw we eiis su un ng g I In ns st tr ru uc ct tiio on n b bo oo ok k JCG 94185 Kühl Gefriergerät fridge freezer ...

Page 2: ......

Page 3: ...ben eine breite Vielfalt von Qualitätsprodukten anzubieten die helfen Ihr Leben etwas komfortabler zu machen Sie finden einige Beispiele auf der vorletzten Seite in diesem Heft Bitte nehmen Sie sich einige Minuten diese Benutzerinformation zu lesen um voll von den Vorteilen Ihres neuen Gerätes profitieren zu können Wir sind sicher dass wird Ihr Leben zukünftig etwas leichter machen Wir wünschen ei...

Page 4: ...des Gerätes gekennzeichnet Das Symbol auf dem Produkt oder seiner Verpackung weist darauf hin dass dieses Produkt nicht als normaler Haushaltsabfall zu behandeln ist sondern an einem Sammelpunkt für das Recycling von elektrischen und elektronischen Geräten abgegeben werden muss Durch Ihren Beitrag zum korrekten Entsorgen dieses Produkts schützen Sie die Umwelt und die Gesundheit Ihrer Mitmenschen ...

Page 5: ...enungsblende G Gefrierraum 12 Tasten zur Temperatureinstellung 13 Temperaturanzeige 13 Super Frost Taste 13 Taste ALARM AUS 14 Inbetriebnahme und Temperaturregelung 14 Einfrieren von frischen Lebensmitteln 15 Aufbewahrung der Tiefkühlkost 15 Eiswürfelbereitung 15 Auftauen 15 Kälteakku 15 Tips 16 Tips für das Kühlen 16 Tips für das Einfrieren 16 Tips für Tiefkühlkost 17 Gefrierkalender 17 Wartung 1...

Page 6: ...wenden Es ist gefährlich die Eigenschaften dieses Gerätes zu ändern Vor der inneren bzw äußeren Reinigung des Gerätes sowie beim Auswechseln der Glühlampe bei damit ausgestatteten Geräten das Gerät spannungslos machen Eis aus dem Gefrier bzw Frosterfach nicht sofort essen es könnte Kälte Brandwunden verursachen Dieses Gerät ist schwer Beim Versetzen bitte darauf achten B Beachten S Sie d dan w wäh...

Page 7: ... N 10 C bis 32 C Klasse SN die Geräteklasse ist auf dem Typschild angegeben Zu beachten Wird dieses Gerätes bei anderen Umgebungstemperaturen betrieben als den in der entsprechenden Klimaklasse angegebenen Werten sind folgende Hinweise zu beachten sinkt die Umgebungstemperatur unter den angegebenen Mindestwert ab könnte die Lagertemperatur im Gefrierabteil nicht mehr garantiert sein es wird daher ...

Page 8: ...rursachen Achten Sie auf die Installationsanweisungen Teile die heiß werden z B Kompressorgehäuse Verflüssiger und zugehörige Rohre sollen nicht frei zugänglich sein Wo es auch immer möglich ist soll das Gerät mit der Rückseite gegen eine Wand gestellt werden Umweltnormen Dieses G Gerät e enthält iim Kühlkreislauf u und iin d der I Isolierung k kein ozonschädigendes G Gas D Das G Gerät darf n nich...

Page 9: ...könnten D Temperaturanzeige E Taste zur Temperatureinstellung kälter F Schnellkühlenanzeige gelb G Schnellkühlen Taste Tasten zur Temperatureinstellung Die Temperatur im Kühlraum kann zwischen 2 C und 8 C gewählt werden Durch Druck auf eine der Tasten zur Temperatur einstellung C oder E wird die Temperaturanzeige vom Anzeigemodus Temperaturanzeige leuchtet auf den Eingabemodus Temperaturanzeige bl...

Page 10: ...on ein Die gelbe Anzeige F leuchtet Die Kühltemperatur sinkt auf 2 C ab Die Schnellkühlen Funktion schaltet sich nach 6 Stunden automatisch ab Inbetriebnahme und Temperaturregelung Netzstecker in die Steckdose stecken EIN AUS Taste B drücken Die grüne Lampe A leuchtet auf Der Kühlschrank ist auf die eine Kühlraumtemperatur von 5 C eingestellt Diese Temperatur wird erst nach ein paar Stunden erreic...

Page 11: ...schen den verschiedenen Abstellregalen kann je nach Wunsch geändert werden Dazu die Regale herausnehmen und auf das gewünschte Niveau einsetzen Zum besseren Raumnutzung können die vorderen Halbteile auf die rückwärtigen hinaufgelegt werden Feuchteregulierung Vor der Abstellfläche über den Obst und Gemüseschalen befindet sich bei einigen Modellen ein verstellbares Lüftungsgitter Die Öffnung der Lüf...

Page 12: ...enweise in Pfeilrichtung drücken bis es frei wird dann in der gewünschten Höhe wieder anbringen P R X X X Bedienungsblende Gefrierraum H I J K L M N O P H Netzkontrollanzeige grün I Geräte EIN AUS Taste J Taste zur Temperatureinstellung wärmer K Temperaturanzeige L Taste zur Temperatureinstellung kälter M Anzeige für eingeschaltete Super Frost Funktion gelb N Super Frost Taste O Alarmanzeige rot P...

Page 13: ...icht werden Achtung Bei Inbetriebnahme des Geräts stimmt während der Einlauf und Stabilisierungs Phase die Temperaturanzeige nicht mit der gewählten Temperatur überein In dieser Zeit sind auch niedrigere Anzeigen als der gewählte Wert möglich Temperaturanzeige Im Normalbetrieb wird im Display die Temperatur an der wärmsten Stelle des Gefrierraumes angezeigt Achtung Zu häufiges Öffnen oder zu lange...

Page 14: ... Mengen frischer Lebensmittel Einlagerung von maximaler Menge frischer Lebensmittel s Typschild bei Einlagerung von bereits gefrorener Ware bei Einlagerung von bis zu 2kg frischer Lebensmittel pro Tag Inbetriebnahme und Temperaturregelung Netzstecker in die Steckdose stecken EIN AUS Taste I drücken Das Gerät ist im Betrieb Die grüne Lampe H leuchtet auf Der Gefrierschrank ist auf die eine Gefrierr...

Page 15: ...irbt n nicht w wenn e es s sich u um e eine kurze U Unterbrechung h handelt bis 6 6 8 8 Std u und d das G Gerät v voll iist W Wenn d das nicht d der F Fall iist iist e es n nötig d die tiefgefrorenen L Lebensmittel iinnerhalb kurzer Z Zeit z zu v verbrauchen eine Temperaturerhöhung d der T Tiefkühlkost verkürzt d die A Aufbewahrungsdauer Eiswürfelbereitung Das Gerät hat eine oder mehrere Eiswürfel...

Page 16: ...ank gegeben w werden Tips für das Einfrieren Für ein einwandfreies Einfrieren der Lebensmittel geben wir folgende Ratschläge Das Gefriervermögen des Gefrierabteils in 24 Std kann auf dem Typenschild abgelesen werden Der Gefriervorgang dauert ca 24 Stunden In dieser Zeit sollte keine zusätzliche Ware in das Gefrierabteil eingelegt werden Die Nahrungsmittel vor dem Einfrieren in kleine Portionen ein...

Page 17: ...ere oder der untere Wert der angegebenen Lagerzeiten gültig ist hängt von der Qualität der Lebensmittel und deren Vorbehandlung vor dem Einfrieren ab WARTUNG Vor jjeder R Reinigungsarbeit immer d den N Netzstecker a aus der S Steckdose z ziehen Achtung Dieses Gerät enthält im Kältekreislauf Kohlen wasserstoff Aus diesem Grund darf die Wartung und das Nachfüllen aussschließlich von autorisiertem Fa...

Page 18: ... im Gefrierfach bildende Reifschicht soll sobald diese eine Stärke von 4 mm erreicht hat mit dem mitgelieferten Plastikschaber abgekratzt werden Während dieses Vorganges ist es nicht nötig das Gerät auszuschalten und die Nahrungsmittel herauszunehmen Wenn sich jedoch eine dicke Eisschicht bildet muß man vollkommen abtauen Um ein D037 Stillstandszeiten Bei längerem Stillstand des Gerätes müssen Sie...

Page 19: ...nelleren Abtauprozeß m mit A Ausnahme d der v vom Hersteller e empfohlenen Ein T Temperaturanstieg d der T Tiefkühlkost während d des A Abtauens k könnte d die Aufbewahrungsdauer v verkürzen STORUNGEN Falls das Gerät Störungen aufweisen sollte überprüfen Sie zuerst folgendes Steckt der Netzstecker in der Steckdose Befindet sich der Hauptschalter der elektrischen Anlage in der richtigen Stellung Is...

Page 20: ... Raumtemperaturen Für den Einbau bitte den entsprechenden Abschnitt durchlesen Elektrischer Anschluß Bevor Sie den Stecker in die Steckdose einstecken überprüfen Sie bitte daß die auf dem Typenschild des Gerätes angegebene Spannung sowie Frequenz mit dem Anschlußwert des Hauses übereinstimmen Eine Abweichung von 6 von der Nominalspannung ist zulässig Für die Anpassung des Gerätes an andere Spannun...

Page 21: ...destbelüftung gesichert sein wie aus der Abb hervorgeht Achtung D Die V Ventilations Ö Öffnungen müssen iimmer s saubergehalten werden Ferner ist auch am hinteren Einbauschrankteil ein Lüftungskamin mit filgenden Massen notwendig Tiefe 50 mm Breite 540 mm 50 mm min 200cm2 200cm 2 min D567 PR01 540 50 3 2 1 ...

Page 22: ...i Auftreten des Mangels in Deutschlandbetrieben wird und Garantieleistungen auch in Deutschland erbracht werden können Mängel müssen uns innerhalb von zwei 2 Monaten nach Kenntnis angezeigt werden 3 Mängel dieses Gerätes werden wir innerhalb angemessener Frist nach Mitteilung des Mangels unentgeltlichbeseitigen die zu diesem Zweck erforderlichen Aufwendungen insbesondere Transport Wege Arbeits und...

Page 23: ...ätegarantie gilt für denselben Zeitraum und in demselben Ausmaß für Arbeitszeit und Teile wie sie für dieses spezielle Modell oder diese spezielle Gerätereihe in Ihrem neuen Aufenthaltsland gelten Die Gerätegarantie ist personengebunden d h sie gilt für den Erstkäufer des Geräts und kann nicht auf einen anderen Benutzer übertragen werden Das Gerät wird in Übereinstimmung mit der von Electrolux her...

Page 24: ...land 353 1 40 90 753 Long Mile Road Dublin 12 Italia 39 0 434 558500 C so Lino Zanussi 26 33080 Porcia PN Latvija 37 17 84 59 34 Kr Barona iela 130 2 LV 1012 Riga Lietuva 370 5 2780609 Verki 29 LT 09108 Vilnius Luxembourg 35 2 42 43 13 01 Rue de Bitbourg 7 L 1273 Hamm Magyarország 36 1 252 1773 H 1142 Budapest XIV Erzsébet királyné útja 87 Nederland 31 17 24 68 300 Vennootsweg 1 2404 CG Alphen aan...

Page 25: ...re in the future Electrolux ambition is to offer a wide variety of quality products that would make your life even more comfortable You can look at some examples on the cover in this manual But now it s time to study this manual and start using and enjoying the benefits from your new machine We promise that it ll make your life a little easier Good luck ...

Page 26: ...waste Instead it shall be handed over to the applicable collection point for the recycling of electrical and electronic equipment By ensuring this product is disposed of correctly you will help prevent potential negative consequences for the environment and human health which could otherwise be caused by inappropriate waste handling of this product For more detailed information about recycling of ...

Page 27: ...ation 36 Freezing fresh food 36 Storage of frozen food 36 Cold accumulator 36 Thawing 36 Ice cube production 36 Hints 38 Hints for refrigeration 38 Hints for freezing 38 Hints for storage of frozen food 38 Freezing Calendar 39 Maintenance 3 39 Periodic cleaning 39 Periods of non operation 39 Interior light 39 Defrosting 40 Customer s service a and s spare p parts 4 41 Installation 41 Location 41 E...

Page 28: ... can cause frost burns if consumed straight from the appliance Take u utmost c care w when h handling your a appliance s so a as n not t to c cause any d damages t to t the c cooling u unit with c consequent p possible f fluid leakages The a appliance m must n not b be llocated close t to r radiators o or g gas c cookers Avoid p prolonged e exposure o of t the appliance t to d direct s sunlight Th...

Page 29: ...P INSTRUMENTS to scrape off frost or ice Frost may be removed by using the scraper provided Under no circumstances should solid ice be forced off the liner Solid ice should be allowed to thaw when defrosting the appliance Do not place carbonated or fizzy drinks in the freezer as it creates pressure on the container which may cause it to explode resulting in damage to the appliance Do not use a mec...

Page 30: ...be against a wall Environment Protection This a appliance d does n not c contain gasses w which c could d damage t the o ozone layer iin e either iits r refrigerant c circuit o or insulation m materials T The a appliance shall n not b be d discarded t together w with the u urban r refuse a and r rubbish A Avoid damaging t the c cooling u unit e especially at t the r rear n near t the h heat e exch...

Page 31: ...e the typical smell of a brand new product then dry thoroughly USE Do n not u use d detergents o or abrasive p powders a as t these w will damage t the f finish Use of the fridge Control Panel A B C D E F G A On OFF light B Fridge button ON OFF C Temperature setting button warmest D Temperature indicator E Temperature setting button coldest F Super cooling light G Super cooling button ...

Page 32: ...mpartment c can be s switched o off iindependently o of t the freezer c compartment A Light ON OFF B Button ON OFF ON Press the button B The pilot light A switches on OFF Keep pressed the button B until the pilot light A and the temperature indicator switches off C E Temperature setting buttons The temperature can be adjusted between 2 C and 8 C By pressing the button C or E the current temperatur...

Page 33: ...tioned as desired Moisture regulator On some models there is an adjustable air grille in front of the shelf above the fruit and vegetable compartments The opening in the ventilation slots can be adjusted with the slider Right slider Ventilation slots opened With the ventilation slots open more air circulation results in a lower air moisture content in the fruit and vegetable compartments Left slid...

Page 34: ...the shelf press and pull it out Slide the holder out and refit the shelf Positioning the door shelves To permit storage of food packages of various sizes the door shelves can be placed at different heights To make these adjustments proceed as follows Gradually pull the shelf in the direction of the arrows until it comes free then reposition as required P R X X X ...

Page 35: ... set a colder temperature press button L The indicator displays the newly selected temperature for a few seconds and then shows again the inside compartment temperature Attention During the stability period and when first starting the appliance the temperature displayed doesn not correspond to the setting temperature During this time it is possible that the temperature displayed is lower than the ...

Page 36: ... temperature has returned to normal the warning light O will continue to flash although the buzzer has stopped When the alarm button P is pressed the warmest temperature reached in the compartment flashes on the indicator K If the power has been off for a long time frozen food should be consumed as quickly as possible or cooked and then re frozen Operation Insert the plug in the power socket Press...

Page 37: ... storage period about 6 hrs before about 24 hrs before not needed not needed Introducing small quantities of fresh food about 5 kg Introducing the maximum quantity of food see rating plate Introducing frozen food Introducing small quantities of fresh food daily 2 kg maximum Cold accumulator The freezer contains two cold accumulators which increas storage times in the event of a power cut or breakd...

Page 38: ...should be added during this period prepare food in small portions to enable it to be rapidly and completely frozen and to make it possible subsequently to thaw only the quantity required wrap up the food in aluminium foil or polythene and make sure that the packages are airtight do not allow fresh unfrozen food to touch food which is already frozen thus avoiding a rise in temperature of the latter...

Page 39: ...and dry thoroughly Clean the condenser black grill and the compressor at the back of the appliance with a brush or a vacuum cleaner This operation will improve the performance of the appliance and save electricity consumption Periods of non operation When the appliance is not in use for long periods take the following precautions remove the plug from the wall socket remove all food defrost and cle...

Page 40: ...orten their s safe s storage llife Defrosting Frost is automatically eliminated from the evaporator of the refrigerator compartment every time the motor compressor stops during normal use The defrost water drains out through a trough into a special container at the back of the appliance over the motor compressor where it evaporates It iis iimportant t to p periodically c clean the d defrost w wate...

Page 41: ...terference suppression 73 23 E EEC of 19 2 73 Low Voltage Directive and subsequent modifications 89 336 E EEC of 3 5 89 Electromagnetic Compatibility Directive and subsequent modifications ATTENTION It must be possible to disconnect the appliance from the mains power supply the plug must therefore be easily accessible after installation CUSTOMER SERVICE AND SPARE PARTS If the appliance is not func...

Page 42: ...ons minimum ventilation must be as shown in Fig Attention k keep v ventilation o openings clear o of o obstruction It is necessary that the niche is provided with a ventilation conduct having the following dimensions Depth 50 mm Width 540 mm PR01 540 50 3 2 1 50 mm min 200cm2 200cm 2 min D567 ...

Page 43: ... issued by the seller of the appliance The appliance guarantee is for the same period and to the same extent for labour and parts as exists in your new country of residence for this particular model or range of appliances The appliance guarantee is personal to the original purchaser of the appliance and cannot be transferred to another user The appliance is installed and used in accordance with in...

Page 44: ...land 353 1 40 90 753 Long Mile Road Dublin 12 Italia 39 0 434 558500 C so Lino Zanussi 26 33080 Porcia PN Latvija 37 17 84 59 34 Kr Barona iela 130 2 LV 1012 Riga Lietuva 370 5 2780609 Verki 29 LT 09108 Vilnius Luxembourg 35 2 42 43 13 01 Rue de Bitbourg 7 L 1273 Hamm Magyarország 36 1 252 1773 H 1142 Budapest XIV Erzsébet királyné útja 87 Nederland 31 17 24 68 300 Vennootsweg 1 2404 CG Alphen aan...

Page 45: ......

Page 46: ......

Page 47: ......

Page 48: ...2223 408 51 00 06072007 w ww ww w e elle ec ct tr ro ollu ux x c co om m www juno e electrolux de ...

Reviews: