background image

Door reversibility

Please refer to the separate document

with instructions on installation and door

reversal.

CAUTION! At every stage of

reversing the door protect the

floor from scratching with a

durable material.

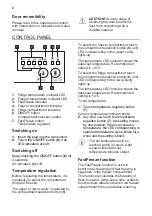
CONTROL PANEL

1

2

4

3

2

5

2

4

2

3

2

1

7

6

1. Fridge temperature indicator LED

2. Freezer temperature indicator LED

3. FastFreeze indicator

4. Freezer compartment indicator

5. Fridge compartment indicator

6. ON/OFF button

Compartment selection button

7. FastFreeze button

Temperature regulator

Switching on

1. Insert the plug into the wall socket.

2. Touch the ON/OFF button (6) if all

LED indicators are off.

Switching off

Keep touching the ON/OFF button (6) for

3 seconds.

All indicators light off.

Temperature regulation

Before regulating the temperature, it is

necessary to select the compartment

(fridge or freezer).
The upper or lower cavity is selected by

the compartment selection button (6).

To select the freezer compartment touch

the compartment selection button (6) until

LED corresponding to the upper cavity

lights up.
The temperature LED indicator shows the

latest set temperature. Recommended

setting is -18°C.
To select the fridge compartment touch

the compartment selection button (6) until

LED corresponding to the lower cavity

lights up.
The temperature LED indicator shows the

latest set temperature. Recommended

setting is +4°C.
To set temperature:

1. Touch temperature regulator button

(7).

Current temperature indicator blinks.

2. Any time you touch the temperature

regulator button (7), the setting moves

by one position. When you select a

temperature, the LED corresponding to

selected temperature value blinks for a

while and the setting is fixed.

The set temperature will be

reached within 24 hours. After

a power failure the set

temperature remains stored.

FastFreeze function

The FastFreeze function is used to

perform pre-freezing and fast freezing in

sequence in the freezer compartment.

This function accelerates the freezing of

fresh food and, at the same time, protects

food products already stored in the freezer

compartment from undesirable warming.

8

Summary of Contents for JCT122E0S1

Page 1: ...JCT122E0S1 User Manual Fridge Freezer Benutzerin formation K hl Ge frierschrank...

Page 2: ...tions in a safe and accessible location for future reference Children and vulnerable people safety This appliance can be used by children aged from 8 years and above and persons with reduced physical...

Page 3: ...efrigerator so that it is not in contact with or drip onto other food WARNING Keep ventilation openings in the appliance enclosure or in the built in structure clear of obstruction WARNING Do not use...

Page 4: ...expose the appliance to the rain Do not install the appliance where there is direct sunlight Do not install this appliance in areas that are too humid or too cold When you move the appliance lift it...

Page 5: ...ate the appliance and disconnect the mains plug from the mains socket This appliance contains hydrocarbons in the cooling unit Only a qualified person must do the maintenance and the recharging of the...

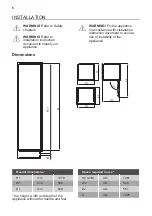
Page 6: ...ppliance in accordance with installation instruction document to avoid a risk of instability of the appliance Dimensions B A H1 W1 D1 W2 D2 W3 D3 9 0 Overall dimensions H1 mm 1218 W1 mm 548 D1 mm 549...
Page 7: ...on of the appliance can only be guaranteed within the specified temperature range If you have any doubts regarding where to install the appliance please turn to the vendor to our customer service or t...

Page 8: ...touch the compartment selection button 6 until LED corresponding to the upper cavity lights up The temperature LED indicator shows the latest set temperature Recommended setting is 18 C To select the...

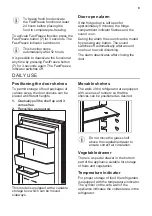
Page 9: ...urbing The alarm deactivates after closing the door DAILY USE Positioning the door shelves To permit storage of food packages of various sizes the door shelves can be placed at different heights 1 Gra...

Page 10: ...te under rising time the defrosted food must be consumed quickly or cooked immediately then cooled and then re frozen Thawing Deep frozen or frozen food prior to being consumed can be thawed in the re...

Page 11: ...n food directly next to it Place food at room temperature in the part of the freezer compartment where there is no frozen food Do not eat ice cubes water ices or ice lollies immediately after taking t...

Page 12: ...iquids and for food to avoid flavours or odours in the compartment To avoid the cross contamination between cooked and raw food cover the cooked food and separate it from the raw one It is recommended...

Page 13: ...egularly 1 Clean the inside and accessories with lukewarm water and some neutral soap 2 Regularly check the door seals and wipe them clean to ensure they are clean and free from debris 3 Rinse and dry...

Page 14: ...or the future use 6 Switch on the appliance and close the door 7 Set the temperature regulator to obtain the maximum coldness and run the appliance for at least 3 hours using this setting Only after t...

Page 15: ...or rectly Refer to Closing the door section The FastFreeze function is switched on Refer to FastFreeze func tion section The compressor does not start immediately after pressing the FastFreeze or afte...

Page 16: ...e sure the door is closed completely Stored food was not wrap ped Wrap food in suitable pack aging before storing it in the appliance Water flows inside the refrig erator Food products prevent the wat...

Page 17: ...nly if neces sary The FastFreeze function is switched on Refer to FastFreeze func tion section If the advice does not lead to the desired result call the nearest Authorized Service Centre Replacing th...

Page 18: ...this appliance It is also possible to find the same information in EPREL using the link https eprel ec europa eu and the model name and product number that you find on the rating plate of the applian...

Page 19: ...ainers to recycle it Help protect the environment and human health by recycling waste of electrical and electronic appliances Do not dispose of appliances marked with the symbol with the household was...

Page 20: ...keine Haftung Bewahren Sie die Anleitung zum Nachschlagen an einem sicheren und zug nglichen Ort auf Sicherheit von Kindern und schutzbed rftigen Personen Das Ger t kann von Kindern ab 8 Jahren und P...

Page 21: ...ten Sie die folgenden Hinweise ffnen Sie die T r nicht ber l ngere Zeit hinweg Reinigen Sie regelm ig Oberfl chen die mit Lebensmitteln in Kontakt kommen k nnen und zug ngliche Ablaufsysteme Lagern Si...

Page 22: ...evor es in den Einbauschrank gesetzt wird Halten Sie sich an die mitgelieferte Montageanleitung Seien Sie beim Umsetzen des Ger tes vorsichtig da es sehr schwer ist Tragen Sie stets Sicherheitshandsch...

Page 23: ...rdgas mit einem hohen Grad an Umweltvertr glichkeit Achten Sie darauf den K ltekreislauf der Isobutan enth lt nicht zu besch digen Nehmen Sie keine technischen nderungen am Ger t vor Stellen Sie keine...

Page 24: ...platten Lichtquellen T rgriffe T rscharniere Ablagen und K rbe Bitte beachten Sie dass einige dieser Ersatzteile nur an Reparaturbetriebe geliefert werden k nnen und nicht alle Ersatzteile f r alle Mo...

Page 25: ...m 548 D2 mm 551 A mm 1225 Platzbedarf w hrend des Betriebs B mm 36 H he Breite und Tiefe des Ger ts einschlie lich Griff und zuz glich des notwendigen Freiraums f r die Zirkulation der K hlluft Platzb...

Page 26: ...ich sein das Ger t vom Netz zu trennen Daher muss der Stecker nach der Installation zug nglich bleiben Elektroanschluss Kontrollieren Sie vor dem Einschalten des Ger ts ob die Netzspannung und frequen...

Page 27: ...ng betr gt 18 C Ber hren Sie zur Auswahl des K hlraums die Auswahltaste 6 bis LED f r das untere Fach aufleuchtet Die Temperatur LED Anzeige zeigt die zuletzt eingestellte Temperatur an Die empfohlene...

Page 28: ...linkt die K hlraumanzeige und ein Signalton ert nt In der Alarmphase kann der Signalton durch Dr cken einer beliebigen Taste ausgeschaltet werden Der Ton schaltet sich nach etwa einer Stunde automatis...

Page 29: ...frieren aktivieren Sie bitte die FastFreeze Funktion mindestens 24 Stunden bevor Sie die einzufrierenden Lebensmittel in das Gefrierfach legen Lagern Sie die frischen Lebensmittel gleichm ig verteilt...

Page 30: ...mpressors und damit zu Reif oder Eisbildung am Verdampfer kommen Stellen Sie in diesem Fall den Temperaturregler auf eine h here Temperatur um das automatische Abtauen zu erm glichen und Energie zu sp...

Page 31: ...s kein Wasser Feuchtigkeit oder Kondenswasser ins Innere gelangt Einkaufstipps Nach dem Lebensmitteleinkauf Achten Sie darauf dass die Verpackung nicht besch digt ist die Lebensmittel k nnten verdorbe...

Page 32: ...e sich dass sie auf Raumtemperatur abgek hlt sind bevor Sie sie einlegen Um eine Verschwendung von Lebensmitteln zu vermeiden sollten die neuen Lebensmittel immer hinter die alten gelegt werden Hinwei...

Page 33: ...dass diese sauber und frei von Fremdk rpern sind 3 Sp len und trocknen Sie diese sorgf ltig ab Abtauen des K hlschranks Bei normalem Betrieb wird Reif automatisch aus dem Verdampfer des K hlschranks e...

Page 34: ...eferten Eiskratzer 5 Wenn der Gefrierraum vollst ndig abgetaut ist wischen Sie das Innere sorgf ltig trocken Bewahren Sie den Eiskratzer f r den zuk nftigen Gebrauch auf 6 Schalten Sie das Ger t ein u...

Page 35: ...lt Siehe Kapitel Bedienfeld Es wurden viele Lebensmit tel gleichzeitig hineingelegt Warten Sie einige Stunden und pr fen Sie erneut die Temperatur Die Raumtemperatur ist zu hoch Siehe Kapitel Montage...

Page 36: ...ln und auf die niedrigste Temperatur ein gestellt Stellen Sie eine h here Temperatur ein Siehe Kapi tel Bedienfeld Die Temperatur im Ger t ist zu niedrig und die Umge bungstemperatur ist zu hoch Stell...

Page 37: ...Temperatur der Lebens mittel ist zu hoch Lassen Sie die Lebensmittel auf Raumtemperatur abk h len bevor Sie diese in das K hlger t legen Viele Lebensmittel werden gleichzeitig in das K hlger t gelegt...

Page 38: ...leistung in der EU EPREL Datenbank Bewahren Sie daher die Energieplakette als Referenz zusammen mit dieser Bedienungsanleitung und allen anderen Unterlagen die mit dem Ger t geliefert wurden auf Es is...

Page 39: ...erhandbuch in Kapitel 3 entsprechen F r weitere Informationen einschlie lich der Beladungspl ne wenden Sie sich bitte an den Hersteller UMWELTTIPPS Recyceln Sie Materialien mit dem Symbol Entsorgen Si...

Page 40: ...222378831 B 042021...

Reviews: