13
INSTALLATION
If this appliance featuring magnetic door seals is
to replace an older appliance having a spring lock
(latch) on the door or lid, be sure to make that
spring lock unusable before you discard the old
appliance.
This will prevent it from becoming a death-trap for
a child.
Positioning
The appliance should be installed well away from
sources of heat such as radiators, boilers, direct sun-
light etc.; best performance is obtained with ambient
temperature b18
°
C and +43
°
C (class T);
+18
°
C and +38
°
C (class ST); +16
°
C and +32
°
C (class
N); +10
°
C and +32
°
C (class SN).
The class of your appliance is shown on its rating
plate.
For building into kitchen units follow the special
“Building-in” instructions given.
For safety reasons, minimum ventilation must be as
shown in Fig. 12.
Attention: keep ventilation openings clear of ob-
struction.
Electrical connection
Before plugging in, ensure that the voltage and fre-
quency shown on the serial number plate correspond
to your domestic power supply.
Voltage can vary by
±
6% of the rated voltage.
For operation with different voltages, a suitably sized
auto-transformer must be used.
The appliance must be earthed.
The power supply cable plug is provided with a con-
tact for this purpose.
If the domestic power supply socket is not earthed,
connect the appliance to a separate earth in compli-
ance with current regulations, consulting a specialist
technician.
The Manufacturer declines all responsibility if the
above safety precautions are not observed.
This appliance complies with EEC directive
number 87/308 of 2/6/87 relative to radio inter-
ference suppression.
This appliance complies with the following
E.E.C. Directives:
- 73/23 EEC of 19.2.73 (Low Voltage Directive) and
subsequent modifications;
- 89/336 EEC of 3.5.89 (Electromagnetic Compatibil-
ity Directive) and subsequent modifications.
Cleaning the interior
Before using the appliance for the first time, wash the
interior and all internal accessories with lukewarm wa-
ter and some neutral soap so as to remove the typical
smell of a brand-new product, then dry thoroughly.
Do not use detergents or abrasive powders, as these
will damage the finish.
Location
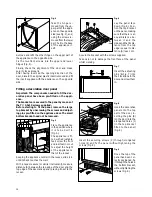
Fig. 1
This appliance is de-
signed to be built-in
to a space having the
dimensions given in
Fig. 1.
Fig. 2
The height of the ap-
pliance can be al-
tered if required by
means of adjustable
feet situated at its
base (Fig. 2).
Door reversibility
Remove the two screws which fix the upper hinge to
the door.
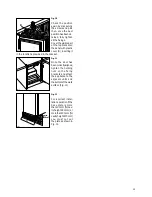
Fig. 3
Carefully lean the ap-
pliance on its back
and remove the plas-
tic insert (Fig. 3).
Remove the two screws which fix the lower hinge to
the door.
Remove the four screws which fix the lower hinge to
the base of the appliance and remove the hinge itself;
be very careful to recover all the screws.
Remove the four screws that fix the upper hinge to the
appliance and remove the hinge itself.
100-170
446
820-870
547
550
450
820
870
D506
D507
D447

