background image


20


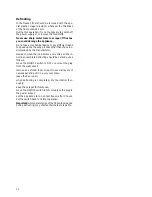
Defrosting


In the freezer, frost should be removed with the spe-
cial plastic scraper provided, whenever the thickness
of the frost exceeds 4 mm.
During this operation it is not necessary to switch off
the power supply or to remove the foodstuffs.


Never use sharp metal tools to scrape off frost as
you could damage the appliance.


Do not use a mechanical device or any artificial means
to speed up the thawing process other than those rec-
ommended by the manufacturer.

However, when the ice becomes very thick on the in-
ner liner, complete defrosting should be carried out as
follows:

move the ON/OFF switch to OFF or pull out the plug
from the wall socket;

remove any stored food, wrap it in several layers of
newspaper and put it in a very cool place;

leave the door open;

when defrosting is completed, dry the interior thor-
oughly;

keep the scraper for future use;

move the ON/OFF switch to ON or replace the plug in
the power socket;
set the appliance to run on fast freeze; after 3 hours,
set the switch back to normal operation.


Important:


 A temperature rise of the frozen food packs,

during defrosting, may shorten their safe storage life.

Summary of Contents for JGU6421

Page 1: ...7 4 2 6 1 3 5 JGU 6421 GEBRAUCHSANWEISUNG OPERATING INSTRUCTIONS MODE D EMPLOI GEBRUIKSAANWIJZING 2222 320 12...

Page 2: ...l page 15 Use page 18 Control panel page 18 Operation page 18 Temperature regulation page 18 Fast freezing page 18 Warning light page 18 Freezing fresh food page 19 Storage of frozen food page 19 Thaw...

Page 3: ...d be punctured this would damage the appli ance beyond repair and cause food loss DO NOT USE SHARP INSTRUMENTS to scrape off frost or ice Frost may be removed by using the scraper provided Under no ci...

Page 4: ...bly sized auto transformer must be used The appliance must be earthed The power supply cable plug is provided with a con tact for this purpose If the domestic power supply socket is not earthed connec...

Page 5: ...he opposite side Fix the two front screws into the upper and lower hinges Fig 4 Finally check the alignment of the door and make sure it closes properly After having reversed the opening direction of...

Page 6: ...itioned fix itthroughtheholesin the bottom bracket without tightening the screws Fig 9 D468 A 1cm D532 B D533 1 B 2 C D471 Fig 10 Check the position again by slackening the screws and pins then once t...

Page 7: ...12 Fig 14 If the appliance has been fitted into a spa ce 870 mm high and the maximum height of the base plate is 150 mm fit the front cover plate as descri bed in Fig 13 If the base plate is between...

Page 8: ...r reduced colder rotating the knob towards higher set tings However the exact setting should be chosen keeping in mind that the temperature inside the refrigerator de pends on room temperature how oft...

Page 9: ...to gether with the recommended storage time in months from the time of freezing do not put carbonated liquids fizzy drinks etc in the freezing compartment as they may burst Storage of frozen food When...

Page 10: ...er However when the ice becomes very thick on the in ner liner complete defrosting should be carried out as follows move the ON OFF switch to OFF or pull out the plug from the wall socket remove any s...

Page 11: ...frost and clean the interior and all accessories leave the door ajar to allow air to circulate to prevent unpleasant smells CUSTOMER SERVICE AND SPARE PARTS If the appliance is not functioning properl...

Reviews: