background image

28   electrolux

Safety information

It is most important that this instruction
book should be retained with the
appliance for future reference. Should
the appliance be sold or transferred to
another owner, or should you move
house and leave the appliance, always
ensure that the book is supplied with
the appliance in order that the new
owner can be acquainted with the
functioning of the appliance and the
relevant warnings.

If this appliance featuring magnetic door
seals is to replace an older appliance
having a spring lock (latch) on the door
or lid, be sure to make that spring lock
unusable before you discard the old
appliance. This will prevent it from
becoming a death-trap for a child.

These warnings are provided in the
interest of safety. You must read them
carefully before installing or using the
appliance.

General Safety

• 

This appliance is not intended for
use by persons (including children)
with reduced physical, sensory or
mental capabilities, or lack of
experience and knowledge, unless
they have been given supervision or
instruction concerning use of the
appliance by a person responsible
for their safety. Children should be
supervised to ensure that they do
not play with the appliance.

• It is dangerous to alter the

specifications or modify this product
in any way.

•  Before any cleaning or maintenance

work is carried out, be sure to switch

off and unplug the appliance.

•  This appliance is heavy. Care should

be taken when moving it

•  Ice lollies can cause frost burns if

consumed straight from the
appliance.

Take  u

utmost  c

care  w

when  h

handling

your  a

appliance  sso  a

as  n

not  tto  c

cause

any d

damages tto tthe c

cooling u

unit w

with

consequent p

possible ffluid lleakages.

• The  a

appliance  m

must  n

not  b

be  llocated

close tto rradiators o

or g

gas c

cookers.

• Avoid  p

prolonged  e

exposure  o

of  tthe

appliance tto d

direct ssunlight.

• There  m

must  b

be  a

adequate  vventilation

round tthe b

back o

of tthe a

appliance a

and

any d

damage tto tthe rrefrigerant c

circuit

must b

be a

avoided.

• For  ffreezers  o

only  ((except  b

built-iin

models):  a

an  iideal  llocation  iis  tthe

cellar o

or b

basement.

• Do  n

not  u

use  o

other  e

electrical

appliances  ((such  a

as  iice  c

cream

makers)  iinside  o

of  rrefrigerating

appliances.

Service/Repair

• 

Any electrical work required to install
this appliance should be carried out
by a qualified electrician or
competent person

•  This product should be serviced by

an authorized Service Centre, and
only genuine spare parts should be
used.

•  Under no circumstances should you

attempt to repair the appliance
yourself. Repairs carried out by
inexperienced persons may cause
injury or more serious
malfunctioning. Refer to your local

Summary of Contents for JUN 44601

Page 1: ...G Ge eb br ra au uc ch hs sa an nw we eiis su un ng g I In ns st tr ru uc ct tiio on n b bo oo ok k JUN 44601 gefrierschrank freezer...

Page 2: ......

Page 3: ...en eine breite Vielfalt von Qualit tsprodukten anzubieten die helfen Ihr Leben etwas komfortabler zu machen Sie finden einige Beispiele auf der vorletzten Seite in diesem Heft Bitte nehmen Sie sich ei...

Page 4: ...s Ger tes gekennzeichnet Das Symbol auf dem Produkt oder seiner Verpackung weist darauf hin dass dieses Produkt nicht als normaler Haushaltsabfall zu behandeln ist sondern an einem Sammelpunkt f r das...

Page 5: ...en Lebensmitteln11 Aufbewahrung der Tiefk hlkost 11 Eisw rfelbereitung 11 Auftauen 12 K lteakkus 12 Tips 12 Tips f r das Einfrieren 12 Tips f r Tiefk hlkost 13 Wartung 1 14 Regelm ige Reinigung 14 Sti...

Page 6: ...tes ausschlie en nur unter Aufsicht oder nach entsprechender Einweisung durch eine Person benutzt werden die sicherstellt dass sie sich den Gefahren des Gebrauchs bewusst sind Kinder sind zu beaufsic...

Page 7: ...itte an die n chste Kundendienststelle Gebrauch Die Haushaltsk hl und Gefrierger te sind nur zur Einlagerung bzw zum Einfrieren von Nahrungsmitteln bestimmt Die beste Leistung erzielt man bei Raumtemp...

Page 8: ...dass die Luft um das Ger t frei zirkulieren kann damit die W rme abgef hrt werden kann Eine ungen gende Luftzirkulation kann einen unregelm ssigen Betrieb bzw Sch den am Ger t verursachen Achten Sie...

Page 9: ...d die das G Ger t b besch digen k k nnten GEBRAUCH W hrend des Transports kann es vorkommen da das im Motorkompressor enthaltene l in den K ltekreislauf abl uft Man sollte mindestens 2 Std warten bevo...

Page 10: ...ung folgender die Innentemperatur beeinflussender Faktoren Raumtemperatur H ufigkeit des T r ffnens Menge der eingelagerten Lebensmittel Aufstellung des Ger tes Die m mittlere E Einstellung iist m mei...

Page 11: ...vor der Einlagerung der Tiefk hlkost das Gefrierabteil f r mindestens Drei Stunden auf den Schnellgefriervorgang gestellt werden Nach ca 2 Std kann dieser auf eine mittlere Stellung zur ckgedreht wer...

Page 12: ...e Das Gefrierverm gen des Gefrierabteils in 24 Std kann auf dem Typenschild abgelesen werden Der Gefriervorgang dauert ca 24 Stunden In dieser Zeit sollte keine zus tzliche Ware in das Gefrierabteil e...

Page 13: ...it der in Monaten Zahlen angegebenen Aufbewahrungsdauer angebracht die Ihnendie Haltbarkeit vom Moment des Einfrierens an anzeigt Es s sollten k keine k kohlens urehaltigen Getr nke iin d das G Gefrie...

Page 14: ...einwickeln und sehr k hl aufbewahren 3 Die T r offen lassen und den Plastikschaber der als Rinne dient am vorgesehenen Platz einsetzen WARTUNG Vor jjeder R Reinigungsarbeit immer d den N Netzstecker a...

Page 15: ...undendienst n notwendig die M Modell u und S Seriennummer anzugeben d die S Sie d dem G Garantieschein oder d dem T Typenschild llinke S Seite unten e entnehmen k k nnen soda das Abtauwasser in ein ge...

Page 16: ...Leistung vorgeschaltet werden Das Ger t mu unbedingt vorschriftsm ig geerdet werden Zu diesem Zweck ist der Stecker des Speisekabels mit dem daf r vorgesehenen Kontakt versehen Sollte die Netzleitung...

Page 17: ...vorgeht Achtung Die Ventilations ffnungen m ssen immer saubergehalten werden Ferner ist auch am hinteren Einbauschrankteil ein L ftungskamin mit filgenden Massen notwendig Tiefe 50 mm Breite 540 mm 50...

Page 18: ...ts ein Abstand von 44 mm besteht Die untere Scharnierabdeckung im Zubeh rbeutel dient zur genauen Ausrichtung zwischen K chenm bel und Ger t Dar ber hinaus darf das Ger t das Netzkabel nicht quetschen...

Page 19: ...linien erleichtert Entfernen Sie das mit DX gekennzeichnete Teil wenn der Stift am rechten Scharnier angebracht werden soll andernfalls das mit SX gekennzeichnete Teil In die Befestigungs und Scharnie...

Page 20: ...lu der Ger tet r berpr fen Schiene Ha auf der Innenseite der M belt r oben und unten auflegen siehe Abb und die Position der u eren Bohrl cher anzeichnen Nachdem die L cher gebohrt wurden die Schiene...

Page 21: ...Die Abdeckung Hd in die Schiene Hb eindr cken bis sie einrastet PR168 Hb PR167 1 Hd Hb electrolux 21...

Page 22: ...ftreten des Mangels in Deutschlandbetrieben wird und Garantieleistungen auch in Deutschland erbracht werden k nnen M ngel m ssen uns innerhalb von zwei 2 Monaten nach Kenntnis angezeigt werden 3 M nge...

Page 23: ...ilt f r denselben Zeitraum und in demselben Ausma f r Arbeitszeit und Teile wie sie f r dieses spezielle Modell oder diese spezielle Ger tereihe in Ihrem neuen Aufenthaltsland gelten Die Ger tegaranti...

Page 24: ...eland 353 1 40 90 753 Long Mile Road Dublin 12 Italia 39 0 434 558500 C so Lino Zanussi 26 33080 Porcia PN Latvija 37 17 84 59 34 Kr Barona iela 130 2 LV 1012 Riga Lietuva 370 5 2780609 Verki 29 LT 09...

Page 25: ...future Electrolux ambition is to offer a wide variety of quality products that would make your life even more comfortable You can look at some examples on the cover in this manual But now it s time to...

Page 26: ...aste Instead it shall be handed over to the applicable collection point for the recycling of electrical and electronic equipment By ensuring this product is disposed of correctly you will help prevent...

Page 27: ...3 Thawing 33 Ice cube production 33 Cold accumulators 33 Hints 34 Hints for freezing 34 Hints for storage of frozen food 34 Maintenance 3 35 Periodic cleaning 35 Periods of no operation 35 Defrosting...

Page 28: ...cations or modify this product in any way Before any cleaning or maintenance work is carried out be sure to switch off and unplug the appliance This appliance is heavy Care should be taken when moving...

Page 29: ...iance consists of channels through which the refrigerant passes If these should be punctured this would damage the appliance beyond repair and cause food loss DO NOT USE SHARP INSTRUMENTS to scrape of...

Page 30: ...ts which heat up should not be exposed Wherever possible the back of the product should be against a wall Environment Protection This a appliance d does n not c contain g gasses which c could d damage...

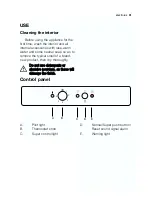
Page 31: ...tral soap so as to remove the typical smell of a brand new product then dry thoroughly Do n not u use d detergents o or abrasive p powders a as t these w will damage t the f finish Control panel A Pil...

Page 32: ...e how often the door is opened the quantity of food stored location of appliance A m medium s setting iis g generally t the most s suitable Quick freezing For quick freezing push the button D The supe...

Page 33: ...c compartment T The f frozen food w will n not b be a affected iif t the p power cut iis o of s short d duration up t to 6 6 8 8 hours a and t the f freezer c compartment iis full o otherwise iit iis...

Page 34: ...latter water ices if consumed immediately after removal from the freezer compartment can possibly cause the skin to be freeze burnt it is advisable to show the freezing in date on each individual pac...

Page 35: ...Periods of non operation When the appliance is not in use for long periods take the following precautions remove the plug from the wall socket remove all food defrost and clean the interior and all ac...

Page 36: ...d To obtain fast service it is essential that when you apply for it you specify the model and serial number of your appliance which can be found on the guarantee certificate or on the rating plate loc...

Page 37: ...ting a specialist technician The M Manufacturer d declines a all responsibility iif t the a above s safety precautions a are n not o observed This appliance complies with the following E E C Directive...

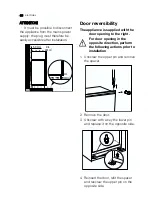
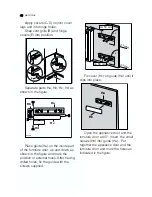
Page 38: ...ions prior to installation 1 Unscrew the upper pin and remove the spacer 2 Remove the door 3 Unscrew with a key the lower pin and replace it on the opposite side 4 Reinsert the door refit the spacer a...

Page 39: ...val of this coomponent Remove the part marked with DX if the pivot pin is inserted in the right hinge SX in opposite case D765 electrolux 39 Apply joint the sealing strip as shown in figure Make sure...

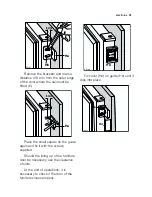
Page 40: ...gure and mark the position of external holes After having drilled holes fix the guide with the screws supplied Fix cover Hc on guide Ha until it clips into place Open the appliance door and the furnit...

Page 41: ...e guide again and fix it with the screws supplied Should the lining up of the furniture door be necessary use the clearance of slots At the end of operations it is necessary to check if the door of th...

Page 42: ...issued by the seller of the appliance The appliance guarantee is for the same period and to the same extent for labour and parts as exists in your new country of residence for this particular model or...

Page 43: ...eland 353 1 40 90 753 Long Mile Road Dublin 12 Italia 39 0 434 558500 C so Lino Zanussi 26 33080 Porcia PN Latvija 37 17 84 59 34 Kr Barona iela 130 2 LV 1012 Riga Lietuva 370 5 2780609 Verki 29 LT 09...

Page 44: ......

Page 45: ......

Page 46: ......

Page 47: ......

Page 48: ...2223 067 15 00 12032008 w ww ww w e elle ec ct tr ro ollu ux x c co om m www juno e electrolux de...

Reviews: