background image

33

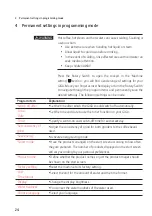
4  Permanent settings in programming mode

In the program item 

‘Factory setting’

 the machine can be reset to its 

factory setting: 

All user settings

 (apart from the ‘water hardness’) 

are reset to factory settings. Your GIGA then switches off. 

Precondition: 

The start screen is displayed.

T

  Press the Rotary Switch.

T

  Touch the ‘Machine setting’   symbol.

‘Switch off after’

T

  Turn the Rotary Switch until 

‘Factory setting’

 is displayed.

T

  Touch 

‘Factory setting’

.

‘Factory setting’

 / 

‘Reset the machine to the factory setting?’

T

  Touch 

‘Yes’

.

‘Saved’

 appears briefly on the display.

Your GIGA is switched off.

Your GIGA has a ‘Smart mode’. If this mode is activated, the 
products on the start screen will be rearranged according to the 
frequency of preparation after some time. The number of products 
displayed on the start screen will vary according to your personal 
preferences.


E

The 

star

 on the cockpit indicates that the ‘Smart mode’ is 

activated.

Example: 

Proceed as follows to 

deactivate

 the ‘Smart mode’.

Precondition: 

The start screen is displayed.

T

  Press the Rotary Switch.

T

  Touch the ‘Machine setting’   symbol.

‘Switch off after’

T

  Turn the Rotary Switch until 

‘Smart mode’

 is displayed.

T

  Touch 

‘Smart mode’

.

‘Smart mode’

T

  Now move your finger across the controller and set it to 

‘0’

.

T

  Touch 

‘Save’

.

‘Saved’

 appears briefly on the display.

‘Smart mode’

T

  Touch 

‘Back’

 the number of times needed to display the start 

screen again.

Restore factory settings  

Smart mode  

Summary of Contents for GIGA 6

Page 1: ...GIGA 6 Instructions for Use K For your safety read and understand manual before use E ...

Page 2: ...g two specialty coffees 17 Preparing specialty coffees with milk 18 Caffè Barista and Americano 18 Ground coffee 19 Hot water 20 3 Daily operation 21 Filling the water tank 21 Switching on the machine 21 Daily maintenance 22 Regular maintenance 23 Switching off the machine 23 4 Permanent settings in programming mode 24 Product settings 25 Setting the consistency of grind 27 Automatic switch off 28...

Page 3: ...bol lt is used to alert you to potential personal injury hazards Obey all safety messages that follow this symbol to avoid possible injury or death DANGER indicates a hazardous situation which if not avoided will result in death or serious injury WARNING indicates a hazardous situation which if not avoided could result in death or serious injury J CAUTION CAUTION used with the safety alert symbol ...

Page 4: ...re putting on or taking off parts and before cleaning the appliance Z Do not operate any appliance with a damaged cord or plug or after the appliance malfunctions or has been damaged in any manner Return appliance to the nearest authorized service facility for examination repair or adjustment Z The use of an accessory attachment not recommended by the appliance manufacturer may result in fire elec...

Page 5: ...d on by children or tripped over Z This appliance has a 3 pin grounded plug Z Do not modify the plug in any way Extension cords are available an may be used if care is exercised in their use If the user chooses to use an extension cord Z the marked electrical rating of the extension cord should be at least as great as the electrical rating of the appliance and Z if the appliance is of the grounded...

Page 6: ... cold water only Z Keep your hands and the cord away from hot parts of the appliance during operation There is a risk of scalds or burns on the spouts and the cappuccino frother nozzle Z Keep children away Z Do not touch any hot parts Use the handles or knobs provided Z Ensure that the cappuccino frother nozzle is correctly fitted and clean If incorrectly fitted or if they become blocked the cappu...

Page 7: ...no nuts no spices nothing other than roasted coffee beans Z Never fill frozen beans into the bean container If you store beans in the freezer let them thaw 3 to 4 hours before filling them into the bean container Z Never fill anything but fresh cold and clean water into the water tank except when decalcifying Z Never use mineral or carbonated water You can use tap water bottled water spring water ...

Page 8: ...h back of the machine 5 Plug in power cord back of the machine 6 Coffee grounds container 7 Drip tray 8 Cup platform 9 Filler funnel for ground coffee 10 Ventilation slats Venti Ports 11 Storage compartment cover 12 Measuring spoon for ground coffee 13 Height and width adjustable dual spout 14 Height adjustable hot water spout 15 Drip tray cover pivoting 16 Insert for drip tray ...

Page 9: ...Off button Q under cover 3 Touchscreen display 1 2 3 4 Back of the machine 1 Service cover open by pressing with your finger 2 Locking device 3 Sliding catch 4 Service socket with JURA Smart Connect Accessories Container for milk system cleaning 6 ...

Page 10: ...or switch between program items in programming mode U Programming with Rotary Switch Also use the Rotary Switch As soon as you turn it the product selector view is displayed Also navigate through the program items in programming mode and change various settings U Press the Rotary Switch to open the cockpit of your GIGA U The cockpit is divided into two sections Maintenance status c and Machine set...

Page 11: ...eeze dried coffee will damage the grinder T Only use roasted untreated coffee beans to fill the bean container T Remove the aroma preservation cover T Remove any dirt or foreign objects from inside the bean container T Fill the bean container with coffee beans and close the aroma preservation cover When you use the machine for the first time you must set the water hardness If you do not know the h...

Page 12: ... is a danger of potentially fatal electric shock T Never use a machine which is damaged T Never use a machine which has a defective power cord Milk sparkling mineral water or other liquids can damage the water tank or the machine T Only fill the water tank with fresh cold water E The water volume is given as standard in oz You can change this setting to ml in programming mode see Chapter 4 Permane...

Page 13: ...lect the time format 24 hrs or AM PM T Touch Save Saved Time T Enter the current time T Touch Save Saved Water hardness E If you do not know the hardness of your water you must find this out first see Chapter 1 Preparing and using for the first time Determining the water hardness T Move your finger across the display to change the water hardness setting e g to 25 dH T Touch Save Saved Insert filte...

Page 14: ...ual spout and the hot water spout Empty drip tray T Empty the drip tray and put it back into the machine T Place a receptacle under the dual spout Machine is heating Machine is rinsing Milk system is being rinsed The rinse stops automatically The start screen is displayed Your GIGA is ready for use Your GIGA creates fine creamy feather light milk foam with a perfect consistency The most important ...

Page 15: ... find more information at www jura com smartconnect E Please note that you can only connect either the accessory or J O E to the coffee machine via Smart Connect and not both at the same time Precondition The start screen is displayed T Press the Rotary Switch T Touch the Machine settings symbol Switch off after T Turn the Rotary Switch until Connect accessory is displayed T Touch Connect accessor...

Page 16: ...your GIGA to your preferred position on the start screen and make it one of your favorites You can duplicate and personalize your favorite specialty coffees by giving them a new product name and individual settings e g amount and coffee strength see Chapter 4 Permanent settings in programming mode Adjusting the product settings Please note that the descriptions provided in the following sections a...

Page 17: ...after 10 seconds if no preparation is started E The last product selected always appears first in the product selector view Example Proceed as follows to prepare one coffee Precondition The start screen is displayed T Place a cup under the dual spout T Touch Coffee Preparation starts The preset amount of water for coffee flows into the cup Preparation stops automatically Your GIGA is once more rea...

Page 18: ...utes after preparation the milk system is automatically rinsed see Chapter 5 Maintenance Automatic milk system rinsing Therefore always place a receptacle under the dual spout after preparing milk To ensure that the milk system in the dual spout always works properly you must clean it daily see Chapter 5 Maintenance Cleaning the milk system For the caffè Barista and Americano the GIGA blends the c...

Page 19: ...lling with the ground coffee Otherwise the GIGA stops the operation and is once more ready for use U All specialty coffees with ground coffee are always prepared following the same model Example Proceed as follows to prepare one coffee using ground coffee Precondition The start screen is displayed T Place a cup under the dual spout T Open the cover of the filler funnel for ground coffee Please add...

Page 20: ...Avoid direct contact with the skin Example Proceed as follows to prepare hot water for green tea Precondition The start screen is displayed page T Place a cup under the hot water spout T Touch Hot water for green tea Hot water for green tea the preset amount of water flows into the cup Preparation stops automatically Your GIGA is once more ready for use Hot water J CAUTION ...

Page 21: ...ter T Open the water tank cover T Remove the water tank and rinse it with cold water T Fill the water tank with fresh cold water and reinsert the tank T Close the water tank cover Precondition Your GIGA is switched on at the power switch T Place a receptacle under the dual spout T Open the cover of the On Off button T Press the On Off button Q to switch the GIGA on Welcome to JURA Machine is heati...

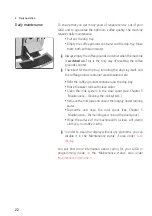
Page 22: ...sher safe T Refit the coffee grounds container and the drip tray T Rinse the water tank with clean water T Clean the milk system in the dual spout see Chapter 5 Maintenance Cleaning the milk system T Remove the milk pipe and rinse it thoroughly under running water T Dismantle and rinse the dual spout see Chapter 5 Maintenance Dismantling and rinsing the dual spout T Wipe the surface of the machine...

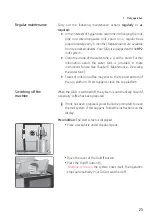
Page 23: ...tenance Descaling the water tank U Traces of milk and coffee may stick to the top and bottom of the cup platform If this happens clean the cup platform When the GIGA is switched off the system is automatically rinsed if a specialty coffee has been prepared E If milk has been prepared you will also be prompted to clean the milk system If this happens follow the instructions on the display Precondit...

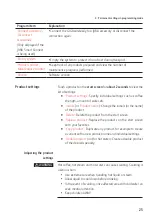
Page 24: ...ter which the GIGA should switch off automatically Time Date T Set the time and date to use the timer function on your GIGA Timer T Specify a switch on and switch off time for each weekday Set consistency of grind T Adjust the consistency of grind for both grinders to the coffee beans used Save energy T Activate energy saving mode Smart mode T Have the products arranged on the start screen accordi...

Page 25: ...settings such as coffee strength amount of water etc U Initials or Product name Change the initials or the name of the product U Delete Delete the product from the start screen U Replace product Replace the products on the start screen with your favorites U Copy product Duplicate any product for example to create a variant with a new product name and individual settings U Double product not for ho...

Page 26: ... low normal high left and or right grinder in product name delete replace copy product Jug of coffee red speedometer symbol Water 0 5 oz 8 0 oz 25 ml 240 ml Bypass water 0 5 oz 8 0 oz 25 ml 240 ml Coffee strength 10 levels number of strokes 1 5 temperature low normal high left and or right grinder in product name delete replace copy product Cappuccino Water 0 5 oz 8 0 oz 25 ml 240 ml Milk foam 0 s...

Page 27: ...t and or right grinder in product name delete replace copy product Permanent settings in programming mode always follow the same model Example Proceed as follows to change the coffee strength for one espresso Precondition The start screen is displayed T Touch Espresso for approximately 2 seconds until the list of possible settings is displayed T Touch Product settings Espresso T Move your finger a...

Page 28: ...er of times needed to display the start screen again By instructing your GIGA to automatically switch itself off you can cut down your energy consumption If this function is activated your GIGA switches off automatically after the preset time following the last action on the machine You can set the automatic switch off to 15 minutes 30 minutes or 1 9 hours Precondition The start screen is displaye...

Page 29: ...rrent time T Touch Save Saved appears briefly on the display Time T Touch Back the number of times needed to display the start screen again The harder the water is the more frequently the GIGA needs to be descaled It is therefore important to set the water hardness accurately The water hardness was set when the machine was first used You can change this setting at any time The water hardness can b...

Page 30: ...d by you Precondition The start screen is displayed T Press the Rotary Switch T Touch the Machine setting symbol Switch off after T Turn the Rotary Switch until Timer is displayed T Touch Timer Timer T Touch Monday Switch machine on T Enter the desired switch on time T Touch Save Switch machine off T Touch Back the number of times needed to display the start screen again In the machine settings yo...

Page 31: ...saving mode E S M is displayed on the cockpit U Before you can prepare a specialty coffee specialty coffee with milk or hot water the machine must heat up U 0 U All specialty coffees specialty coffees with milk and hot water can be prepared without having to wait Example Proceed as follows to switch energy saving mode off Precondition The start screen is displayed T Press the Rotary Switch T Touch...

Page 32: ...çais is displayed in the center T Touch Enregistrer Enregistré appears briefly on the display Langue T Touch Retour the number of times needed to display the start screen again In the program item Display you can set the display brightness as a percentage Precondition The start screen is displayed T Press the Rotary Switch T Touch the Machine setting symbol Switch off after T Turn the Rotary Switc...

Page 33: ...If this mode is activated the products on the start screen will be rearranged according to the frequency of preparation after some time The number of products displayed on the start screen will vary according to your personal preferences E The star on the cockpit indicates that the Smart mode is activated Example Proceed as follows to deactivate the Smart mode Precondition The start screen is disp...

Page 34: ...needed to display the start screen again In programming mode you can view the following information U Product counter Number of prepared specialty coffees and hot water U Maintenance counter Number of maintenance programs performed cleaning descaling etc U Version Software version Example Proceed as follows to view the number of specialty coffees prepared Precondition The start screen is displayed...

Page 35: ...tion You can manage the maintenance of your GIGA in the Maintenance status c section U If a maintenance program needs to be initiated a message with a red background appears on the cockpit You can go straight to the relevant maintenance program by touching this message or pressing the Rotary Switch If several maintenance programs are pending several messages with a red background will appear Maint...

Page 36: ...paring milk Non recommended cleaning agents will not optimally remove milk residues This may cause the cappuccino frother to become blocked and fly off the machine Discharge of hot steam T Use only original JURA milk system cleaner Harmful and irritating cleaning agent Harmful if swallowed Irritating to eyes and skin T Keep children AWAY T Avoid contact with skin and eyes T After contact with skin...

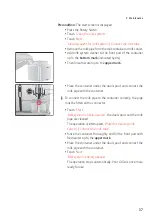
Page 37: ... dual spout and connect the milk pipe with the container E To connect the milk pipe to the container correctly the pipe must be fitted with a connector T Touch Start Milk system is being cleaned the dual spout and the milk pipe are cleaned The operation is interrupted Water for cleaning milk system Connect the milk tube T Rinse the container thoroughly and fill the front part with fresh water up t...

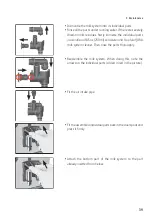
Page 38: ...interests of hygiene T Remove the milk pipe and rinse it thoroughly under running water T Press the releasing devices and pull the cover of the dual spout up and off T Carefully pull the bottom part of the milk system down and off T Remove the milk system from the dual spout T Remove the air intake pipe Dismantling and rinsing the dual spout ...

Page 39: ...on of 8 5 oz 250 ml cold water and 1 capful of JURA milk system cleaner Then rinse the parts thoroughly T Reassemble the milk system When doing this note the arrows on the individual parts circled in red in the picture T Fit the air intake pipe T Fit the assembled individual parts back in the dual spout and press it firmly T Attach the bottom part of the milk system to the part already inserted fr...

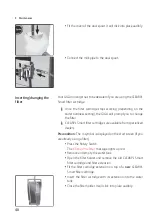
Page 40: ...ges are available from specialized dealers Precondition The c symbol is displayed on the start screen if you are already using a filter T Press the Rotary Switch The Change the filter message lights up red T Remove and empty the water tank T Open the filter holder and remove the old CLEARYL Smart filter cartridge and filter extension T Fit the filter cartridge extension on top of a new CLEARYL Sma...

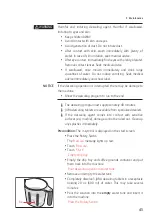
Page 41: ...ginal JURA cleaning tablets These are specially formulated for your machine Harmful and irritating cleaning agent Harmful if swallowed Irritating to eyes and skin T Keep children AWAY T Avoid contact with skin and eyes T Avoid generation of dust Do not inhale dust T After contact with skin wash immediately with plenty of water In case of skin irritation seek medical advice T After eye contact imme...

Page 42: ... Press the Rotary Switch T Press the Rotary Switch Machine is being cleaned water flows out of the dual spout repeatedly The operation stops automatically Empty coffee grounds container T Empty the drip tray and coffee grounds container and put them back into the machine Cleaning is now complete The start screen is displayed The GIGA builds up deposits of limescale over time and automatically prom...

Page 43: ...ling program to run to the end E The descaling program lasts approximately 40 minutes E JURA descaling tablets are available from specialized dealers E If the descaling agent comes into contact with sensitive surfaces e g marble damage cannot be ruled out Clean up any splashes immediately Precondition The c symbol is displayed on the start screen T Press the Rotary Switch The Descale message light...

Page 44: ...e tank Press the Rotary Switch T Press the Rotary Switch Machine is being descaled the descaling operation is continued Water flows straight into the drip tray and out of the hot water spout and dual spout repeatedly Empty drip tray T Empty the drip tray and coffee grounds container and put them back into the machine Descaling is now complete The start screen is displayed E If the descaling operat...

Page 45: ...pressing above the JURA logo It will click into place audibly T Fill the bean container with coffee beans and close the aroma preservation cover Limescale deposits may form in the water tank To ensure correct function of the machine descale the water tank from time to time T Remove the water tank T If you use a CLEARYL Smart filter cartridge remove this T Completely fill the water tank and dissolv...

Page 46: ...tray Fill left bean container Fill right bean container One of the bean containers is empty You cannot prepare any specialty coffees for which coffee beans are required from this bean container You can prepare hot water or milk T Fill the bean container see Chapter 1 Preparing and using for the first time Filling the bean container Clean the milk system The GIGA prompts you to clean the milk syste...

Page 47: ...T The next time you prepare a beverage add more ground coffee see Chapter 2 Preparation Ground coffee Service cover is not fitted The service cover on the back of the machine is not fitted You cannot prepare any products T Fit the service cover Spout is not fitted The cover of the dual spout has not been fitted T Correctly fit the cover of the dual spout ...

Page 48: ...nance Descaling the machine Fill bean container is not displayed although the bean container is empty The bean monitor is dirty T Clean the bean container see Chapter 5 Maintenance Cleaning the bean container Preparation stops Fill bean container is briefly displayed although the bean container has been filled The sliding catch for the bean container has not been pulled out or has not been pulled ...

Page 49: ...or messages are displayed T Contact customer support in your country see Chapter 11 JURA contact details Legal information E If you were unable to solve the problem contact customer support in your country see Chapter 11 JURA contact details Legal information ...

Page 50: ...nder the dual spout and another under the hot water spout T Press the Rotary Switch T Touch the Machine setting symbol Switch off after T Turn the Rotary Switch until Empty system is displayed T Touch Empty system Empty system Remove the water tank T Remove and empty the water tank Press the Rotary Switch T Press the Rotary Switch Water and steam will continue to be discharged from the dual spout ...

Page 51: ...tic max 15 bar Holding capacity of water tank 88 oz 2 6 l Holding capacity of bean container 2 10 oz 2 280g Holding capacity of coffee grounds container max 20 portions Cord length approx 47 in 1 2 m Weight approx 39 7 lbs 18 kg Dimensions W H D 12 6 16 3 19 6 in 32 41 5 49 7 cm The machine complies with the following directives U Standard UL 1082 U Canadian Standard CSA C22 2 No 64 Directives ...

Page 52: ...fees 17 Coffee grounds container 8 Configuration area 24 Connect accessory 15 Consistency of grind Setting the consistency of grind 27 Contact details 56 Cover Service cover 9 Storage compartment 8 Water tank 8 Cup platform 8 Customer support 56 D Daily maintenance 22 Date 29 Descaling Machine 42 Water tank 45 Display Touchscreen display 9 10 Display brightness 32 Displaying product names 34 Displ...

Page 53: ...ng on 21 Maintenance 35 Daily maintenance 22 Regular maintenance 23 Maintenance counter 34 Measuring spoon for ground coffee 8 Messages display 46 Milk Connecting milk 14 Milk system Cleaning 36 Milk system rinsing 36 N Number Maintenance programs 34 Preparations 34 P Permanent settings in programming mode 24 Pot of coffee 17 Power cord 8 Power switch 8 Preparation 16 18 Americano 18 At the touch ...

Page 54: ...4 Setting up Setting up the machine 11 Sliding catch 9 Smart Connect 9 15 Smart mode 33 Spout Height adjustable hot water spout 8 Height and width adjustable dual spout 8 Switching off 23 Timer 30 Switching on 21 Timer 30 Switch off Automatic switch off 28 Switch off time 30 Switch on time 30 Symbol description 3 T Technical data 51 Tel 56 Time 29 Time format Programming mode 30 Timer 30 Touchscre...

Page 55: ...55 ...

Page 56: ...1 8600 Internet www us jura com www ca jura com You will find additional contact details for your country at www jura com We reserve the right to make technical changes The diagrams used in these instructions for use are for illustration purposes only and do not represent the original colors of the machine Some details of your GIGA may vary Your opinion is important to us Use the contact details a...

Reviews: