June 30, 2003 6:18 pm
Page 4
— 4 —
Master Page: Right
A
Check contents
Make sure the package contains all of the accessories listed in
“Specifications” (
墌
22).
B
Situate recorder
Place the recorder on a stable, horizontal surface.
C
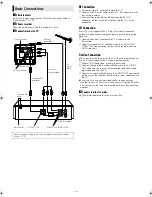
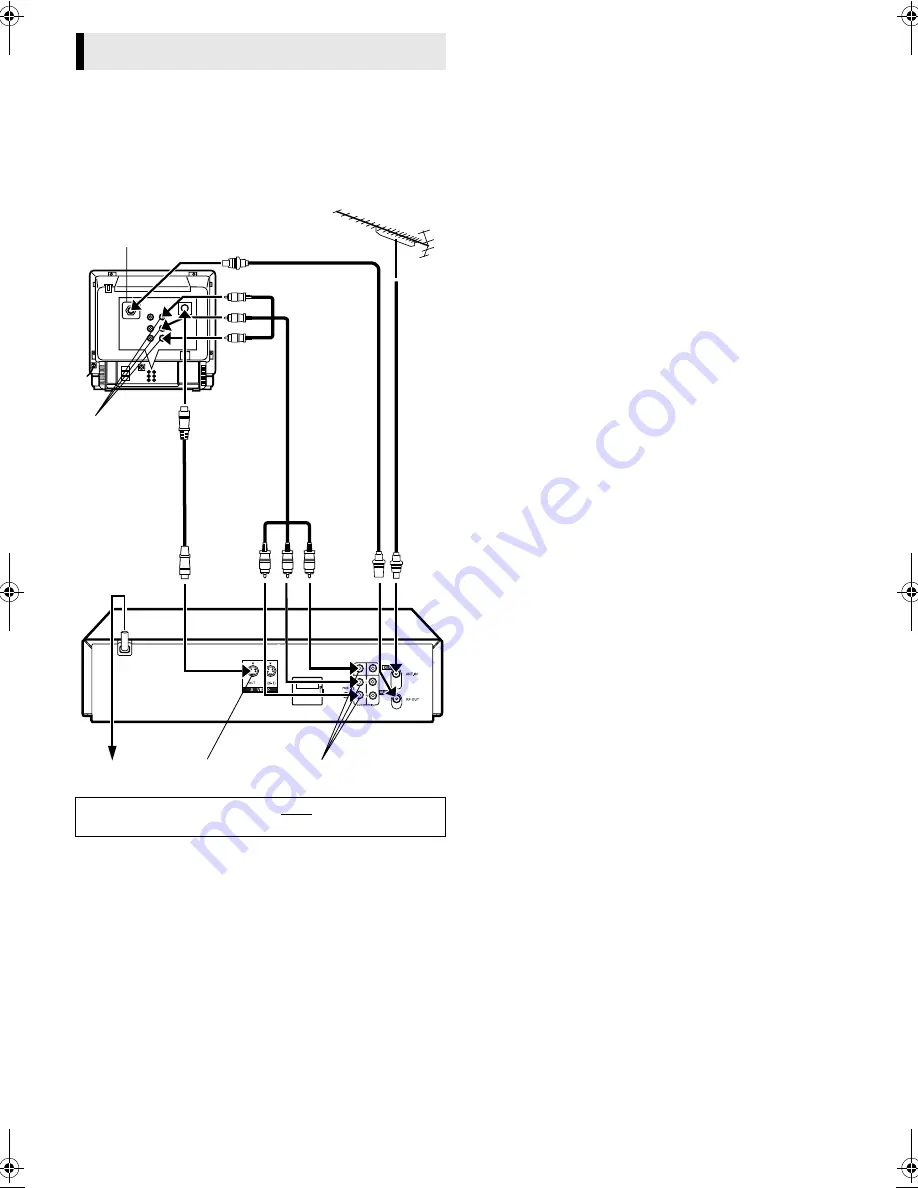
Connect recorder to TV
RF Connection
A
Disconnect the TV aerial cable from the TV.
B
Connect the TV aerial cable to the ANT. IN connector on the
rear of the recorder.
C
Connect the provided RF cable between the RF OUT
connector on the rear of the recorder and the TV’s aerial
connector.
AV Connection
If your TV is equipped with a AV Input Terminals connector,
perform AV connection to improve picture quality during tape
playback.
A
Connect the aerial, recorder and TV as shown in the
illustration.
B
Connect an optional AV cable between the AUDIO OUT/
VIDEO OUT connector on the rear of the recorder and the
AV-IN terminals.
S-video Connection
(allows you to make the most of the S-VHS picture performance.)
If your TV is equipped with a S-video input connector
A
Perform “RF Connection” previously described.
B
Connect the supplied S-video cable between the S-VIDEO
OUT connector on the rear of the recorder and the S-video
input connector on the TV.
C
Connect an audio cable between the AUDIO OUT connectors
on the rear of the recorder and the audio input connectors on
the TV.
●
Even if you are using audio/video cables to connect your
recorder to your TV, you must also connect it using the RF cable.
This will ensure that you can record one show while watching
another.
D
Connect recorder to mains
Plug the mains power cord into a mains outlet.
Basic Connections
Connect the power plug to an AC outlet before installing the lithium
battery. (
墌
2)
(MONO)
Aerial terminal
S-video cable
(provided)
TV
aerial
cable
RF cable
(provided)
AV cable
(not provided)
Mains power
cord
Mains outlet
Back of recorder
S-VIDEO OUT
AV-IN terminals
AUDIO OUT/VIDEO OUT
Back of TV
HR-S6960AA_EN.fm Page 4 Monday, June 30, 2003 6:18 PM
Summary of Contents for 0703-AH-PJ-BJ
Page 27: ... 27 Memo ...


