Chapter 8---Software and Protocol
8-10
Model 250 Service Manual
8.3 Terminals and Communication Protocols
Terminals
The projector can be controlled by a VT-100 terminal. If a VT-100 is not
available, a PC with Windows 3.1 or ProComm for DOS can emulate a VT-100.
Table 8-1 shows the equivalent commands for the terminal and both remotes.
1.
From Windows Program Manager, select TERMINAL then SETTINGS.
2.
Select TERMINAL EMULATION from SETTINGS menu.
3.
Select DEC VT-100 (ANSI) (may already be selected).
4.
Use a Null Modem cable to connect between the projector and the
terminal.
5.
Use the TERMINAL PREFERENCES and COMMUNICATIONS
PROTOCOL below for Windows setup.
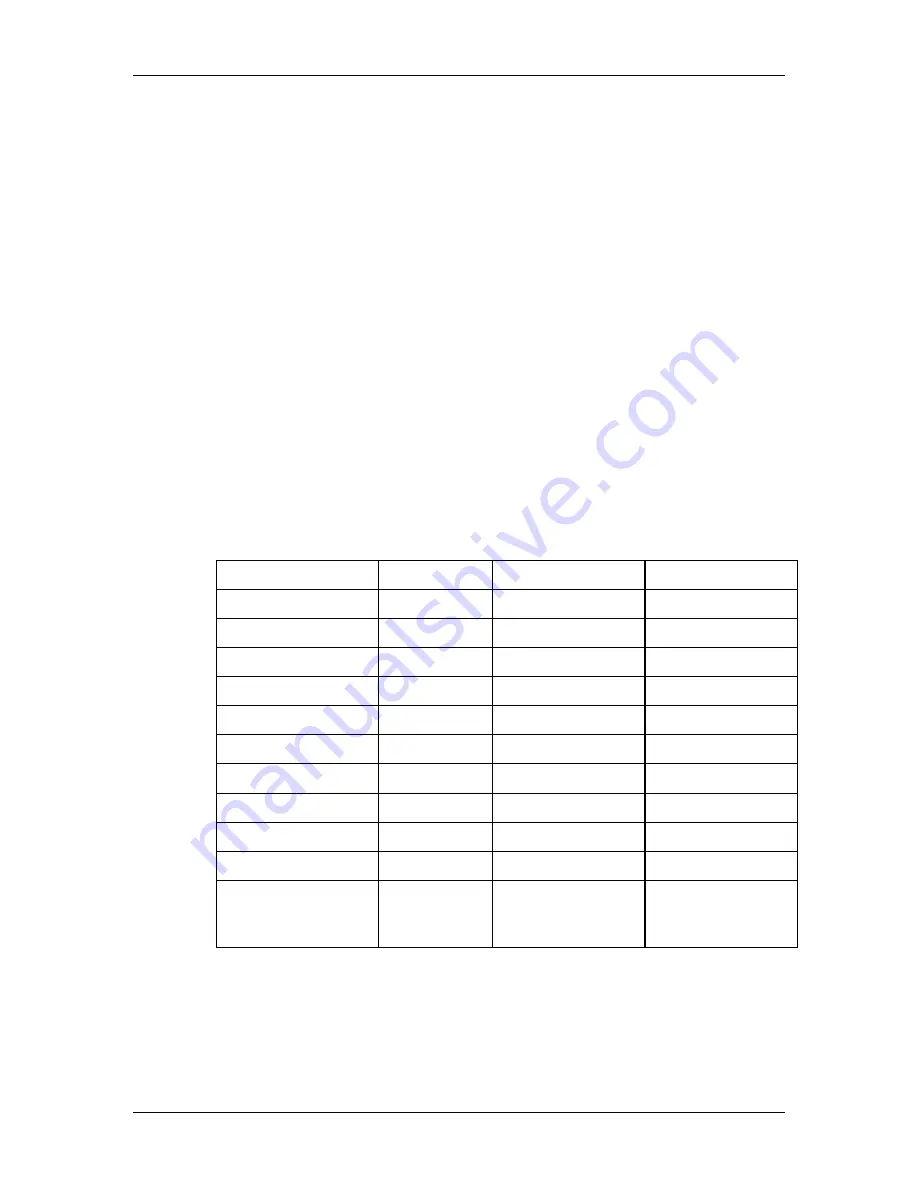
Terminal Preferences
Select SETTINGS again from the menu bar. Select TERMINAL
PREFERENCES. Set the following modes:
Table 8-1
Terminal preference settings
Line Wrap
Yes
CR
"
CR/LF:
Local Echo
No
Inbound
No
Sound
Yes
Outbound
No
Columns:
Cursor:
80:
Yes
Block:
Yes
132:
No
Underline:
No
Blink:
Yes
Terminal Font:
Translations
NONE
Courier 12
IBM to ANSI
No
Terminal Show:
Scroll Bars
Yes
Buffer Lines
100
Use Function Arrow
and Control keys for
Windows
No
Summary of Contents for 250
Page 16: ...Chapter 2 System Description Model 250 Service Manual 2 9 ...
Page 43: ...Chapter 4 Optical 4 10 Model 250 Service Manual Figure 4 6 Optical Path ...
Page 55: ...Chapter 5 Optical 3 4 22 Model 100 Service Manual ...
Page 91: ...Chapter 5 Electronics 5 36 Model 250 Service Manual Figure 5 22 Scan Reversal PCB I O Diagram ...
Page 131: ...Chapter 5 Electronics 5 76 Model 250 Service Manual Figure 5 44 Backplane Diagram right side ...
Page 132: ...Chapter 5 Electronics Model 250 Service Manual 5 77 ...
Page 138: ...Chapter 6 Miscellaneous Items 6 6 Model 250 Service Manual ...
Page 167: ...Chapter 7 Troubleshooting Model 250 Service Manual 7 29 ...
Page 181: ...Chapter 8 Software and Protocol 8 14 Model 250 Service Manual ...
Page 185: ...Chapter 9 Parts List 9 4 Model 250 Service Manual ...


