Chapter 3---Electrical
3-12
Model 250 Service Manual
HVPS - Remove and Replace
Tools Needed
#1 Pozi-drive Phillips-head screwdriver
#2 Pozi-drive Phillips-head screwdriver
small Flathead screwdriver
Parts Needed
High Voltage Power Supply p/n 102566
To remove the High Voltage Power Supply:
1.
Power off the projector by IR Remote or PC, and allow the cooling fans to
run until they shut off.
2.
Turn the AC Circuit Breaker to the OFF position and unplug the AC
Power Cord.
3.
Remove the front cover.
4.
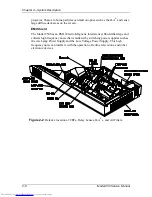
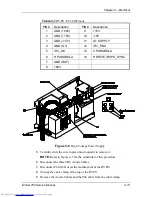
Remove the High Voltage Power Supply cover (see Figure 3-5) by
removing the 1 Pozi-drive screw that secures the HVPS at the bottom of
the cover and loosening the 2 Pozi-drive screws at the top of the front flap.
Figure 3-5
High Voltage Power Supply cover
.
Electronic
Focus
Adjustment
Summary of Contents for 250
Page 16: ...Chapter 2 System Description Model 250 Service Manual 2 9 ...
Page 43: ...Chapter 4 Optical 4 10 Model 250 Service Manual Figure 4 6 Optical Path ...
Page 55: ...Chapter 5 Optical 3 4 22 Model 100 Service Manual ...
Page 91: ...Chapter 5 Electronics 5 36 Model 250 Service Manual Figure 5 22 Scan Reversal PCB I O Diagram ...
Page 131: ...Chapter 5 Electronics 5 76 Model 250 Service Manual Figure 5 44 Backplane Diagram right side ...
Page 132: ...Chapter 5 Electronics Model 250 Service Manual 5 77 ...
Page 138: ...Chapter 6 Miscellaneous Items 6 6 Model 250 Service Manual ...
Page 167: ...Chapter 7 Troubleshooting Model 250 Service Manual 7 29 ...
Page 181: ...Chapter 8 Software and Protocol 8 14 Model 250 Service Manual ...
Page 185: ...Chapter 9 Parts List 9 4 Model 250 Service Manual ...

