background image

JVC 650  
Basic Starter 
Guide 


Battery insertion


The Battery can only be 
Inserted one way. 
If forces is used it will 
cause damage to the  
battery & camera 
 
Insert the battery by sliding 
It in the direction of the 
Arrow until it clicks into 
Place. 
 

Battery Removal 
 

Turn off the camera 
Press the blue button 
Lift up the battery and pull 
Carefully out. 

 
Using AC Power Adaptor 
 

Plug in the power adaptor as shown  
and turn on at the wall.  
Turn on the camera. 


Summary of Contents for 650

Page 1: ...damage to the battery camera Insert the battery by sliding It in the direction of the Arrow until it clicks into Place Battery Removal Turn off the camera Press the blue button Lift up the battery and pull Carefully out Using AC Power Adaptor Plug in the power adaptor as shown and turn on at the wall Turn on the camera ...

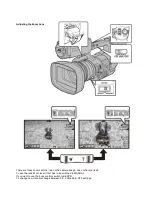
Page 2: ...f the Power Adjusting the LCD Screen Adjust the LCD Screen by folding it out from the camera and carefully turning it to suit your view Adjusting the Viewfinder Adjust the viewfinder to your preferred viewing angle ...

Page 3: ...rrows centre button navigate to System Media Format Media choose Format Slot A or B if SD card installed in this slot press centre button then select Format The Card is then formatted Press MENU THUMB button to clear the screen Lens The Lens has a number of controls these are as follows Lenshood move the lever 2 to open close the lens If your LCD screen viewfinder are both showing black then this ...

Page 4: ...zoom controls two on the camera body one on the lens itself To use the lens Zoom lever it first has to be switched to MANUAL If you want to use the body controls switch to SERVO To change how it zooms change between FIX VARiable OFF settings ...

Page 5: ...ake focusing easier Best Practise Zoom in on your subject eyes focus zoom out again frame your shot Adjusting the Iris Press the Iris Button to change to Manual Iris mode the A icon on the screen disappears Turn the iris ring on the lens to adjust the iris manually A lower number will mean more light getting into the camera but shallower depth a field A higher number will mean less light getting i...

Page 6: ... the ND filter to 1 64 Whereas indoors in dim light set the ND filter to Off The set level of ND filter is shown On the screen as highlighted Setting the Gain Adjust the Gain to Low Medium or High Gain enables the camera to still work in dim light However it introduces grain noise into the signal recorded and so lowers overall quality ...

Page 7: ...lt these are B 3200K to use indoors with tungsten lighting A 5600K to use outside sunny blue sky To make new Presets 1 Set to A or B Presets 2 Press the button whist filling the frame with a white piece of paper or similar that has the same lighting as your subject 3 Adjusting the Brightness Fully Auto Mode Press the Left or Right arrows to adjust the brightness of the picture Press the AE LOCK 4 ...

Page 8: ...ever possible connect it to either Channel 1 or 2 and adjust the settings manually or set to Auto Levels if you are shorthanded or pressed for time Press the Display Button to bring up the sound level monitor on the LCD Screen This will help you check the sound levels in a visual way its good practise to plug in headphones use these too check both the sound levels as well as good microphone positi...

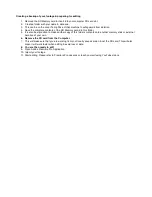
Page 9: ... 5 It is also best practise to make another copy of this folders contents onto another memory stick or external hardrive of your own 6 Remove the SD card from the Computer 7 This will make sure that you are working from your locally saved version not the SD card This will also mean it will work faster when editing avoid loss of data 8 You are then ready to edit 9 Open Adobe Premiere Pro Applicatio...

Reviews: