background image

5

C O N N E C T I O N S

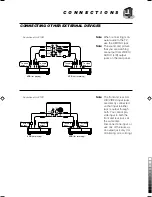
CONNECTING OTHER EXTERNAL DEVICES

To audio 
input

To video 
input

VCR 

(for playing)

VCR 

(for recording)

To video 
output

To audio 
output

Note:

When connecting mon-
aural audio to the TV,
use the L/MONO jack.

Note:

The sound and picture
that you are watching
are output from VIDEO/
AUDIO (L/R) output
jacks on the rear panel.

Note:

The front and rear AU-
DIO/VIDEO input jacks
are directly connected
so that input to either
jack is output through
both. You cannot pro-
vide input to both the
front and rear jacks at
the same time.
Disconnect one input, or
use one of the jacks as
an output jack only (for
monitoring or recording.)

To audio 
input

To video 
input

VCR 

(for playing)

VCR 

(for recording)

To video 
output

To audio 
output

Illustration of AV-21D31

Illustration of AV-21D11

 LCT1013-001A-H (02-09)

01.6.7, 10:56 PM

5

Black

Summary of Contents for AV-14F11

Page 1: ...NSTRUCTIONS COLORTELEVISION AV 21D31 AV 20N31 AV 14F31 AV 21D11 AV 20N11 AV 14F11 VICTOR COMPANY OF JAPAN LIMITED LCT1013 001A H 0601 Ki NV PH 2001 VICTOR COMPANY OF JAPAN LIMITED 01 6 7 10 57 PM 1 Black ...

Page 2: ...he power plug from the AC outlet TABLE OF CONTENTS CONNECTIONS Front Rear Panel Diagrams 3 Indoor Antenna Connection 3 Connecting the Antenna and VCR 4 Connecting other External Devices 4 GETTING STARTED Remote Controls 6 Power 7 Adjusting Volume 7 Changing Channels 7 MENU FUNCTIONS Using the Menu 8 Initial Setup Auto Tuner Setup 9 Background 9 Closed Caption 9 Language for on screen menus 9 Noise...

Page 3: ... and connect the Matching adaptor to the TV RF input You will receive the best reception or best picture if you use connect your TV to an outdoor antenna of a cable output ON TIMER POWER MENU L MONO IN VIDEO 2 CHANNEL OPERATE EXIT VOLUME V R AV 21D31 Front Panel AV 20N31 AV 14F31 Front Panel VIDEO AUDIO IN MENU CHANNEL OPERATE POWER EXIT VOLUME ON TIMER AV 21D11 Front Panel AV 20N11 AV 14F11 Front...

Page 4: ...rectly connected so that input to either jack is output through both You cannot provide input to both the front and rear jacks at the same time Disconnect one input or use one of the jacks as an output jack only for monitoring or recording CONNECTING OTHER EXTERNAL DEVICES Note Use headphones with a stereo mini jack When using headphones the speaker sound output is disabled MENU L MONO IN VIDEO 2 ...

Page 5: ...VIDEO AUDIO L R output jacks on the rear panel Note The front and rear AU DIO VIDEO input jacks are directly connected so that input to either jack is output through both You cannot pro vide input to both the front and rear jacks at the same time Disconnect one input or use one of the jacks as an output jack only for monitoring or recording To audio input To video input VCR for playing VCR for rec...

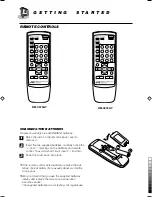
Page 6: ...nd markings on the batteries and remote control To avoid a short circuit insert end first 3 Snap the cover back into place If the remote control acts erratically replace the bat teries Typical battery life is usually about six months to one year We recommend that you use the supplied batteries initially and replace them as soon as operation becomes erratic The supplied batteries are for testing no...

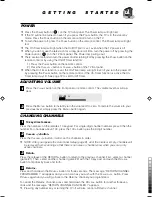
Page 7: ...r remote control The volume level bar will ap pear 2 Press the MUTING button to instantly turn the volume off to zero To restore the volume to your previous level simply press the MUTING button again CHANGING CHANNELS 1 10 key direct access Press the numbers on the remote s 10 key pad For single digit channel numbers press 0 then the number For channels above 100 press the 100 button plus the 2 di...

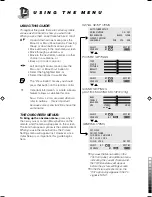
Page 8: ...MENUS To bring up the onscreen menu press any of the 4 way cursor control MENU buttons on the remote and the menu will appear on the screen The item that appears yellow is the selected item When you use the menu buttons the Picture Settings menu will appear first However since Initial Setup is so important this guide begins here If you use the Menu button on the TV s front panel an additional menu...

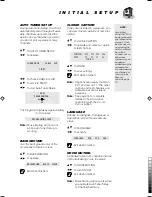
Page 9: ...ed in Scan Some weak channels may be included or omitted during this procedure You can add or delete any channels for scanning in the Channel Summary page 13 CLOSED CAPTION If they are included in a program you can view closed captions or text infor mation To CLOSE CAPTION To operate and select a caption or text channel CAPTION CC1 CC2 CC3 CC4 TEXT T1 T2 T3 T4 FINISH To FINISH To save settings EXI...

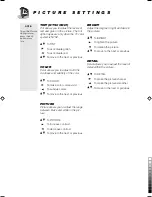
Page 10: ...lety of the color To COLOR To make colors more vivid To subdue colors To move to the next or previous PICTURE Picture allows you to adjust the range between black and white in the pic ture To PICTURE To increase contrast To decrease contrast To move to the next or previous BRIGHT Adjust the degree of light and dark in the picture To BRIGHT To lighten the picture To darken the picture To move to th...

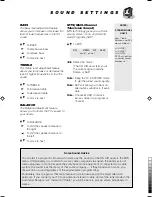
Page 11: ...MTS menu Unfortunately it is common for some cable companies to squash the transmission of stereo programs to mono because they only have mono equipment If connected to a cable system the sound is at the mercy of that cable company if they broadcast in mono you receive mono sound regardless of the original stereo programming Fortunately most programs that are broadcast in stereo are aired on the m...

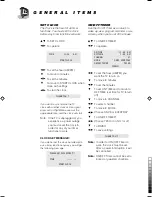
Page 12: ...t the clock but attempt to use a timer function anyway you will get the following message PLEASE SET CLOCK FIRST TIME START CLOCK ON OFF TIMER Use the On Off Timer as an alarm to wake up as a program reminder or as a decoy when you re out of the house To ON OFF TIMER To operate ON TIME 12 00 AM OFF TIME 1 00 AM CHANNEL 07 MODE ONCE EVERYDAY ON OFF TIMER YES NO FINISH To set the hour AM PM you want...

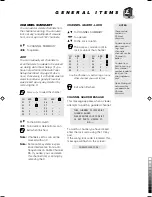
Page 13: ...CHANNEL m to select the channel CH ADD CH ADD 01 X 06 X 02 X 07 03 08 04 X 09 X 05 X 10 X To the ADD column To include or delete from scan Exit when finished Note Channels set to scan will be marked with an X Note Some cable systems experi ence interference from radio frequencies on Cable Channel 95 If you like you can delete this channel from scanning by removing the X CHANNEL GUARD LOCK To CHANN...

Page 14: ...umber To move to the next place Continue to follow these directions for all three numbers To FINISH To save settings and exit Note If you forget the Lock Code you can set another one this same way Note After a power interruption you must reset the lock code CHILD LOCK You can disable the front control buttons of the TV When this function is set to ON the TV can be operated using only the re mote c...

Page 15: ... off for another 15 minutes HYPER SURROUND AV 21D31 AV 20N31 AV 14F31 ONLY Creates a deep 3 dimensional sound effect by channeling the sound through the TV s front firing speakers HYPER SURROUND DISPLAY The Display screen shows the current status of timers and inputs DISPLAY 07 NOW 12 20 PM SLEEP TIMER OFF ON OFF TIMER EVERYDAY ON TIME 7 00 PM OFF TIME 10 00 PM The channel or AV input Channel 07 C...

Page 16: ...n again MENU BUTTONS The MENU buttons allow you to control the options located in the menu screens A complete discussion on these buttons and on the menu system is located on page 8 TV VIDEO TV Video selects the input mode TV VIDEO AV 21D11 AV 20N11 AV 14F11 TV VIDEO AV 21D31 AV 20N31 AV 14F31 TV VIDEO 1 VIDEO 2 VIDEO 1 The video signal input to the input terminal on the rear panel is selected VID...

Page 17: ...or mal when you set the Picture Booster to HIGH then set it to LOW or OFF RETURN There are two kinds of Return Return Set a Return Channel to return to after scanning with CHANNEL m RETURN and hold for 3 seconds RETURN CHANNEL PROGRAMMED Scan with CHANNEL m RETURN Note To cancel a Return channel press and hold the RETURN button for another 3 seconds until Return Channel Canceled appears Return Ret...

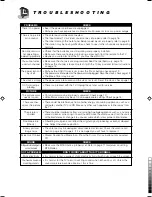
Page 18: ...page 12 The power was interrupted or the power cord unplugged Reset the clock check page 12 The Sleep Timer may be set The power was interrupted and the clock not reset Reset the clock check page 12 There is a problem with the TV Unplug the set and call for service CHECK Tint and color may be improperly adjusted Check page 10 Video Status mode may be set to an inappropriate setting Check page 15 T...

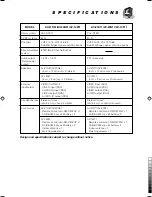
Page 19: ... 1 VIDEO 2 VIDEO input RCA input output VIDEO input RCA AUDIO input RCA AUDIO L R input RCA VIDEO output RCA VIDEO output RCA AUDIO output RCA AUDIO L R output RCA Headphone jack Stereo mini jack Stereo mini jack dia 3 5 mm sound is stereo dia 3 5 mm sound is monaural Accessories AV 21D31 AV 20N31 AV 21D11 AV 20N11 Remote control unit RM C373GY 1 Remote control unit RM C372GY 1 AA R6 UM 3 dry cell...

Reviews: