background image

INSTRUCTIONS

GGT0121-001A-H

AV-29BA16 AV-21BA16
AV-29MT16 AV-21MT16
AV-29ST16 AV-21VT16 
 AV-29VT16

AV-25MT16

COLOR  TELEVISION 

EQUALIZER • CINEMA SURROUND • COMPONENT INPUT

Contents

Knowing your TV’s features .......................................................3
Remote control buttons and basic functions ..............................4
TV buttons and functions ............................................................6
Setting up your TV ......................................................................7
Basic setting for picture ..............................................................9
Advanced setting for picture ..................................................... 11
Basic setting for sound .............................................................12
Advanced setting for sound ......................................................13
DVD Menu ................................................................................15
Customized setting ...................................................................16
TV channel presetting ..............................................................18
Additional preparation ..............................................................19
Troubleshooting ........................................................................20
Speci

fi

 cations ...........................................................................21

GGT0121-001A-H.indd   1

GGT0121-001A-H.indd   1

23.06.2006   9:26:18 Uhr

23.06.2006   9:26:18 Uhr

Summary of Contents for AV-21BA16

Page 1: ...Contents Knowing your TV s features 3 Remote control buttons and basic functions 4 TV buttons and functions 6 Setting up your TV 7 Basic setting for picture 9 Advanced setting for picture 11 Basic setting for sound 12 Advanced setting for sound 13 DVD Menu 15 Customized setting 16 TV channel presetting 18 Additional preparation 19 Troubleshooting 20 Specifications 21 ...

Page 2: ...The surface of the TV screen is easily damaged Be very careful with it when handling the TV Should the TV screen become soiled wipe it with a soft dry cloth Never rub it forcefully Never use any cleaner or detergent on it 7 This TV can be turned on off power by connecting disconnecting the AC plug into AC outlet While this TV is being installed enough space should be reserved for connection discon...

Page 3: ...D player the television will display the previous channel MaxxBass MaxxBass enhances bass sound that cannot be reproduced by normal speakers to be heard by our ears MTS You can listen the stereo sound or SAP from TV program broadcating by MTS system SAP Second audio program CLOSED CAPTION You can display dialog on the screen from TV broadcasting with Closed caption system You also may be able to d...

Page 4: ...t the program number For three digits program number press 100 then press the number button RETURN a Return to the frequently view channel with one touch 1 Choose the channel you want to register 2 Press and hold RETURN button until RETURN PLUS PROGRAMMED appears To cancel press and hold RETURN button until RETURN PLUS CANCELED appears b Return to the previously viewed channel if you have not set ...

Page 5: ...press the 2 3 buttons 3 to change the setting Press the TV VIDEO EXIT button 6 to exit from the menu Adjust the effect level of a function Press 5 buttons 3 to choose a function Then press the 2 3 buttons 3 to adjust the effect level Display the sub menu of a function Press the 5 buttons 3 to choose a function Then press MENU OK button 2 to display the sub menu Top menu 2nd menu Location 3nd menu ...

Page 6: ...0 15 seconds When you operate the TV POWER Lamp will be blink 3 ECO sensor 4 Remote control sensor 5 TV VIDEO Press to select TV or Video terminal input or exit from menu 6 VOLUME Press to adjust the volume level 7 CHANNEL Press to select the desired channel Both of RF and Video input 8 MENU OK Press to display the menu 9 IN VIDEO 3 Video and audio input jacks for VIDEO 3 mode 19 Headphone jack 19...

Page 7: ...ears on the screen V L R R L MONO Y CB CR V V S OVER L R MONO OUTPUT VIDEO 1 COMPONENT VIDEO 2 INPUT INPUT Rear of TV AV 29ST16 VHF UHF outdoor aerial VCR If you connect a VCR connect the aerial output jack of your VCR and the aerial jack on the TV with aerial cable Then connect the output jacks of your VCR and the VIDEO 1 input jacks of the TV with the video cable or S VIDEO cable if available an...

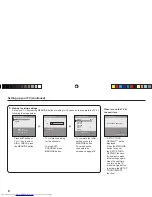
Page 8: ... the MENU OK button To set undesired channels to be skipped see page 18 SETUP TOUR RESTART will be displayed Press the MENU OK button to cancel the SETUP TOUR RESTART function If you want to make initial settings again when the next time you turn on the TV press the Red button to activate the SETUP TOUR RESTART function AUTO PROGRAM MENU OK DISPLAY BACK TV VIDEO EXIT AUTO PROGRAM MENU OK 10 CHANNE...

Page 9: ...hen you set DVD THEATER STATUS in DVD MENU to ON you cannot adjust PICTURE MODE To operate this function with a menu To return the USER setting to default press the blue button when the PICTURE SETTING menu is displayed Basic setting for picture AUTO PAL SECAM NTSC3 58 NTSC4 43 MENU INSTALL menu COLOR SYSTEM MENU PICTURE menu PICTURE MODE Area Country or Region System Asia Middle East Bahrain Kuwa...

Page 10: ...cannot adjust DETAIL Basic setting for picture continued WHITE BALANCE You can change the white balance of the picture to better match the type of video being viewed Select WHITE BALANCE in the PICTURE menu then choose the desired setting NORMAL Normal white balance COOL Bluish white WARM Reddish white When you set DVD THEATER STATUS in DVD MENU to ON you cannot adjust WHITE BALANCE MENU PICTURE m...

Page 11: ...ollowing display appears 2 Press the 5 buttons until the picture becomes level Then press the MENU OK button COMPRESS 16 9 You can convert a normal picture 4 3 aspect ratio into a wide picture 16 9 aspect ratio Select COMPRESS 16 9 in the FEATURES menu then choose ON or OFF BLUE BACK You can set the TV to automatically change to a blue screen and mute the sound if the signal is weak or absent or w...

Page 12: ...hasize on movie sound MUSIC Emphasize on music effect NEWS Emphasize on vocal sound When you select VIDEO 2 you cannot adjust SOUND MODE function You can adjust it in DVD Menu When SOUND MODE is set to SOUND TURBO EQUALIZER CINEMA SURROUND and MaxxBass functions are not available BALANCE You can adjust the volume balance between the left and right speakers Select BALANCE in SOUND menu then adjust ...

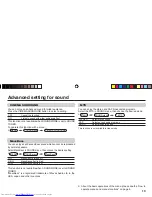
Page 13: ...n SOUND MODE is set to SOUND TURBO To operate this function with a menu Advanced setting for sound MENU SOUND menu CINEMA SURROUND MaxxBass You can enjoy an enhanced bass sound which cannot be reproduced by normal speakers Select MaxxBass in SOUND menu then choose the desired setting OFF MaxxBass is turned off HIGH MaxxBass effect is high LOW MaxxBass effect is low MENU SOUND menu MaxxBass This fu...

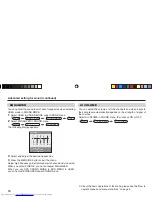
Page 14: ...set DVD SOUND MODE in DVD MENU to USER you can adjust EQUALIZER under SOUND menu IIIIIII IIIIIIIIIIIIIIII IIIIIIII 100 300 1K 3K 8K Hz EQUALIZER MENU OK DISPLAY BACK TV VIDEO EXIT IIIIIIIIIIIIIIII MENU SOUND menu SOUND MODE USER MENU SOUND menu EQUALIZER MENU SOUND menu AI VOLUME AI VOLUME You can adjust the volume of all the channels and video inputs to the same level automatically depends on the...

Page 15: ...eater Select DVD THEATER STATUS in DVD MENU under FEATURES menu then choose ON or OFF ON Enjoy movie playback with suitable color temperature sharp subtitles and improved gradation for black like in a theater OFF Cancel the function When you set DVD THEATER STATUS to ON PICTURE MODE WHITE BALANCE and AI ECO SENSOR ECO MODE functions are not available DVD SOUND MODE You can choose different sound s...

Page 16: ...ns of the menu please see the How to operate menus and menus locations on page 5 MENU FEATURES menu CHILD LOCK 2 Choose the CH channel by pressing the 2 3 button External input AV position and any un preset channel cannot be chosen for CH 3 Set the ON TIMER to your desired period of time by pressing the 2 3 button ON TIMER starts You can set the period of time to a maximum of 12 hours in 15 minute...

Page 17: ...DEO 2 SETTING in INSTALL menu then choose a setting Factory setting is COMPONENT MENU INSTALL menu VIDEO 2 SETTING VIDEO If a normal video signal composite video signal is input COMPONENT If a component video signal Y CB CR is input You must choose a setting according to the signal that you input to VIDEO 2 If you input the VIDEO Signal or VCR Signal to VIDEO 2 you must set VIDEO 2 SETTING to VIDE...

Page 18: ...OK button CHANNEL SUMMARY menu appears 3 Choose the channel which you want to skip The skip can be set to all channels of AIR CH02 CH69 and CABLE CC01 CC125 4 Press the yellow button to skip the channel To cancel the skip press the blue button 5 Press the MENU OK button to exit the menu CHANNEL SUMMARY MENU OK SKIP CANCEL CH CC SKIP CH 02 CH 03 CH 04 CH 05 CH 06 CH 07 CH 08 MENU INSTALL menu MENU ...

Page 19: ...ng the TV Note that connecting cables are not supplied Connecting to front video input terminals Additional preparation Connecting to rear component video input terminals and output terminals C MENU OK V R L MONO IN VIDEO 3 R V L MONO IN VIDEO 3 Front of TV Headphones AV 29ST16 AV 21BA16 Camcorder or TV game When connecting to COMPONENT VIDEO 2 input depending on the connection choose the appropri...

Page 20: ... Please disconnect either S VIDEO cable or video input cable from Video 1 input No picture no sound Deactivate the BLUE BACK function if it is turned on Snowy picture Check the aerial cable and its connection with the TV Stripes appear on the picture Interference occurs caused by other devices such as an amplifier personal computer or a hair drier Move such devices away from your TV Double picture...

Page 21: ...O L R input VIDEO 2 COMPONENT VIDEO input AUDIO L R input COMPONENT VIDEO Y CB CR input VIDEO 3 VIDEO input AUDIO L R input OUTPUT VIDEO output AUDIO L R output Headphone jack Stereo mini jack 3 5 mm diameter Sound multiplex systems MTS Multi channel Television Sound Except AV 29BA16 AV 21BA16 AV STEREO For AV 29BA16 AV 21BA16 only Viewing Screen Size Visible area AV 21BA16 508 mm AV 21MT16 508 mm...

Page 22: ...22 MEMO ...

Page 23: ...23 MEMO ...

Page 24: ... 2006 Victor Company of Japan Limited 0606 FLE JMT ...

Reviews: