(No.YA318)1-41
4.6.3.3
DEFLECTION ADJUSTMENT
Item
Measuring
instrument
Test point
Adjustment part
Description
V. POSITION /
V.SIZE /
V.LINEARITY
adjustment
Signal
generator
Remote
control unit
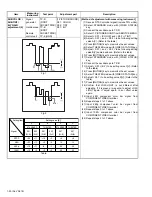
[1.PICTURE/SOUND]
D01 : V. SIZE
D05 : V. LINE
D06 : V. CENT
F62 : Without
convergence operation
• To memorize every time after finish adjustment on each
mode.
(1) Receive NTSC circle pattern signal.
(2) Select FULL mode with [ASPECT] key.
(3) Select 1. PICTURE/SOUND from SERVICE MENU.
(4) Select < F62 > (Without convergence operation).
(5) Change the data 0 to 1, then it makes picture without
convergence operation.
(6) Select < D01 > (V. SIZE), < D05 > (V. LINE) and
< D06 > (V. CENT).
(7) Adjust < D01 >, < D05 > and < D06 > to make A = B
(precision ±2mm), and adjust to make C same value
as table.
(8) After adjustment, select < F62 > and change the
data 1 to 0.
(9) Press [MUTING] key to memorize the set value.
NOTE :
Do not adjust < D04 > (V. SCORE), if it is different
vertical position after adjust vertical linearity, to adjust
vertical position.
H. POSITION
adjustment
Signal
generator
Remote
control unit
[1.PICTURE/SOUND]
D14 : H. CENTER
F62 : Without
convergence operation
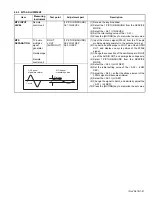
(1) Receive NTSC circle pattern signal.
(2) Select FULL mode with [ASPECT] key.
(3) Select 1. PICTURE/SOUND from SERVICE MENU.
(4) Select < F62 > (Without convergence operation).
(5) Change the data 0 to 1 with [VOL-/VOL+] key, then
it makes picture without convergence operation.
(6) Select < D14 > (H. CENTER).
(7) Adjust < D14 > to make D = E as shown figure.
(8) After adjustment, select < F62 > and change the
data 1 to 0.
(9) Press [MUTING] key to memorize the set value.
H. SIZE
adjustment
Signal
generator
Remote
control unit
[1.PICTURE/SOUND]
D03 : H. SIZE
F62 : Without
convergence operation
(1) Receive NTSC crosshatch signal.
(2) Select FULL mode with [ASPECT] key.
(3) Select 1. PICTURE/SOUND from SERVICE MENU.
(4) Select < F62 > (Without convergence operation).
(5) Change the data 0 to 1, then it makes picture without
convergence operation.
(6) Select < D03 > (H. SIZE).
(7) Adjust < D03 > to make sure that the vertical screen
size of the picture size is 92%.
(8) After adjustment, select < F62 > and change the
data 1 to 0.
(9) Press [MUTING] key to memorize the set value.
C
no-signal area
no-signal area
C
B
A
C
55mm
75mm
48"
56"
D
E
Picture size
100%
Screen size
(92%)
Summary of Contents for AV-48P776/H
Page 1: ......
Page 92: ... No YA318 2 4 ...
Page 135: ...2 47 No YA318 PATTERN DIAGRAMS MAIN PWB PATTERN SOLDER SIDE ...
Page 136: ... No YA318 2 48 FRONT ...
Page 137: ...2 49 No YA318 MAIN PWB PATTERN PARTS SIDE ...
Page 138: ... No YA318 2 50 FRONT ...


