No. 51914
AV-48WP30
12
!
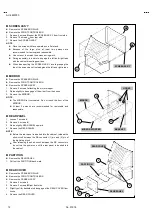
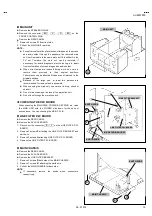
SCREEN ASS’Y
"
Remove the SPEAKER GRILLE.
"
Remove the FRONT CONTROL BOX.
1. Remove
4
screws
G
under the SCREEN ASS’Y from front side.
2. Remove
10
screws
H
from rear side.
3. Remove the SCREEN ASS’Y.
NOTE
:
"
Place the screen with face upwards on a flat stand.
"
Because of the large size, at least two parsons are
recommended for removal and reassemble.
"
Use core not to scratch the screen during work.
"
During assembly, be sure to engage the left and right tabs
with the cabinet mounting positions.
"
When than sporting the SCREEN ASS’Y, avoid grasping the
top of the screen panel, instead grasp the left and right areas.
!
MIRROR
"
Remove the SPEAKER GRILLE.
"
Remove the FRONT CONTROL BOX.
"
Remove the SCREEN ASS’Y.
1. Remove
2
screws
I
attaching the mirror stopper.
2. Raise slightly to disengage of the mirror from the hooks.
3. Remove the MIRROR.
NOTE
:
"
The MIRROR is front-coated. Do not touch the front of the
MIRROR.
"
At least 2 persons are recommended for removable and
reassemble.
!
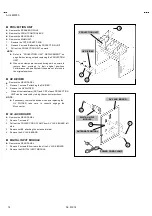
REAR PANEL
1. Loosen 7 screws
J.
2. Remove
4
screws
K
.
3. Raise slightly REAR PANEL upward.
4. Remove the REAR PANEL.
NOTE
:
"
Before the rear panel is inserted into the cabinet, release the
short-circuit between the SB connector (1) pin and (2) pin of
the digital input unit
"
After releasing the short-circuit between the SB connectors,
do not turn the power on until the rear panel is inserted into
the cabinet
!
PARTITION
"
Remove the REAR PANEL.
1. Pull out the PARTITION back ward.
!
REAR COVER
"
Remove the SPEAKER GRILLE.
"
Remove the FRONT CONTROL BOX.
"
Remove the SCREEN ASS’Y.
1. Remove
2
screws
L
.
2. Remove
2
screws
M
from front side
3. Slightly pull for backside to disengage of the REAR COVER from
hooks.
4. Remove the REAR COVER.
M
M
MIRROR
I
HOOKS
BRACKET
MIRROR STOPPER
PARTITION
L
J
J
L
REAR PANEL
REAR COVER
K
J
SCREEN ASS’Y
H
G
G
G
G
G
G
G
G
Summary of Contents for AV-48WP30
Page 1: ......


