background image

6

Prep

a

rat

io

n

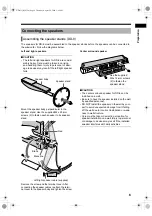
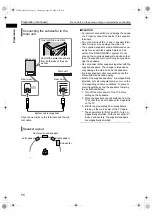
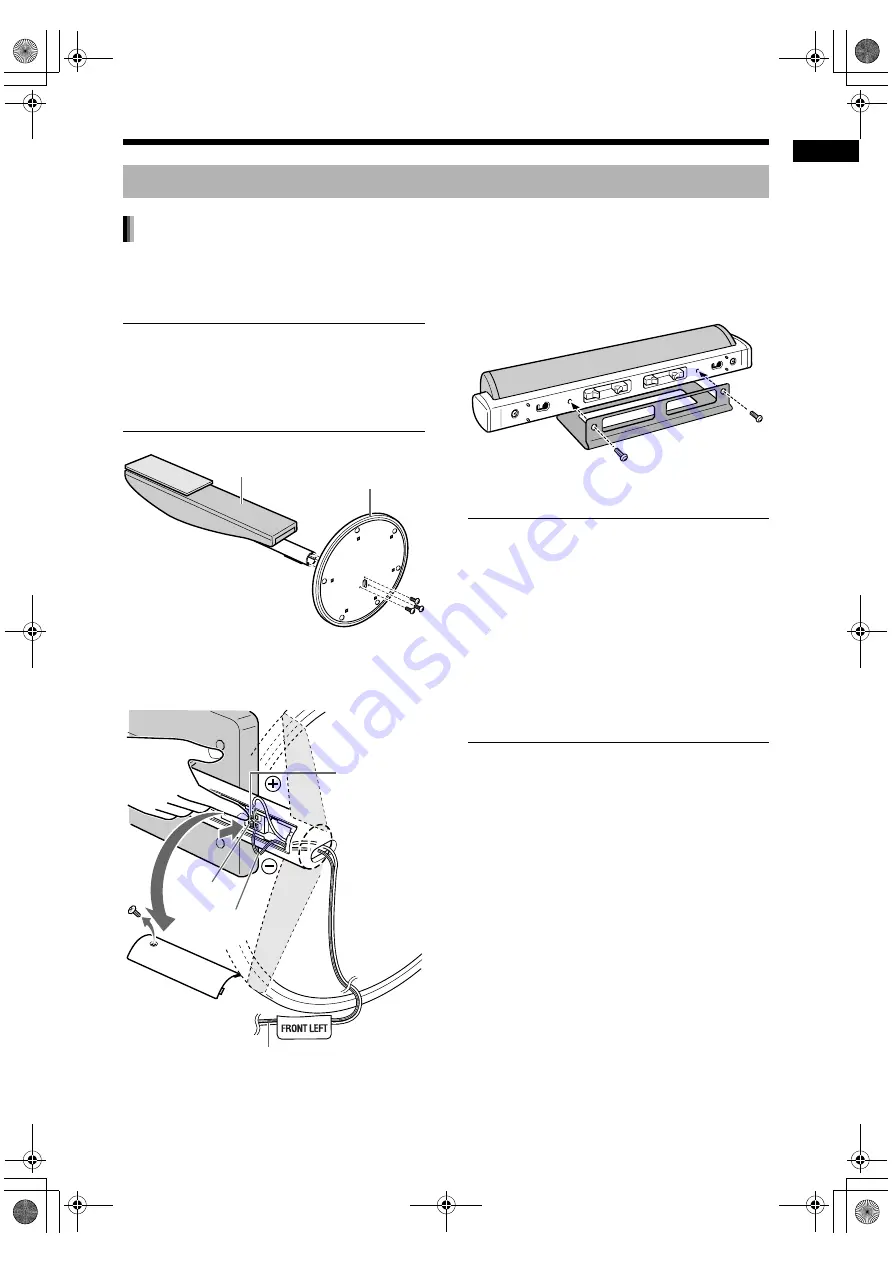
The speakers for DD-8 must be assembled to the speaker stands before the speakers can be connected to 
the subwoofer. Follow the diagrams below. 

Left and right speakers

 CAUTION

• The left and right speakers for DD-8 are consid-

erably heavy. Care must be taken in carrying 
and handling them. Injury to personnel or dam-
age to devices may result if the left/right speaker 
falls.

Mount the speaker body perpendicular to the 
speaker stand. Use the supplied M4 x 25-mm 
screws (3) to fasten each speaker to its speaker 
stand.

Center surround speaker

 CAUTION

• The center surround speaker for DD-8 can be 

installed on a wall. 

• Be sure to have the speaker installed on the wall 

by qualified personnel. 

• DO NOT install the speaker on the wall by your-

self to avoid unexpected damage from it falling 
off the wall due to incorrect installation or weak-
ness in wall structure. 

• Care must be taken in selecting a location for 

speaker installation on a wall. Injury to personnel 
or damage to devices may result if the installed 
speaker interferes with daily activities. 

Connecting the speakers

Assembling the speaker stands (DD-8)

Speaker body

Speaker stand

Black line

Left/right speaker cable (supplied)

Remove the screw and the terminal cover. After 
connecting the speaker cables, reattach the termi-
nal cover to the speaker body and tighten the screw.

Red

Black

Use the supplied 
M5 x 14-mm screws 
(2) to fasten the 
speaker stand.

DD-831[B]-03.fm  Page 6  Thursday, August 24, 2006  1:46 PM

Summary of Contents for CA-DD1

Page 1: ... 8 Consists of CA DD8 SP PWDD8 SP DD8F and SP DD8S DD 3 Consists of CA DD3 SP PWDD3 SP DD3F and SP DD8S DD 1 Consists of CA DD1 SP PWDD1 SP DD1F and SP DD1S DIGITAL MEDIA SYSTEM Only for DD 8 and DD 3 DD 831 B book Page 1 Tuesday August 1 2006 12 09 PM ...

Page 2: ...us IMPORTANT FOR LASER PRODUCTS 1 CLASS 1 LASER PRODUCT 2 CAUTION Do not open the top cover There are no user serviceable parts inside the unit leave all servicing to qualified service personnel 3 CAUTION Visible and or invisible class 1M laser radiation when open Do not view directly with optical instruments 4 REPRODUCTION OF LABEL CAUTION LABEL PLACED INSIDE THE UNIT CAUTION Proper Ventilation T...

Page 3: ... should not be disposed as general household waste at its end of life Instead the product should be handed over to the applicable collection point for the recycling of electrical and electronic equipment for proper treatment recovery and recycling in accordance with your national legislation By disposing of this product correctly you will help to conserve natural resources and will help prevent po...

Page 4: ...ff The power can be remote controlled CAUTION SP PWDD8 SP PWDD3 SP PWDD1 The power supply to the subwoofer is linked to the center unit Disconnect the mains plug to shut the power off completely the POWER ON lamp goes off When installing the apparatus ensure that the plug is easily accessible When the system is turned on the POWER ON lamp lights green CAUTION To avoid personal injury or accidental...

Page 5: ...s unattended unless it is specifically stated that it is designed for unattended operation or has a standby mode Switch off using the switch on the equipment and make sure that your family know how to do this Special arrangements may need to be made for infirm or handicapped people DON T use equipment such as personal stereos or radios so that you are distracted from the requirements of traffic sa...

Page 6: ... 27 Display window on the main unit for disc file types 28 Stopping playback 30 Resuming playback 30 Pausing playback 31 Advancing the picture frame by frame 31 Fast reverse fast forward search 31 Playing back from a position 10 seconds before 31 Slow motion playback 31 Skipping to the beginning of a chapter track file 31 Selecting a chapter track using the number buttons 32 Skipping at approximat...

Page 7: ...58 Supplied accessories 58 Playing back sources from other devices Operating other devices using the remote control Reference How to read this manual This manual explains operations assuming that you will use the remote control Some buttons on the main unit are the same as those on the remote control You can use either button in this case This manual explains operations mainly with diagrams of the...

Page 8: ...ay window 2 For DD 8 DD 3 users Refer to the separate volume of the operation manual for the network function For DD 1 users The LAN terminal is not available 3 For DD 8 DD 3 users Refer to page 12 For DD 1 users The HDMI terminal is not available Refer to Display window shown below Front view These terminals are available when the front cover is open Remote control sensor STANDBY lamp Rear view D...

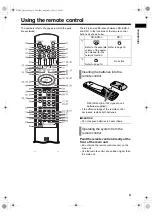
Page 9: ...emote control directly at the front of the main unit Do not block the remote control sensor on the main unit Use the remote control at a position higher than the main unit DD 8 DD 3 DD 1 1 Refer to the separate volume of the opera tion manual for the network function Refer to page 19 2 Refer to page 19 No button Inserting the batteries into the remote control R6P SUM 3 AA 15F type dry cell batteri...

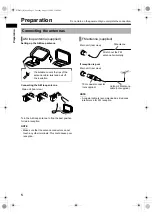
Page 10: ...ded as it reduces interference for FM reception Connecting the antennas AM loop antenna supplied If insulation covers the tips of the antenna cable twist and pull off the insulation Main unit rear view FM antenna supplied Main unit rear view FM antenna Stretch out the FM antenna horizontally Main unit rear view Outdoor FM antenna cable not supplied 75 Ω coaxial connector not supplied Preparation D...

Page 11: ...to have the speaker installed on the wall by qualified personnel DO NOT install the speaker on the wall by your self to avoid unexpected damage from it falling off the wall due to incorrect installation or weak ness in wall structure Care must be taken in selecting a location for speaker installation on a wall Injury to personnel or damage to devices may result if the installed speaker interferes ...

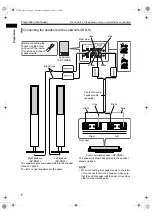
Page 12: ...he same Black lines Black Gray Black Blue Black Rear view Gray Blue Left Right The speaker is shown assembled to the speaker stand on page 6 NOTE When connecting the speaker cable to the termi nal on the center surround speaker make sure that the end of speaker cable does not touch any other nearby metallic parts Right speaker SP DD8F Left speaker SP DD8F Center surround speaker cable supplied Pre...

Page 13: ...over and then affix the bottom cover to the left right speaker DO NOT install the speakers on the wall by your self to avoid unexpected damage from them fall ing off the wall due to incorrect installation or weakness in wall structure Care must be taken in selecting a location for speaker installation on a wall Injury to personnel or damage to devices may result if the installed speakers interfere...

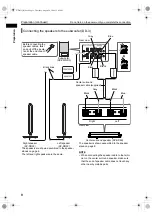
Page 14: ...nes Black Gray Black Blue Black Black Rear view Gray Blue Rear view Left Right The speaker is shown assembled to the speaker stand on page 8 NOTE When connecting the speaker cable to the termi nal on the center surround speaker make sure that the end of speaker cable does not touch any other nearby metallic parts Right speaker SP DD3F Left speaker SP DD3F Center surround speaker cable supplied Pre...

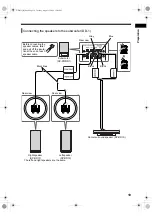
Page 15: ... pull off the insula tion at the end of each speaker cable Rear view Subwoofer SP PWDD1 Center surround speaker SP DD1S Black lines Black Black Rear view Gray Blue Rear view Rightspeaker SP DD1F Leftspeaker SP DD1F The left and right speakers are the same DD 831 B book Page 10 Tuesday August 1 2006 12 09 PM ...

Page 16: ...on some conditions To prevent color irregularity set up the speakers following the instructions below 1 Turn off the main power of the TV before setting up the speakers 2 Place the speakers enough distance from the TV so that they do not cause color irregularity on the TV 3 Wait for approximately 30 minutes before turning on the main power of the TV again The subwoofers for DD 3 and DD 1 are not m...

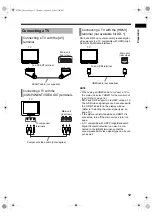
Page 17: ...MI TV is connected turn off the main unit and turn it on again A TV compatible with HDCP High Bandwidth Digital Content Protection can also be con nected to the HDMI terminal so that the uncompressed HD video signal type can be out put as well Connecting a TV Connecting a TV with the AV terminal TV To a SCART terminal SCART cable not supplied Main unit rear view Connecting a TV with the COMPONENT ...

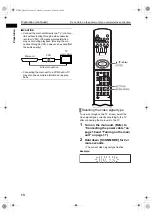
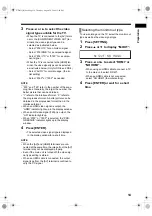
Page 18: ...ay back To view an image on the TV screen select the video signal type correctly according to the TV after connecting the main unit to the TV 1 Turn on the main unit Refer to Connecting the power cable on page 16 and Turning on the main unit on page 17 2 Hold down SCAN MODE for 2 or more seconds The current video signal type flashes Example Main unit Direct connection TV or monitor VCR Selecting t...

Page 19: ...l is output the HDMI indicator lights up in the display window When an HD video signal 720p is output the HD indicator lights up When 576P or 720P is selected the PRO GRESSIVE indicator lights up in the display window 4 Press ENTER The selected video signal type is displayed in the display window for a short time NOTE When the AV and HDMI terminals are con nected at the same time the image from th...

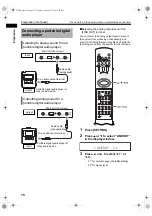
Page 20: ... setting L2 for higher level Connecting a portable digital audio player Listening to analog sound from a portable digital audio player Main unit front view Input Output Portable digital audio player or other audio device Audio cable notsupplied To an audio output terminal Outputting analog sound to a portable digital audio player Output Main unit front view Audio cable not supplied Input Portable ...

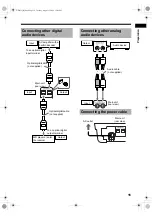
Page 21: ...ut Output Main unit rear view Optical digital cable not supplied Input MD player or satel lite receiver To an optical digital output terminal Output Connecting other analog audio devices Connecting the power cable Output Audio device Audio cable not supplied Input Main unit rear view Main unit rear view AC outlet DD 831 B book Page 16 Tuesday August 1 2006 12 09 PM ...

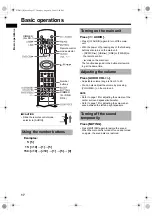
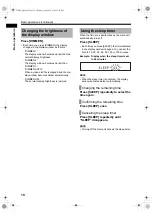
Page 22: ...rom 0 to 40 You can also adjust the volume by pressing VOLUME on the main unit NOTE Refer to page 18 for adjusting the volume of the center surround speaker subwoofer Refer to page 18 for adjusting the volume bal ance between the left and right speakers Press MUTING Press MUTING again to restore the sound When the main unit is turned off once and turned on again the sound also is restored Using th...

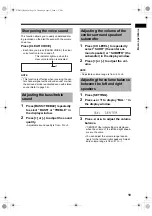
Page 23: ...URR the center sur round speaker or SUBWFR the subwoofer in the display window 2 Press or to adjust the vol ume NOTE Adjustable volume range is from 6 to 6 1 Press SETTING 2 Press 5 or to display BAL in the display window 3 Press 2 or 3 to adjust the volume balance CENTER the initial setting is displayed when the volume of the left and right speak ers are the same You can adjust the volume range r...

Page 24: ...EEP Each time you press SLEEP the time indicated in the display window changes You can set the time to 10 20 30 60 90 120 or 150 minutes Example Display when the sleep timer is set to 60 minutes NOTE When the sleep timer is activated the display window becomes darker automatically Press SLEEP repeatedly to select the time again Press SLEEP once Press SLEEP repeatedly until SLEEP disappears NOTE Tu...

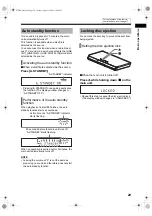
Page 25: ...minutes the main unit automatically turns off NOTE Leaving the volume at 0 is not the same as producing no sound and therefore does not start the auto standby function You can lock the disc tray to prevent the disc from being ejected When the main unit is turned off Press 0 while holding down 7 on the main unit Repeat this step to cancel the disc ejection lock The display window changes to UNLOCKE...

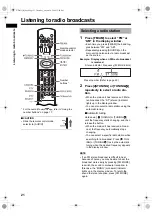
Page 26: ... TUNING or TUNING until the frequency starts changing and then release the button When the main unit has received a broad cast the frequency automatically stops changing You can select a specific radio station while searching for a broadcast Press TUN ING or TUNING to stop the automatic tuning when the desired frequency appears in the display window NOTE If an FM stereo broadcast is difficult to h...

Page 27: ...et number by press ing 2 or 3 Radio Data System allows FM radio stations to send an additional signal along with their regular program signals For example a radio station sends its radio station name or information on the types of broadcasted programs such as sports or music You can receive the following types of Radio Data System signals PS Program Service Shows commonly known radio station names...

Page 28: ... ing the corresponding PTY code The PTY search is applicable only to the preset radio stations When an FM radio broadcast is selected as the source 1 Press PTY SEARCH Display on the main unit 2 Press PTY SELECT or PTY SELECT repeatedly to select a PTY code while PTY SELECT is flashing in the display window Example When Document is selected as a PTY code Refer to page 24 for the PTY codes 3 Press P...

Page 29: ...n tinue the musical tradition of the American Southern States Varied Used for mainly speech based pro grams such as quizzes panel games and personality interviews Nation M Current popular music of the nation or region Pop M Commercial music of current popular appeal Oldies Music from the so called golden age of popular music Rock M Rock music Folk M Music which has its roots in the musi cal cultur...

Page 30: ...uned in with the Enhanced Other Networks function you can only use TA News Info and DISPLAY MODE as the tuner operation buttons If you press any other button LOCKED appears in the display window If the radio stations toggle intermittently between the radio station tuned in to by the Enhanced Other Networks function and the currently tuned radio station press TA News Info to cancel the Enhanced Oth...

Page 31: ... it on the inner hollow of the disc tray 3 Press DVD CD 3 NOTE Instead of step 3 you can use the buttons on the main unit Repeatedly pressing SOURCE can select the disc as the source and pressing 3 starts playback A menu screen may appear on the TV screen after DVD playback starts In such a case oper ate the menu screen referring to Selecting a track from the menu screen on page 32 Number buttons ...

Page 32: ...e class device its length should be less than 1 m Connect a USB mass storage class device directly to the main unit without routing through a USB hub Otherwise a malfunction may occur Before disconnecting the USB mass storage class device make sure that playback is stopped The main unit does not charge a USB mass stor age class device connected to the USB termi nal 2 Press DVD CD 3 or USB 3 The me...

Page 33: ...ack You can control the playback of a PBC compati ble disc using a menu screen To cancel the PBC function follow the instruc tions below Specify the track number using the number buttons when the disc is stopped Specify the track number using 4 or when the disc is stopped and then press DVD CD 3 Press RETURN to go back to the upper layer during PBC playback When a disc is stopped When the PBC func...

Page 34: ...al number of tracks Totalplayback time MP3 WMA WAV ASF DivX MPEG1 MPEG2 file Group number Track number Elapsed playback time File type Group number Track number JPEG file File type Group number File number Messages on the TV screen When a DVD VIDEO is selected as the source the messages shown below are displayed on the TV screen to indicate the disc status NOW READING Appears when the main unit is...

Page 35: ...the sub woofer The or indicator in the frame shows the speaker produc ing the sound The input signal is for the left speaker The input signal is for the center surround speaker The input signal is for the right speaker The input signal is LFE The input signal is for the right speaker on the center surround speaker The input signal is monophonic The input signal is for the right speaker on the cent...

Page 36: ... cannot go back to the previous title When a disc is paused Press SLOW or SLOW Each time you press SLOW or SLOW the speed increases Pressing DVD CD 3 cancels this function and starts normal playback NOTE No sound is produced The picture motion in the reverse direction may not be smooth For a VCD or SVCD slow motion playback can be used in the forward direction only When a disc file is played back ...

Page 37: ...d or played back 1 Press MENU or TOP MENU The menu screen is displayed 2 Press 5 2 3 or the number buttons to select the desired track 3 Press ENTER NOTE You can use this function only when a menu screen is recorded on the disc For a VCD SVCD MENU and TOP MENU may be unavailable in step 1 In this case press RETURN once or more For a VCD SVCD you cannot use 5 2 or 3 in step 2 For a VCD SVCD whose m...

Page 38: ...settings when the disc file contains multiple audio languages subtitle languages or view angles When a language code such as AA and AB is displayed refer to Language codes on page 43 You can also use the menu bar to set the func tions Refer to page 38 ST L and R displayed when playing back a VCD or SVCD respectively indicate Stereo Left sound and Right sound Number buttons Selecting the audio lang...

Page 39: ... on the TV screen ALL appears and all the tracks in the selected group are programmed You can erase the programmed tracks one by one from the bottom of the list on the program screen by pressing CANCEL repeatedly You can erase the whole program at once by pressing 7 Ejecting the disc or turning off the main unit also erases the program 3 Press DVD CD 3 When a disc file is played back Press 7 Playb...

Page 40: ...isc is played back or paused 1 Press ZOOM Each time you press the button the picture magnification changes in the display win dow 2 Select the portion you want to magnify by using 5 2 or 3 To return to normal playback select ZOOM x 1 in step 1 NOTE When you magnify a picture image quality may be deteriorated or the image may be distorted Playing back a disc file in a random order Random playback o...

Page 41: ...oader than the one with MOVIE M MUSIC SUPER WIDE Surround sound broader than the one with the WIDE 2chMUSIC is produced SURROUND OFF Turns off the surround sound NOTE When a surround processed signal is input while AUTO SURROUND MOVIE M MUSIC WIDE 2chMUSIC or SUPER WIDE is selected the SURROUND indicator in the dis play window lights up Depending on the signal type surround sound may not be produc...

Page 42: ...tions Selectable options LOW MID and HIGH BRIGHTNESS Controls the brightness of the display Setting range 8 to 8 CONTRAST Controls the contrast of the display Set ting range 12 to 12 SATURATION Controls the saturation of the display Set ting range 16 to 16 TINT Controls the tint of the display Setting range 16 to 16 SHARPNESS Controls the sharpness of the display Selectable options LOW and HIGH 4 ...

Page 43: ...the time information in the display window and the status bar Each time ENTER is pressed the display changes on the menu bar DVD VIDEO operating during play back TOTAL Elapsed playback time of the current title T REM Remaining time of the cur rent title Time Elapsed playback time of the current chapter REM Remaining time of the cur rent chapter CD operating during playback VCD SVCD Time Elapsed pl...

Page 44: ...page 38 2 Press 2 or 3 to select 3 Press ENTER 4 Enter the time using the number buttons Example When you want to play back a DVD VIDEO from the position of 0 hour 23 minutes 45 seconds press the number buttons in the order of 0 2 3 4 and 5 You can skip entering the minute and sec ond settings If the incorrect value is entered press 2 to delete the values and enter values again 5 Press ENTER To tu...

Page 45: ...NTER to control the preference screen Proceed with operations by following the description on the TV screen NOTE If the selected language is not recorded on the disc file the optimum language set for the disc file is displayed For a language code such as AA refer to the Language codes on page 43 Remote control mode selector Basic operations LANGUAGE Items Contents MENU LANGUAGE Select the language...

Page 46: ...tivates when there is no operation made for approxi mately 5 minutes since a still picture was last displayed NOTE This function does not work when this system outputs the video signal via the HDMI terminal FILE TYPE When files of different types are recorded on a disc or connected USB mass stor age class device select the file type before playback For MP3 WMA WAV files STILL PICTURE For JPEG file...

Page 47: ...ow volume only for a DVD recorded with Dolby Digital WIDE RANGE For enjoying the original full dynamic range of surround sound without effects For normal usage Surround sound is compressed to a certain level HDMI AUDIO OUT You can select whether or not the audio signal from the HDMI terminal is output ON The audio signal from the HDMI is out put The audio signal from the HDMI is not output STREAM ...

Page 48: ...rbian AY Aymara HR Croatian MS Malay MAY SS Siswati AZ Azerbaijani HU Hungarian MT Maltese ST Sesotho BA Bashkir HY Armenian MY Burmese SU Sundanese BE Byelorussian IA Interlingua NA Nauru SV Swedish BG Bulgarian IE Interlingue NE Nepali SW Swahili BH Bihari IK Inupiak NL Dutch TA Tamil BI Bislama IN Indonesian NO Norwegian TE Telugu BN Bengali Bangla IS Icelandic OC Occitan TG Tajik BO Tibetan IW...

Page 49: ...d device 3 Adjust the volume and make other necessary settings Refer to Basic operations on page 17 You can select the gain of the signal from the LINE IN 1 and LINE IN 2 terminals Use the initial settings for normal operation If the sound is too small or too loud change the settings 1 Press LINE repeatedly to select LINE 1 or LINE 2 in the display window 2 Hold down ENTER Each time you hold down ...

Page 50: ...CT is also displayed to indicate the status of QP LINK According to the status of the main unit ACT and NO ACT changes automati cally QP ON ACT is displayed when QP LINK is activated and available QP ON NO ACT is displayed when QP LINK is activated but unavailable Pressing QP LINK once can be used to con firm the status of QP LINK If the sensitivity for the input audio signal is too high QP LINK m...

Page 51: ...remote control properly Continued on the next page Operating a TV using the remote control Manufacturer Code Manufacturer Code JVC 01 Nordmende 13 14 18 26 27 28 Akai 02 05 Okano 09 Blaupankt 03 Orion 15 Daewoo 10 31 32 Panasonic 16 17 Fenner 04 31 32 Philips 10 Fisher 05 Saba 13 14 18 26 27 28 Grundig 06 Samsung 10 19 32 35 36 37 38 Hitachi 07 08 Sanyo 05 Inno Hit 09 SEG 15 Irradio 02 05 Schneide...

Page 52: ...e that operates the VCR and the remote control properly Remote control button Usage TV F Turns on off the TV TV VIDEO Changes between the TV and video input TV CHANNEL Changes channels TV VOL Adjusts volume Number but tons 1 9 0 100 Slide the remote control mode selector to TV in advance Selects the channels TV RETURN Changes between the previously selected chan nel and the cur rent channel Using ...

Page 53: ...e control mode selector is slid to VCR STB some buttons may not work Manufacturer Code Manufacturer Code JVC 01 02 Mascom 32 Amstrad 03 04 05 06 31 Maspro 13 BT 01 Nokia 24 26 33 Canal 20 Pace 10 25 31 Canal Satellite 20 Panasonic 15 D Box 24 Philips 09 23 Echostar 17 18 19 21 RFT 12 Finlux 11 Saba 35 Force 28 Sagem 22 29 Galaxis 27 Salora 11 Grundig 07 08 Selector 29 Hirschmann 07 17 37 Skymaster...

Page 54: ...he operation panel with thinners benzenes or other chemical agents Do not spray insecticides onto the operation panel These may cause discoloration and damage to the surface Manufactured under license from Dolby Labora tories Dolby and the double D symbol are trademarks of Dolby Laboratories DTS and DTS Digital Surround are registered trademarks of Digital Theater Systems Inc This product incorpor...

Page 55: ...hen away on travel or for other reasons for an extended period of time disconnect the power cord plug from the wall outlet Do not block the vents Blocking the vents may damage the system Care of the cabinet When cleaning the system use a soft cloth and fol low the relevant instructions on the use of chemi cally coated cloths Do not use benzene thinner or other organic solvents including disinfecta...

Page 56: ...DEO DVD VIDEO players and DVD VIDEO discs have their own Region Code numbers This system can play back a DVD VIDEO whose Region Code number includes the system s Region Code which is indicated on the rear panel If a DVD VIDEO with an improper region code number is loaded REGION CODE ERROR appears on the TV screen and playback cannot start On some DVD VIDEOs VCDs SVCDs or DivX files their actual op...

Page 57: ...P3 WMA discs since groups tracks are played back in alphabetical order a commercially available MP3 WMA disc may be played back in an order different from that indi cated on the label attached to the disc Playing back an MP3 WMA file including a still image may take a long time The elapsed time is not displayed until playing back starts If playing back starts the elapsed time may not be dis played...

Page 58: ...he profile and level should be MP ML Main Profile at Main Level SP ML Simple Profile at Main Level MP LL Main Profile at Low Level Audio streams should conform to MPEG1 Audio Layer 2 MPEG2 Audio Layer 2 or Dolby Digital MPEG2 only The Non DVD side of a DualDisc does not com ply with the Compact Disc Digital Audio standard Therefore the use of Non DVD side of a DualDisc on this product may not be r...

Page 59: ...ceeding 150 and the groups with num bers exceeding 99 these cannot be played back If there are any type of files other than MP3 WMA WAV JPEG ASF DivX MPEG1 MPEG2 files on a disc those files are also counted in the total file number Do not use any non standard shape disc like a heart flower or credit card etc available on the market because it may damage the system Do not use a disc with tape stick...

Page 60: ...place the disc 54 The picture is distorted when the TV is con nected to the HDMI ter minal Only for DD 8 DD 3 The proportion of the picture is not appropriate Connect the TV to the AV termi nal or COMPONENT VIDEO OUT terminals and select the video signal type and the monitor out type 12 14 A radio broadcast can not be received No antenna is connected Connect an antenna 5 A whirring noise is pro du...

Page 61: ...ion in operation 25 W Power consumption on standby 0 5 W Dimensions W x H x D 445 mm x 55 mm x 286 4 mm including projecting parts Weight 3 5 kg CA DD8 3 0 kg CA DD3 CA DD1 Type Bass reflex type Magnetically shielded type Amplifier Subwoofer 120 W at 4 Ω 110 Hz THD 10 Left right speaker 25 W x 2 at 3 Ω 1 kHz THD 10 Center surround speaker 25 W x 2 at 3 Ω 1 kHz THD 10 Speaker 16 cm cone Power handl...

Page 62: ... D 289 mm x 1 101 mm x 289 mm Weight 1 unit 10 0 kg Type 2 way acoustic suspension type Magnetically shielded type Speaker 9 5 cm x 1 cm direct drive 2 cm dome Power handling capacity 30 W Impedance 3 Ω Frequency range 100 Hz 40 kHz Sound pressure level 78 dB W m Dimensions W x H x D 165 mm x 376 mm x 165 mm including stand Weight 1 unit 1 0 kg including stand Type 2 way bass reflex type Magnetica...

Page 63: ...a x 1 Left right speaker cable x 2 Center surround speaker cable x 1 Only for DD 8 and DD 3 System cable x 1 M4 x 25 mm screw for the stands of the left and right speakers x 6 Only for DD 8 M4 x 16 mm screw for the stands of the left and right speakers x 6 Only for DD 3 M5 x 14 mm screw for the stands of the center surround speaker x 2 Only for DD 8 and DD 3 Bottom cover of the left and right spea...

Page 64: ...0806SKMMODJEM 2006 Victor Company of Japan Limited EN c DD 831 B book Page 59 Thursday August 24 2006 12 05 PM ...

Reviews: