background image

– 19 –

UNFINALIZE  DISC

SLEEP

RDS EON  [ TA News  Info ]

dB

REC LEVEL

PITCH

STEREO

UNFINALIZE  DISC

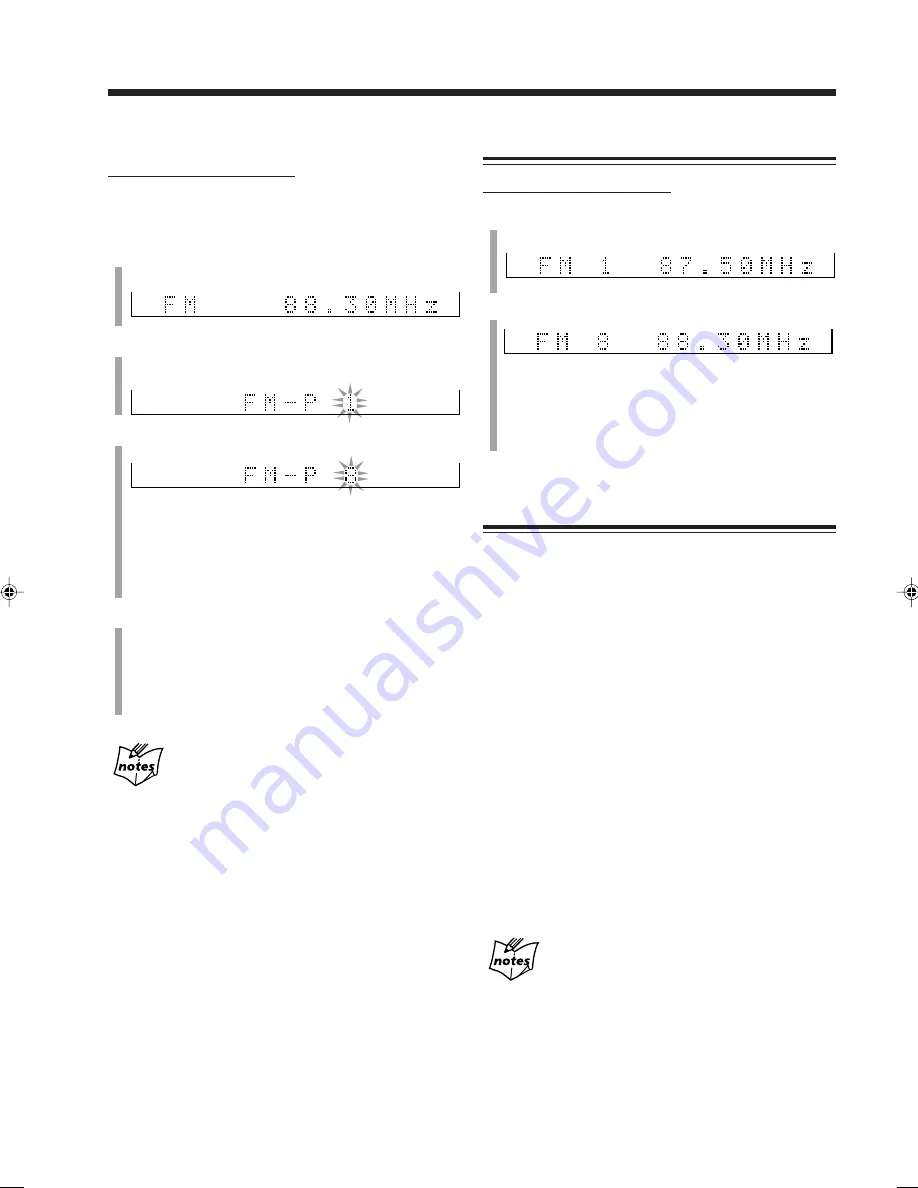
To preset stations manually—Manual Presetting

On the remote control ONLY:
• There is a time limit in doing the following steps. If the

setting is canceled before you finish, start from step 2
again.

1

Tune into a station you want to preset.
• See “Tuning into a Station” on page 18.

2

Press SET.
The preset number appears and starts flashing.

3

Press the number buttons to select a preset number.

Ex.: For preset number 5, press 5.

For preset number 15, press +10, then 5.
For preset number 20, press +10, then 10.
For preset number 30, press +10, +10, then 10.

4

Press SET again.
“MEMORY” appears in the main display, and the tuned
station in step 1 is stored in the preset number selected
in step 3.
• Storing a new station on a used number erases the

previously stored one.

When you unplug the AC power cord or if a power
failure occurs

The preset stations will be erased in a few days. If this happens,
preset the stations again.

Tuning into a Preset Station

On the remote control ONLY:

1

Press SOURCE repeatedly until FM or AM (MW/
LW) is selected.

2

Press the number buttons to select a preset number.

Ex.: For preset number 5, press 5.

For preset number 15, press +10, then 5.
For preset number 20, press +10, then 10.
For preset number 30, press +10, +10, then 10.

Receiving FM Stations with RDS

RDS allows FM stations to send an additional signal along
with their regular program signals. For example, the
stations send their station names, as well as information
about what type of program they broadcast, such as sports
or music, etc.

When tuned into an FM station which provides the RDS
service, the RDS indicator lights on the display.
• Some FM stations do not provide RDS signals.

With the unit, you can receive the following types of RDS
signals.

PS (Program Service):

Shows commonly known station names.

PTY (Program Type):

Shows types of broadcast programs.

RT (Radio Text):

Shows text messages the station sends.

EON (Enhanced Other Networks):

Provides the information about the types of the
programs sent by other RDS stations than the one
being received.

More about RDS

• Broadcast RDS signals differ among FM stations. If in doubt,

check with local radio stations for details on RDS in your area.

• RDS may not work correctly if the received station is not

transmitting the signals properly or if the signal strength is
weak.

UNFINALIZE  DISC

SLEEP

RDS EON  [ TA News  Info ]

dB

REC LEVEL

PITCH

STEREO

UNFINALIZE  DISC

Ex.: When selecting preset number “8”

Ex.: When selecting preset number “8”

Ex.: When selecting FM

UNFINALIZE  DISC

SLEEP

RDS EON  [ TA News  Info ]

dB

REC LEVEL

PITCH

STEREO

UNFINALIZE  DISC

CD RW

UNFINALIZE  DISC

REC

SLEEP

RDS EON  [ TA News  Info ]

dB

REC LEVEL

TEXT

PITCH

STEREO

UNFINALIZE  DISC

3

2

1

OVER

REC

CD RW

UNFINALIZE  DISC

REC

SLEEP

RDS EON  [ TA News  Info ]

1CD ALL SKIP ON

dB

REC LEVEL

TEXT

PITCH

STEREO

UNFINALIZE  DISC

3

2

1

OVER

REC

EN17-22_CA-NXCDR7R[B]_f

01.7.23, 9:59 AM

19

Summary of Contents for CA-NXCDR7R

Page 1: ... EON RM SNXCDR7R REMOTE CONTROL TA News Info MENU PTY SELECT PTY SELECT A P off PTY SEARCH CLOCK TIMER RDS DISPLAY SLEEP BASS SOUND VOLUME PITCH REPEAT FM PLAY MODE AUTOPRESET 10 10 1 2 3 4 5 6 7 8 9 STANDBY ON C O M P A C T C O M P O N E N T C D R S Y S T E M N X C D R 7 R SOURCE OPEN CLOSE CDR VOLUME CD3 CD2 CD1 3CD Changer System Play Exchange 3CD DISC CD CDR FINALIZE DIRECT REC REC PAUSE FADE ...

Page 2: ...reen and yellow The wires in the mains lead on this product are coloured in accordance with the following code Blue Neutral Brown Live As these colours may not correspond with the coloured markings identifying the terminals in your plug proceed as follows The wire which is coloured blue must be connected to the terminal which is marked with the letter N or coloured black The wire which is coloured...

Page 3: ... ventilation openings or holes are blocked by a newspaper or cloth etc the heat may not be able to get out Do not place any naked flame sources such as lighted candles on the apparatus When discarding batteries environmental problems must be considered and local rules or laws governing the disposal of these batteries must be followed strictly Do not use this apparatus in a bathroom or places with ...

Page 4: ...CATION LABEL PLACED ON REAR ENCLOSURE 2 WARNING LABEL PLACED INSIDE THE UNIT CLASS 1 LASER PRODUCT ADVARSEL Usynlig laser stråling ved åbning når sikkerhedsafbrydere er ude af funktion Undgåudsæt telse for stråling d VARNING Osynlig laser strålning när denna del är öppnad och spärren är urkopplad Betrakta ej strålen s CAUTION Invisible laser radiation when open and interlock failed or defeated AVO...

Page 5: ... equipment switched on when it is unattended unless it is specifically stated that it is designed for unat tended operation or has a standby mode Switch off using the switch on the equipment and make sure that your family know how to do this Special arrangements may need to be made for infirm or handicapped people DON T use equipment such as personal stereos or radios so that you are distracted fr...

Page 6: ...tion 2 About This Manual 2 Precautions 2 Precautions on Disc Playback and Recording 3 Location of the Buttons and Controls 4 Remote Control 4 Main Unit 5 Display Window 6 Getting Started 8 Unpacking 8 Connecting Antennas 8 Connecting Speakers 9 Connecting Other Components 10 Putting the Batteries into the Remote Control 12 Basic and Common Operations 13 Turning On the Power 14 Saving the Power Con...

Page 7: ...ain this manual for future reference Precautions Installation Install in a place which is level dry and neither too hot nor too cold between 5 C 41 F and 35 C 95 F Install the unit in a location with adequate ventilation to prevent internal heat buildup in the unit Leave sufficient distance between the unit and the TV Keep the speakers away from the TV to avoid interference with TV DO NOT install ...

Page 8: ...is unit has been designed to record on the discs bearing the following logos In addition to the logos shown above the words shown below or their equivalent should also be indicated somewhere on the package or accompanying documentation FOR CONSUMER FOR CONSUMER USE FOR MUSIC USE ONLY The following discs cannot be used for recording Discs bearing logos other than the above Discs intended for profes...

Page 9: ...utton 18 25 26 9 BASS button 15 p SOUND button 16 q STANDBY ON button 14 w DISPLAY button 14 15 28 35 e CANCEL button 26 43 48 51 r SET button 14 16 19 48 51 t ENTER button 43 46 y CD 3 8 play pause button 14 24 Pressing this button also turns on the unit u CDR 3 8 play pause button 14 30 Pressing this button also turns on the unit i 7 stop button 14 24 30 34 o MENU button 43 RDS operation buttons...

Page 10: ... RW UNFINALIZE DISC PROGRAMRANDOM DAILY REC SLEEP RDSEON TA News Info 1CD ALL SKIP ON NORMAL AUTO TRACK HIGH SPEED dB REC LEVEL TEXT A P off PITCH MONO STEREO UNFINALIZE DISC 3 2 1 DIGITAL BASS CD SOUND OVER ANALOG REC CDR C O M P A C T C O M P O N E N T C D R S Y S T E M N X C D R 7 R VOLUME CD3 CD2 CD1 DISC CD CDR FINALIZE DIRECT REC REC PAUSE REC START CANCEL SET REC MODE REC SPEED FADE IN OUT ...

Page 11: ...T button 34 f REC MUTE button 35 g Disc tray compartment CD1 CD2 and CD3 h PHONES jack stereo mini type 15 j LINE REC SELECT button 34 k REC SPEED button 36 39 l REC MODE button 37 41 SET button 14 39 43 46 z REC LEVEL button 35 x REC START button 37 41 c CANCEL button 26 39 43 v Sliding panel Display Window Display Window 1 CD indicators 3 Disc number indicator 4 Disc loading indicator Flashes wh...

Page 12: ...Window 2 Timer mode indicators 48 52 8 Timer indicator 48 9 DAILY Daily Timer indicator 50 0 REC Recording Timer indicator 48 SLEEP Sleep Timer indicator 52 3 A P off Auto Power off indicator 52 4 CD CDR play mode indicators 25 27 45 PROGRAM RANDOM and repeat 1 CD ALL and SKIP ON indicators 5 BASS indicator 15 6 SOUND indicator 16 7 RDS operation indicators 19 21 RDS EON and TA News Info indicator...

Page 13: ... immediately Connecting Antennas FM antenna 1 Attach the FM antenna to the FM 75 Ω COAXIAL terminal 2 Extend the FM antenna 3 Fasten it up in the position which gives you the best reception About the supplied FM antenna The FM antenna supplied with this unit can be used as temporary measure If reception is poor you can connect an outdoor FM antenna FM antenna supplied Outdoor FM antenna not suppli...

Page 14: ...ls and connecting cords Keep the antennas away from metallic parts of the unit connecting cords and the AC power cord AM MW LW antenna Vinyl covered wire not supplied AM MW LW loop antenna supplied Connecting Speakers You can connect the speakers using the speaker cords Right speaker Left speaker 1 If cords are covered with insulation twist the core of the cord at the end of each cord then remove ...

Page 15: ...E OUT jacks Between the audio output jacks on the cassette deck and the LINE IN jacks To output PLAY Ex cassette deck To connect digital components When connecting a digital component equipped with an optical digital output terminal The following connection allows you to perform digital to digital recording through the digital terminals and playback of the connected digital component through the a...

Page 16: ...igital recording Protective cap Before connecting the other component remove the protective cap from the terminal To optical digital input Audio equipment with optical digital input Connect between the optical digital input terminal on the other component and the 3CD DIGITAL OUT terminal NOW you can plug in the unit and other connected components FINALLY To a wall outlet SPEAKERS CAUTION SPEAKER I...

Page 17: ...e batteries to heat or flame DO NOT leave the batteries in the battery compartment when you are not going to use the remote control for an extended period of time Otherwise it will be damaged from battery leakage R6 UM 3 AA 15F 2 When using the remote control point it at the remote sensor on the front panel Remote sensor STANDBY ON C O M P A C T C O M P O N E N T C D R S Y S T E M N X C D R 7 R SO...

Page 18: ...7 8 9 BASS SOUND VOLUME 10 10 STANDBY ON DISPLA Y SET STANDBY ON C O M P A C T C O M P O N E N T C D R S Y S T E M N X C D R 7 R SOURCE OPEN CLOSE CDR VOLUME CD3 CD2 CD1 3CD Changer System Play Exchange 3CD DISC CD CDR FINALIZE DIRECT REC REC PAUSE FADE IN OUT REC MUTE PHONES COMPACT TEXT DIGITAL AUDIO COMPACT Recordable ReWriteble DIGITAL AUDIO C O M P A C T C O M P O N E N T C D R S Y S T E M N ...

Page 19: ...EC LEVEL PITCH UNFINALIZE DISC U SC S S O e s o dB PITCH UNFINALIZE DISC Selecting the Sources and Starting Play To select 3 CD Changer as the source press CD 3 8 The unit automatically turns on Play starts if a CD is on the last selected disc tray To stop play press 7 For more detailed operations see pages 23 to 28 To select CD Recorder as the source press CDR 3 8 The unit automatically turns on ...

Page 20: ... level to 20 UNFINALIZE DISC SLEEP RDSEON TA News Info dB REC LEVEL PITCH UNFINALIZE DISC REC Changing the Display Information You can change the information in the main display For display information while recording see To change the display information while recording on page 35 On the remote control ONLY Press DISPLAY repeatedly Each time you press the button the information in the main displa...

Page 21: ... in the main display Creating Your Own Sound Modes MANUAL Modes You can create and store your own sound modes There is a time limit in doing the following steps If the setting is canceled before you finish start from step 1 again On the remote control ONLY 1 Press SOUND repeatedly until SET MANUAL1 or SET MANUAL2 appears in the main display The SOUND indicator also lights on the display SET MANUAL...

Page 22: ...S T E M N X C D R 7 R SOURCE OPEN CLOSE CDR VOLUME CD3 CD2 CD1 3CD Changer System Play Exchange 3CD DISC CD CDR FINALIZE DIRECT REC REC PAUSE FADE IN OUT REC MUTE PHONES COMPACT TEXT DIGITAL AUDIO COMPACT Recordable ReWriteble DIGITAL AUDIO SOURCE STANDBY ON DISPLA Y CANCEL SET ENTER EON TA News Info MENU PTY SELECT PTY SELECT A P off PTY SEARCH CLOCK TIMER RDS DISPLAY SLEEP BASS SOUND VOLUME PITC...

Page 23: ...ogram is broadcast in stereo Presetting Stations You can preset 30 FM and 15 AM MW LW stations using either automatic presetting method or manual presetting method You cannot store FM reception mode separately for each preset station In some cases test frequencies have been already memorized for the tuner since the factory examined the tuner preset function before shipment This is not a malfunctio...

Page 24: ...with RDS RDS allows FM stations to send an additional signal along with their regular program signals For example the stations send their station names as well as information about what type of program they broadcast such as sports or music etc When tuned into an FM station which provides the RDS service the RDS indicator lights on the display Some FM stations do not provide RDS signals With the u...

Page 25: ...MAL AUTO TRACK HIGH SPEED TEXT A P off STEREO 3 2 1 DIGITAL BASS CD SOUND OVER ANALOG CDR CD RW PROGRAMRANDOM DAILY RDS 1CD ALL SKIP ON NORMAL AUTO TRACK HIGH SPEED TEXT A P off STEREO 3 2 1 DIGITAL BASS CD SOUND OVER ANALOG CDR REC RDS TEXT STEREO 3 2 1 OVER REC CD RW RDS 1CD ALL SKIP ON TEXT STEREO 3 2 1 OVER 2 Press PTY SELECT or to select a PTY code while PTY SELECT is still in the main displa...

Page 26: ... program you have selected The unit continues tuning in the current station When a station starts broadcasting the program you have selected the unit automatically switches to the station The indicator of received PTY code starts flashing When the program is over EON END appears in the main display and the unit goes back to the previously tuned station but the EON function still remains activated ...

Page 27: ...of national or regional culture including language theater etc Science Programs about natural sciences and technology Varied Used for mainly speech based programs such as quizzes panel games and personality interviews Pop M Commercial music of current popular appeal Rock M Rock music Easy M Current contemporary music considered to be easy listening Light M Instrumental music and vocal or choral wo...

Page 28: ... 8 9 DISPLA Y CANCEL PITCH REPEAT FM PLAY MODE 10 10 1 2 3 4 5 6 7 8 9 STANDBY ON C O M P A C T C O M P O N E N T C D R S Y S T E M N X C D R 7 R SOURCE OPEN CLOSE CDR VOLUME CD3 CD2 CD1 3CD Changer System Play Exchange 3CD DISC CD CDR FINALIZE DIRECT REC REC PAUSE FADE IN OUT REC MUTE PHONES COMPACT TEXT DIGITAL AUDIO COMPACT Recordable ReWriteble DIGITAL AUDIO C O M P A C T C O M P O N E N T C D...

Page 29: ...CD 2 then stops If no disc is on the disc trays 3 CD Changer skips such an empty tray If the current disc is a CD Text You can change the information in the main display See To show the text information recorded on a CD Text on page 28 Track No Disc No The built in 3 CD Changer can play back both finalized and unfinalized CD Rs CD RWs However some unfinalized discs cannot be played back because of...

Page 30: ...e track number you want Ex For track number 5 press 5 For track number 15 press 10 then 5 For track number 20 press 10 then 10 For track number 32 press 10 10 10 then 2 Programing the Playing Order of the Tracks Program Play You can arrange the order in which the tracks play before you start playing You can program up to 32 tracks On the remote control ONLY 1 Load discs into 3 CD Changer If the cu...

Page 31: ...MORY FULL will appear in the main display If your entry is ignored You have tried to program a track from an empty tray or a track number that does not exist on the disc for example selecting track 14 on a disc that only has 12 tracks Such entries are ignored Playing at Random Random Play The tracks of all loaded discs will play at random On the remote control ONLY 1 Load discs into 3 CD Changer I...

Page 32: ...ALL is selected Other Convenient Functions The following functions can be used only for 3 CD Changer To select the Continuous Play mode for 3 CD Changer This is not possible when the current source is 3 CD Changer On the unit ONLY 1 Press DISC while listening to a source other than 3 CD Changer Each time you press the button the following play modes appear in the main display CD1 PLAY Select this ...

Page 33: ... 12 faster 4 1 to decrease the playback speed pitch down to 12 slower If you press and hold the button you can continuously change the pitch setting until you release the button You can also change the pitch setting by pressing or 4 on the unit repeatedly To restore normal speed playback select PITCH 0 so that the PITCH indicator goes off Do not forget to restore normal speed playback after you ha...

Page 34: ...PTY SEARCH CLOCK TIMER RDS DISPLAY SLEEP BASS SOUND VOLUME PITCH REPEAT FM PLAY MODE AUTOPRESET 10 10 1 2 3 4 5 6 7 8 9 REPEAT 10 10 1 2 3 4 5 6 7 8 9 STANDBY ON C O M P A C T C O M P O N E N T C D R S Y S T E M N X C D R 7 R SOURCE OPEN CLOSE CDR VOLUME CD3 CD2 CD1 3CD Changer System Play Exchange 3CD DISC CD CDR FINALIZE DIRECT REC REC PAUSE FADE IN OUT REC MUTE PHONES COMPACT TEXT DIGITAL AUDIO...

Page 35: ...sc CD R CD RW on page 41 Good No good Elapsed playing time Track number Ex When an unfinalized CD RW is loaded CD RW UNFINALIZE DISC 3 2 1 CDR Basic Disc Operations To locate a particular point in a track during play On the remote control Press and hold or 4 1 On the unit Press and hold or 4 Fast forwards the tracks 4 1 4 Fast reverses the tracks To go to another track On the remote control Press ...

Page 36: ...ONES COMPACT TEXT DIGITAL AUDIO COMPACT Recordable ReWriteble DIGITAL AUDIO C O M P A C T C O M P O N E N T C D R S Y S T E M N X C D R 7 R VOLUME CD3 CD2 CD1 DISC CD CDR FINALIZE DIRECT REC REC PAUSE REC START CANCEL SET REC MODE REC SPEED FADE IN OUT REC MUTE COMPACT Recordable ReWriteble DIGITAL AUDIO LINE REC SELECT CDR OPEN CLOSE CD3 CD2 CD1 SOURCE CDR FINALIZE DISC CD REC LEVEL REC START CAN...

Page 37: ...converter see Turning On or Off Sampling Frequency Rate Converter on page 44 dts is a trademark of Digital Theater Systems Inc HDCD is a registered trademark of Pacific Microsonic Inc Auto track marking Whenever you turn on the unit auto track marking is activated The AUTO TRACK indicator will light on the display When auto track marking is activated Recording from 3 CD Changer Track marks are rec...

Page 38: ...ck recording See page 41 7 When the source is the external component Sound Synchronized Recording See page 40 When recording is stopped or finished CD Synchronized Recording and Sound Synchronized Recording are canceled automatically Digital recording or analog recording CD Recorder automatically selects appropriate recording either digital or analog during CD Synchronized Recording When digital s...

Page 39: ...wn here CD RW UNFINALIZE DISC AUTO TRACK dB REC LEVEL STEREO 3 2 1 OVER ANALOG REC CD RW UNFINALIZE DISC AUTO TRACK dB REC LEVEL STEREO 3 2 1 OVER ANALOG REC Continued 4 Adjust the recording input level if necessary See To adjust the recording input level on page 35 5 Press CDR 3 8 Recording starts 6 When recording from 3 CD Changer Press CD 3 8 Recording stops when a selected disc is recorded Whe...

Page 40: ...u record any source on CD Recorder using any recording method except when high speed recording is selected While adjusting the recording input level the sounds through the speakers and headphones also change so that you can check the difference by your own ears On the unit ONLY 1 While CD Recorder is in recording pause mode press REC LEVEL inside the sliding panel Now the VOLUME control and VOLUME...

Page 41: ...0 temporarily and will not affect the recording CD RW UNFINALIZE DISC AUTO TRACK HIGH SPEED dB REC LEVEL CD RW UNFINALIZE DISC NORMAL AUTO TRACK SPEED dB REC LEVEL Remaining time of the currently playing track Remaining time in the CD R CD RW 4 Press DIRECT REC If OPC see page 32 is being performed UPDATE OPC flashes first in the main display then recording starts Recording stops when a selected d...

Page 42: ...OPC flashes first in the main display then recording starts Recording stops when a selected disc or a program is recorded Both 3 CD Changer and CD Recorder stop automatically To confirm the recording contents see To change the display information while recording on page 35 To stop recording press 7 STOP DUBBING flashes for a while In this case the disc will not be finalized even if you have select...

Page 43: ...irst Track Recording First Track Recording allows you to record the first track of each loaded disc in 3 CD Changer You can for example make a directory of all your best CDs Using the REC MODE button ONLY On the unit ONLY 1 Prepare discs in 3 CD Changer If the current playing source is not 3 CD changer press CD 3 8 then 7 To select a disc press DISC repeatedly then 7 You can also use the remote co...

Page 44: ... include the current playing track in the program press SET The current playing track is programed and the next track starts playing After the last track of a disc is programed the first track of the next disc starts playing To skip the current playing track press CANCEL The current playing track is not programed and the next track starts playing If you do not press either button while the current...

Page 45: ...YNC REC Canceled 5 Press REC START inside the sliding panel The REC indicator flashes on the display for a while 6 Start playback on the selected external component Recording starts automatically when the sound signals come in To confirm the recording contents see To change the display information while recording on page 35 To stop recording press 7 STOP DUBBING flashes for a while Both 3 CD Chang...

Page 46: ...RW 7 Using the DIRECT REC button On the unit ONLY Press DIRECT REC while playing back or pausing a track you want to record Playback of that track is stopped and the same track starts playing from the beginning again This time CD Recorder starts recording the track 7 Using the REC MODE button On the unit ONLY 1 Press REC MODE inside the sliding panel repeatedly while playing back or pausing a trac...

Page 47: ...ges 43 to 46 You cannot use the buttons and controls on the unit Use only the remote control STANDBY ON DISPLA Y CANCEL SET ENTER EON RM SNXCDR7R REMOTE CONTROL TA News Info MENU PTY SELECT PTY SELECT A P off PTY SEARCH CLOCK TIMER RDS DISPLAY SLEEP BASS SOUND VOLUME PITCH REPEAT FM PLAY MODE AUTOPRESET 10 10 1 2 3 4 5 6 7 8 9 MENU SET ENTER Continued ...

Page 48: ...press of the button will be ignored only one track mark will be recorded where you press SET for the first time You cannot put track marks manually during CD Synchronized Recording Auto track marking is activated temporarily Ex When auto track marking is activated initial setting By pressing MENU you can use or cancel the following convenient CD Recorder functions AUTO TRACK Selects either auto tr...

Page 49: ...ENTER in step 3 Ex When Converter is activated initial setting Separating Recorded Tracks Automatically Auto Track Space While recording from the 3 CD Changer onto CD Recorder using Standard Recording method see page 34 CD Recorder automatically places a 2 second blank space at the beginning of each track in the recording When shipped from the factory this function is turned ON This function works...

Page 50: ...When you erase the 12th track up to the last Recording Skip Marks onto a CD R CD RW Before finalizing a disc you can record a skip mark to an unwanted track so that it will be skipped ignored as if it does not exist during play IMPORTANT Once skip marks are recorded they cannot be erased you can only erase skip marks by erasing the tracks with skip marks If you unplug the power cord or if a power ...

Page 51: ...lashes in the main display Erasing All Tracks Only for CD RW You can erase all the recorded tracks on a CD RW at a time Before you start Once erasure is performed erased data cannot be restored If you unplug the power cord or if a power failure occurs while ERASE DISC is flashing in the main display in step 3 the disc may not be utilized any more On the remote control ONLY 1 Press MENU repeatedly ...

Page 52: ...nnot use the buttons and controls on the unit Use only the remote control STANDBY ON DISPLA Y CANCEL SET ENTER EON RM SNXCDR7R REMOTE CONTROL TA News Info MENU PTY SELECT PTY SELECT A P off PTY SEARCH CLOCK TIMER RDS DISPLAY SLEEP BASS SOUND VOLUME PITCH REPEAT FM PLAY MODE AUTOPRESET 10 10 1 2 3 4 5 6 7 8 9 STANDBY ON CANCEL SET A P off CLOCK TIMER SLEEP ...

Page 53: ...th Recording Timer you can make an unattended recording You can set Recording Timer whether the unit is turned on or off on standby To correct a misentry any time during the process press CANCEL To cancel the setting any time during the process press CLOCK TIMER How Recording Timer actually works The unit automatically turns on about 3 minutes before timer recording starts then turns off the volum...

Page 54: ...DAILY ON 0 00 0 00 Canceled back to the beginning REC CD 8 Press to turn off the unit on standby if you have set the timer with the unit turned on IMPORTANT If you turn off the unit within 4 minutes before the timer on time timer recording will not start To turn on or off Recording Timer after its setting is done 1 Press CLOCK TIMER repeatedly until REC appears in the main display 0 00 is the init...

Page 55: ...r starts flashing on the display Each time you press the button the timer mode changes as follows 0 00 is the initial setting time at the factory 2 Press or 4 1 to set the hour of the on time then press SET 3 Press or 4 1 to set the minute of the on time then press SET 4 Press or 4 1 to set the hour of the off time then press SET 5 Press or 4 1 to set the minute of the off time then press SET 6 Pr...

Page 56: ...he unit is kept turned on when the timer on time comes Daily Timer does not work at all If you change the source or press CLOCK TIMER or SLEEP while Daily Timer playback is being performed Daily Timer is canceled and the unit does not turn off automatically When you set Sleep Timer by pressing SLEEP the unit turns off as you set by Sleep Timer To turn on or off Daily Timer after its setting is don...

Page 57: ...ith the Daily Timer The unit turns off when the shut off time comes set by Sleep Timer and turns on when the timer on time set by Daily Timer comes 1 Set the Daily Timer see pages 50 and 51 2 Start playing back any source you want to listen to until you sleep 3 Set the Sleep Timer Using Auto Power Off You can use this function only while playing a disc either on 3 CD Changer or on CD Recorder Auto...

Page 58: ...ay have some rough spots around the inner and outer edges If such a disc is used this unit may reject the disc To remove these rough spots rub the edges with a pencil or ballpoint pen etc Moisture condensation Moisture may condense on the lens inside the unit in the following cases After starting the heater When the unit is moved from the extremely hot place to the extremely cold place Should this...

Page 59: ... points one second is divided into for example for CD sound one second is divided into 44 100 points since its sampling frequency is 44 1 kHz SCMS Serial Copy Management System Digital audio components such as CD recorder MD Mini Disc recorder and DAT Digital Audio Tape recorder can exchange audio signals in the digital forms through digital input output terminals The digital audio components allo...

Page 60: ...tions which is only possible on a CD RW You are trying to perform one of the functions which is only possible on a CD R or CD RW OPC cannot be performed No recording or erasure can be performed on this disc PCA is full No recording or erasure can be performed on this disc PMA is full No recording or erasure can be performed on this disc Digital recording is prohibited in accordance with SCMS regul...

Page 61: ... Insert the disc correctly CD R Replace the disc CD RW Unfinalize the CD RW see page 46 Clean or replace the disc see page 53 Reconnect the antenna securely Change the position and direction of the AM MW LW loop antenna Extend FM antenna to the best reception position Remove the obstruction Replace the batteries See page 12 Plug in the AC power plug Turn off Disc Lock See page 28 Put the disc in w...

Page 62: ...kΩ at LEVEL 3 Digital input LINE DIGITAL IN OPTICAL Signal wave length 660 nm Input level 23 dBm to 15 dBm With the built in sampling rate converter corresponding to 32 kHz 44 1 kHz 48 kHz Audio output level Impedance at 1 kHz Analog output LINE OUT 160 mV 2 2 kΩ Digital output 3CD DIGITAL OUT OPTICAL Signal wave length 660 nm Output level 23 dBm to 15 dBm Speakers Impedance 6 Ω 16 Ω Tuner FM tuni...

Page 63: ... range 91 dB Signal to noise ratio 94 dB Frequency response 20 Hz to 20 kHz Wow and flutter Immeasurable General Power requirement AC 230 V 50 Hz Power consumption 70 W at operation 1 W on standby with Display Off 3 3 W on standby with Display On Dimensions approx 185 mm x 210 mm x 349 mm W H D Mass approx 7 4 kg Supplied accessories See page 8 Design and specifications are subject to change witho...

Page 64: ...J VC 0701MWMMDWJEM EN VICTOR COMPANY OF JAPAN LIMITED ...

Reviews: