background image

COMPACT COMPONENT SYSTEM

NX-T10


—Consists of CA-NXT10, SP-NXT10F, and SP-NXT10W

INSTRUCTIONS

LVT2022-010A

[UG]

EN_NX-T10[UG]_CS2.indb   1

EN_NX-T10[UG]_CS2.indb   1

09.12.14   9:52:57 PM

09.12.14   9:52:57 PM

Summary of Contents for CA-NXT10

Page 1: ...COMPACT COMPONENT SYSTEM NX T10 Consists of CA NXT10 SP NXT10F and SP NXT10W INSTRUCTIONS LVT2022 010A UG EN_NX T10 UG _CS2 indb 1 EN_NX T10 UG _CS2 indb 1 09 12 14 9 52 57 PM 09 12 14 9 52 57 PM ...

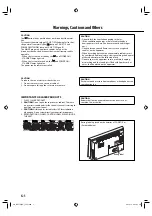
Page 2: ... with optical instruments 4 REPRODUCTION OF LABEL CAUTION LABEL PLACED INSIDE THE UNIT CAUTION Do not block the ventilation openings or holes If the ventilation openings or holes are blocked by a newspaper or cloth etc the heat may not be able to get out Do not place any naked flame sources such as lighted candles on the apparatus When discarding batteries environmental problems must be considered...

Page 3: ... obstructions should be placed in the areas shown by the dimensions below 3 Bottom Place on the level surface Maintain an adequate air path for ventilation by placing on a stand with a height of 10 cm or more Front view Side view CA NXT10 SP NXT10F SP NXT10F SP NXT10W SP NXT10W European Union only EN_NX T10 UG _CS2 indb 2 EN_NX T10 UG _CS2 indb 2 09 12 14 9 53 02 PM 09 12 14 9 53 02 PM ...

Page 4: ...oo hot nor too cold between 5 C and 35 C Leave sufficient distance between the System and the TV Keep the speakers away from the TV to avoid interference with the TV Power sources When unplugging the System from the wall outlet always pull on the plug not the power cord DO NOT handle the power cord with wet hands Moisture condensation Moisture may condense on the lens inside the System in the foll...

Page 5: ...24 Selecting the Audio Track 24 Selecting the Subtitle Language 25 Selecting the View Angle 25 Special Effect Playback 26 Advanced Disc File Playback Operations 27 Programming the Playing Order Program Play 27 Playing at Random Random Play 28 Playing Repeatedly 28 Prohibiting Disc Ejection Child Lock 29 Recording Operations 30 Recording from a Disc 31 On Screen Operations 32 On Screen Bar Operatio...

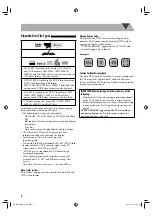
Page 6: ...nly discs DVD indicator lights on the TV screen when a R RW disc is loaded DVD Logo is a trademark of DVD Format Logo Licensing Corporation This System can play back Everio files see page 44 recorded on DVD CD and USB mass storage class device Only when the maximum bit rate is less than 2 Mbps About color system This System can play back discs recorded in both PAL and NTSC video format Note on Reg...

Page 7: ...lly or Horizontally You can place the main unit either vertically or horizontally Set the DISPLAY MODE switch according to the way the main unit is placed The position of the remote sensor also changes according to the setting of the DISPLAY MODE switch see page 14 This manual explains operations using the illustrations of the main unit placed vertically as examples Buttons and operations when the...

Page 8: ...Set Top Box See page 6 TO SP NXT10W From the subwoofer with the supplied system cable See page 7 Ÿ VIDEO OUT From the input of a TV monitor See page 6 Ÿ HDMI MONITOR OUT From the input of a TV monitor See page 6 When placing the main unit horizontally Also use the same hole as illustrated below when installing the main unit on a wall see page 11 FM ANT From the FM antenna See page 7 AUDIO IN From ...

Page 9: ... Digital Set Top Box When connecting with an HDMI cable use the HDMI cable of less than 2 m Scanning mode setting of the System see page 14 does not affect the video signals of the HDMI MONITOR OUT terminal coming from the HDMI IN 1 and 2 terminals When connecting the digital audio output of the device to the DIGITAL IN OPTICAL terminal make sure of the following Set the digital audio output setti...

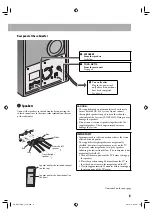
Page 10: ...nalog audio device FM antenna supplied FM outdoor antenna not supplied Audio cord not supplied Red White System cable Connect the system cable with the arrow side facing up After connections on the rear of the main unit have been completed connect speakers and the system cable to the subwoofer See pages 8 and 9 System cable supplied From the subwoofer Arrow EN_NX T10 UG _CS2 indb 7 EN_NX T10 UG _C...

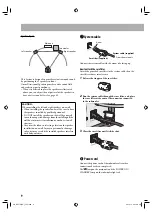
Page 11: ...ubwoofer of the System SP NXT10W Doing so may damage the speakers Do not connect external speakers together with the supplied speakers The change in impedance may damage the System IMPORTANT Improper speaker cable connection reduces the stereo effect and sound quality The supplied left right speakers are magnetically shielded but color irregularity may occur on the TV To prevent color irregularity...

Page 12: ...or speaker installation on a wall Injury to personnel or damage to devices may result if the installed speakers interfere with daily activities System cable Connect the system cable with the arrow side facing up How to attach the core filter Attach the provided core filter to the system cable then the core filter reduces interference 1 Release the stopper of the core filter 2 Run the system cable ...

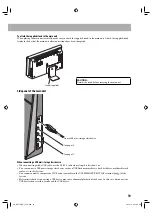
Page 13: ...B MEMORY REC PLAY terminal of the System Electrostatic shock at connecting a USB device may cause abnormal playback of the device In this case disconnect the USB device then reset this System and the USB device See page 18 See page 37 To attach the supplied stand to the main unit When placing the main unit vertically make sure to attach the supplied stand to the main unit Attach the supplied stand...

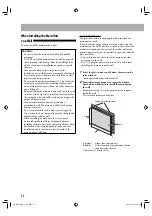
Page 14: ...re must be taken in selecting a location for installation on a wall Injury to personnel or damage to devices may result if the main unit installed on a wall interfere with daily activities The main unit weighs approximately 2 3 kg Sufficient care must be required when installing the main unit on a wall to prevent any accidents caused by the main unit s falling off Before installing the main unit o...

Page 15: ... than 4 mm and their length must be 3 times the thickness of the board mounted on the wall also take the thickness of the wall into account 4 Mount three screws not supplied to the board which has been attached on the wall Attach the screws to the board as illustrated below Slide down D Screws not supplied F F E D 240 mm E 78 mm F 120 mm Board G H I J K G Keep the space of 6 to 7 mm H 10 5 to 12 m...

Page 16: ...screws are loose In the event that the main unit has fallen turn off the power disconnect the power cord from the AC outlet Then contact your dealer for an inspection and repairs Using the main unit in this state may cause a fire or electrical shock Do not place valuables breakables underneath the location where the main unit is installed They will be damaged if the main unit should fall JVC bears...

Page 17: ...the Scanning Mode INFO Select the video signal output according to the type of your TV after connecting the main unit to the TV Turn on the System before setting the scanning mode See page 17 There is no need to make this setting when you connect the TV with a composite video cord 1 Select DVD CD as the source 2 Enter the scanning mode setting Finish the following process while the setting item is...

Page 18: ...he main unit is turned off standby 3 Select the scanning mode When connecting the TV to the HDMI MONITOR OUT terminal AUTO Normally select this NT 480P PAL 576P NT 720P PAL720P NT1080I PAL1080I NT1080P PAL1080I Select a scanning mode when it is needed Available settings vary according to the available resolutions of the connected TV When connecting the TV to the COMPONENT jacks or VIDEO jack N 480...

Page 19: ...IO IN is selected as the source the current source name appears While playing a disc or file current status appears 1 FM reception indicators ST stereo lights while an FM stereo station with sufficient signal strength is tuned in MONO monaural lights while receiving an FM station in monaural 2 Digital audio signal format indicators 3 HDMI indicator Lights when an HDMI video signal is output 4 FM i...

Page 20: ...s INPUT repeatedly to select USB DGTL IN or AUDIO IN See pages 19 and 21 On the Main unit Pressing SOURCE repeatedly changes the source as follows You can change the display information by pressing DISPLAY For details see page 23 3 Adjust the volume You can adjust the volume level from VOL MIN level 0 to VOL MAX level 60 To turn off standby the System The lamp on the main unit lights red The POWER...

Page 21: ...uency stops changing When you repeatedly press the button the frequency changes step by step To manually stop the search press either button If the FM reception is poor Remote ONLY The MONO monaural indicator lights on the display Reception will improve though stereo effect is lost Monaural reception To restore the stereo effect press the button again The ST stereo indicator lights on the display ...

Page 22: ... Select a file type on the control screen on the TV For still moving picture files it appears while playback is stopped For details see page 35 1 Control screen appears on the TV 1 Audio 2 Still picture 3 Moving picture 2 Select a file type When the sound of DVD Video or DVD VR is not loud enough DVD sound is sometimes recorded at a lower level than other discs and sources You can set the increase...

Page 23: ...g picture To return to normal playback press 3 You can also select the position to play by using the on screen bar For details see page 33 To locate an item directly Remote ONLY You can select a title chapter track file directly and start playback For DVD Video you can select a title before starting playback while you can select a chapter after starting playback To select a number see How to selec...

Page 24: ...appears on the TV select an item on the menu Playback of the selected item starts While playing a disc with PBC PBC appears on the on screen bar see page 32 To select a number see How to select a number on page 18 To move to the next or previous page of the current menu To show the menu during playback To cancel PBC select a track to play by using the on screen bar For details about the on screen ...

Page 25: ...woofer is always activated to reproduce the bass sound Daily Operations Sound Other Adjustments Turning Off the Sound in a Moment Remote ONLY To restore the volume press again or adjust the volume level Adjusting the Sound INFO Remote ONLY To activate the surround mode For Disc USB HDMI 1 HDMI 2 DGTL IN For a 5 1 channel digital audio signal Dolby Digital or DTS Digital Surround The surround mode ...

Page 26: ...tion on the display and on screen bar For details see page 32 3 For CD SVCD VCD Track number For MP3 WMA JPEG MPEG 1 MPEG 2 DivX files Group and file number For DVD Video DVD VR Title and chapter number Turning Off the Power Automatically Remote ONLY Sleep Timer You can set the shut off time so that you can go to bed without turning off the System yourself 1 Specify the time in minutes 2 Wait unti...

Page 27: ... a DVD VR or SVCD VCD STEREO To listen to normal stereo 2 channel playback MONO L To listen to the left audio channel MONO R To listen to the right audio channel MIX MONO To listen to monaural sound the left and right sounds are mixed SVCD can have 4 audio channels SVCD usually uses these 4 channels to record two 2 channel recordings STEREO 3 JAPANESE 1 ENGLISH D 5 1CH 2 FRENCH D 5 1CH 3 JAPANESE ...

Page 28: ...g subtitles in different languages you can select the subtitle language to display on the TV For DVD VR While playing you can turn the subtitles on or off For SVCD While playing you can select the subtitles even if no subtitles are recorded on the disc While playing a DVD Video Ex While playing a DVD VR While playing an SVCD 3 JAPANESE 1 ENGLISH 2 FRENCH 3 JAPANESE OFF 1 2 3 4 1 3 2 3 3 3 1 3 2 3 ...

Page 29: ...B 1 7 SB 1 8 SB 1 6 SF 1 2 SF 1 3 SF 1 4 SF 1 5 SF 1 7 SF 1 6 Forward slow motion starts Reverse slow motion starts Returns to normal playback Returns to normal playback To replay the previous scenes One Touch Replay This function is only used while playing DVD Video DVD VR While playing The playback position moves back about 10 seconds before the current position only within the same title for DV...

Page 30: ...lect a number input a number directly with the number buttons see page 18 To erase the entire program select CLEAR on the program menu screen then press ENTER 3 Repeat step 2 until you complete your program 4 Start playback Playback starts in the order you have programmed You can also start playback by selecting PLAY on the program menu screen and then pressing ENTER To skip To pause To stop To re...

Page 31: ...eatedly INFO Remote ONLY For DVD Video While playing For CD SVCD VCD While playing without PBC for SVCD VCD For DVD VR While playing an Original Program While playing a Play List For MP3 WMA JPEG MPEG 1 MPEG 2 DivX files While playing CHAPTER Repeats the current chapter TITLE Repeats the current title REP 1 Repeats the current track file REP GROUP Repeats the current folder group REP PG Repeats th...

Page 32: ...ton To cancel A B Repeat press REPEAT A B again A B Repeat will also be canceled when you stop playback or skip the chapter or track Prohibiting Disc Ejection Child Lock Main Unit ONLY You can lock the disc ejection so that no one can eject the loaded disc While the System is turned on and the disc player panel is closed To cancel the prohibition repeat the same procedure UNLOCKED appears on the d...

Page 33: ...a USB device while READING is shown on the display You cannot record tracks in the root group as much as into other groups This is not a malfunction It depends on the USB device used Do not disconnect a USB device while playing recording It may cause malfunction About SCMS Serial Copy Management System The System uses the Serial Copy Management System which allows only first generation digital cop...

Page 34: ...ready exists or the number of tracks recorded for one group is more than 99 tracks JVC_A02 JVC_A03 and so on will be created You cannot change the source while recording The tracks are recorded in the normal order even if Program Play is activated Some messages may appear on the display when recording For details about the messages on the display for recording operations see page 48 Playback sound...

Page 35: ...screen bar differs depending on the type of disc file The following information is displayed on the on screen bar Items displayed depend on the types of disc or file TT Title CH Chapter TRK Track Time indication Audio language Subtitle language Angle D DTS LPCM Audio format Repeat mode PBC Playing back a disc with PBC On Screen Operations Remote control Number buttons 1 2 3 4 TT DVD C H 3 6 1 7 0 ...

Page 36: ...elapsed playback time from the beginning using the on screen bar This function is not available during Program Play and Random Play 1 While playing display the on screen bar You can also select the position to play before starting playback Ex When a DVD Video is played 2 Move the highlight to the position you want to specify Highlighted TT DVD CH 001 006 00 00 4 1 0 1 07 TT DVD CH 001 006 0 1 07 0...

Page 37: ...Listed number 2 Recording creating date 3 Recording channels 4 Start time of recording 5 Title 6 Highlight bar current selection 7 Chapters included 8 Playback time To select an item in the list and start playback If you move the highlight bar the selected item starts playback automatically NO CH TIME TITLE 1 2009 12 03 12 15 00 L L L L L 2 2009 12 09 23 05 00 3 2009 12 18 08 17 00 4 2009 12 20 07...

Page 38: ...rent folder group 3 Current file track 4 File track list 5 File track information 6 File type If different types of playable files audio still picture moving picture are recorded on a disc or USB mass storage class device select a file type to play see also page 19 Summer Rain mp3 01 Cloudy 02 Rain 03 Fair 01 Summer 02 Spring 03 Fall 04 Winter 05 __________ __________ 06 04 Fog 05 Hail 06 indian s...

Page 39: ...PEG The selected file still picture is displayed until you change it Slide show playback starts Each file still picture is shown on the screen for about 3 seconds then changes one after another To display the current still picture press 8 For the other files Playback starts with the selected track Pressing 3 also starts playback EN_NX T10 UG _CS2 indb 36 EN_NX T10 UG _CS2 indb 36 09 12 14 9 53 25 ...

Page 40: ... on the main unit 2 Select DVD CD as the source 3 Start playing a disc You can select the audio channel for a disc See Selecting the Audio Channel on page 38 You can apply the echo effect to your voice see page 38 4 Sing into the microphone 5 Adjust the microphone s volume and System s volume You can adjust the microphone volume level from 00 to 08 For the adjustment of the System s volume see pag...

Page 41: ...dio channel changes see also page 24 Applying an Echo to Your Voice Echo You can apply the echo effect to your voice and adjust the effect level You can adjust the effect level from 00 to 08 As the number increases the effect is emphasized On the TV EN_NX T10 UG _CS2 indb 38 EN_NX T10 UG _CS2 indb 38 09 12 14 9 53 26 PM 09 12 14 9 53 26 PM ...

Page 42: ...tch your TV when you play back pictures recorded for wide screen televisions 4 3 PS Pan Scan conversion For a conventional 4 3 TV The picture is zoomed in to fill the screen vertically and the left and right sides of the picture are cut off 4 3 LB Letter Box conversion For a conventional 4 3 TV Displays a wide screen picture to fit the width of the TV screen keeping the aspect ratio 16 9 Wide scre...

Page 43: ...the audio signal into PCM and emits the signal from the HDMI MONITOR OUT terminal MIC SETUP You can turn on or off the microphone AUTO Normally select this The System reproduce the sound of the microphone when DVD CD HDMI 1 HDMI 2 USB or DGTL DIGITAL IN is selected as the source OFF The System does not reproduce the sound of the microphone BRIGHTNESS You can adjust the brightness 0 to 12 CONTRAST ...

Page 44: ... you do not want to have the System automatically turned on off by turning on off the TV or external HDMI CEC compatible devices All other available HDMI CEC functions operate the same as when ON 1 is selected OFF Deactivates the HDMI CEC function DVICOLOR You can select the settings for the picture appearance image quality color intensity and black fading on the TV connected to the HDMI MONITOR O...

Page 45: ...d for HDMI CEC setting See page 41 When you select the menu screen language of the TV the same language is automatically selected on the System after the System is turned off and turned on again The selectable languages are limited to those supported by the System As long as the connected TV is compatible you can use the operations of the TV to start playback and operate other functions on the Sys...

Page 46: ...ass device If any unplayable files are included in a folder those files are also counted in the total file number Playable files which do not belong to any groups are handled as GROUP 1 For playback of files in the USB mass storage class device When connecting a USB mass storage class device refer also to its manual Connect one USB mass storage class device to the System at a time Do not use a USB...

Page 47: ...ly a disc of UDF Bridge format Multi border is not supported The System supports all versions of DivX video including DivX 6 The System supports DivX files whose resolution is 720 x 480 pixels or less 30 fps and 720 x 576 pixels or less 25 fps Audio stream should conform to Dolby Digital MPEG 1 Audio Layer 2 or MPEG Audio Layer 3 MP3 This System can play back DivX files with the extension code div...

Page 48: ...ouch the shiny surface of the disc or bend the disc Put the disc back in its case after use to prevent warping Be careful not to scratch the surface of the disc when placing it back in its case Avoid exposure to direct sunlight extreme temperature and moisture To clean the disc Wipe the disc with a soft cloth in a straight line from center to edge Cleaning the System Stains should be wiped off wit...

Page 49: ...iate Select the monitor type suitable for your TV see page 39 The screen size setting of the TV is improper The TV screen is dark The screen saver setting is activated Press any button see page 39 FM Radio Operations Hard to hear broadcasts because of noise Antenna connections are incorrect or loose The FM antenna is not properly extended and positioned Disc USB Mass Storage Class Device Playback ...

Page 50: ...TOR OUT terminal A disc file recorded in a format incompatible with the System TV is played back Confirm the playable disc file types see page 3 The connected TV is not compatible with HDCP Connect a TV compatible with HDCP The System fails to recognize the TV connected to the HDMI MONITOR OUT terminal Disconnect the HDMI cable and connect it again An HDMI cable longer than 2 m is used Use an HDMI...

Page 51: ...he USB memory has exceeded the maximum number of files it can support The USB device is write protected SCMS VLT violation You have tried to copy from a duplicated disc to the USB device USBERROR A reading or a writing error occurred during playback or recording EN_NX T10 UG _CS2 indb 48 EN_NX T10 UG _CS2 indb 48 09 12 14 9 53 31 PM 09 12 14 9 53 31 PM ...

Page 52: ...onent video interlaced progressive Y 1 V p p 75 Ω PB PR 0 7 V p p 75 Ω Microphone input MIC 1 MIC 2 2 0 mV 10 kΩ Tuner FM tuning range 87 50 MHz 108 00 MHz Disc player Playable disc DVD Video CD VCD SVCD CD R CD RW CD SVCD VCD MP3 WMA JPEG MPEG 1 MPEG 2 DivX format DVD R RW DVD Video DVD VR MP3 WMA JPEG MPEG 1 MPEG 2 DivX format R RW DVD Video MP3 WMA JPEG MPEG 1 MPEG 2 DivX format Dynamic range 8...

Page 53: ...V 50 Hz 60 Hz Power consumption 95 W at operation of the System 0 85 W at standby Mass approx 10 kg Dimensions approx 231 mm 393 mm 370 5 mm W H D Speakers SP NXT10F Speaker 1 way bass reflex type magnetically shielded Front 8 cm cone x 1 Surround 5 5 cm cone x 1 Impedance 4 Ω Power handling capacity Front 80 W Surround 80 W Frequency range Front 80 Hz 20 kHz Surround 125 Hz 20 kHz Sound pressure ...

Page 54: ...t play Learn more at www divx com vod Plays DivX video Microsoft and Windows Media are either registered trademarks or trademarks of Microsoft Corporation in the United States and or other countries This product incorporates copyright protection technology that is protected by U S patents and other intellectual property rights Use of this copyright protection technology must be authorized by Macro...

Page 55: ...L g 20 21 34 MIC VOLUME 22 MUTING h 22 Number buttons 4 18 20 21 33 39 PLAY MODE x 27 28 PRESET 6 18 REC r 31 REPEAT i 28 REPEAT A B u 29 SCAN MODE t 14 15 SET UP c 39 41 SLEEP b 23 SLOW 9 k 26 SUBTITLE n 25 SURROUND y 22 TIME SEARCH v 32 33 TOP MENU PG 5 20 34 TUNING 9 8 18 VOLUME j 17 Main unit Name Page 1 17 3 7 17 19 8 8 19 26 36 7 6 19 29 0 9 17 19 29 Display 5 16 DISPLAY MODE switch 4 MIC 1 ...

Page 56: ...NX T10 1209DUMMDWCDT 2009 Victor Company of Japan Limited EN COMPACT COMPONENT SYSTEM EN_NX T10 UG _CS2 indb 1 EN_NX T10 UG _CS2 indb 1 09 12 14 9 53 34 PM 09 12 14 9 53 34 PM ...

Reviews: