background image

19

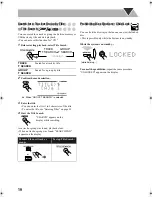
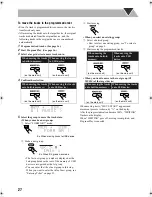
Search for a Track or Group by Title

—Title Search

You can search for a track or group in a built-in memory or 
USB device by title and start playback.
• You cannot use this function for “CD.”

1

Before starting playback, select Title Search.

2

Confirm the mode selection.

3

Enter the title.

• You can enter the first 1 to 5 characters of the title.
• To enter the title, see “Entering Titles” on page 29.

4

Start the Title Search.

As a track or group was found, playback starts.
• When no track or group was found, “SEARCH END” 

appears on the display.

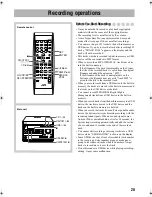
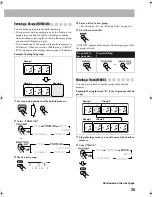
Prohibiting Disc Ejection—Child Lock

You can lock the disc tray so that no one can eject the loaded 
disc.
• This is possible only while the System is on standby.

While the system is on standby...

To cancel the prohibition,

 repeat the same procedure.

“UNLOCKED” appears on the display.

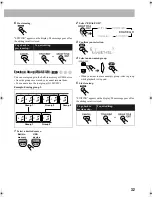
TRACK 
T SEARCH

Search for a track by title.

GROUP 
T SEARCH

Search for a group by title.

To search for next track or 
group:

To stop Title Search:

Remote
ONLY

INFO

TRACK

T SEARCH

GROUP

T SEARCH

Canceled

Ex. When “GROUP T SEARCH” is selected

“SEARCH” appears on the 
display while searching.

or

Main Unit

ONLY

(while holding...)

UX-DM8[U].book  Page 19  Monday, June 4, 2007  8:20 PM

Summary of Contents for CA-UXDM8

Page 1: ...MICRO COMPONENT SYSTEM UX DM8 Consists of CA UXDM8 and SP UXDM8 INSTRUCTIONS GVT0204 005A US UB A ...

Page 2: ...accessible The button in any position does not disconnect the mains line When the System is on standby the STANDBY lamp lights red When the System is turned on the STANDBY lamp goes off The power can be remote controlled CAUTION Do not block the ventilation openings or holes If the ventilation openings or holes are blocked by a newspaper or cloth etc the heat may not be able to get out Do not plac...

Page 3: ... spacing 2 Sides Top Back No obstructions should be placed in the areas shown by the dimensions below 3 Bottom Place on the level surface Maintain an adequate air path for ventilation by placing on a stand with a height of 10 cm or more Front view 10 cm 15 cm 1 cm 15 cm 15 cm 1 cm SP UXDM8 CA UXDM8 SP UXDM8 Side view 15 cm 15 cm CA UXDM8 European Union only ...

Page 4: ...le below Some related tips and notes are explained later in the sections Learning More about This System and Troubleshooting but not in the same section explaining the operations indicates that the content has some information Playable Disc File Types In addition to the above discs files this System can play back audio data recorded on CD Extra and CD Text The following discs cannot be played back...

Page 5: ...p Group Random Play 18 Playing Repeatedly Repeat Play 18 Search for a Track or Group by Title Title Search 19 Prohibiting Disc Ejection Child Lock 19 Recording operations 20 Before You Start Recording 20 Recording from a Disc 21 Recording from the Radio iPod or the other equipment 23 Moving Tracks Between the Built in Memory and USB Device 25 Editing operations 28 Giving Editing Titles to Tracks o...

Page 6: ...ord x1 Batteries x2 Speaker cord x2 Core filter x1 AC plug adapter x1 Except for Hong Kong and Australian models Front panel From the other audio equipment See page 11 From the USB device See page 8 From the headphones See page 6 To a wall outlet See page 4 Plug in the AC power cord only after all connections are completed If the wall outlet does not match the AC plug use the supplied AC plug adap...

Page 7: ...he power cord Disconnect the power cord before cleaning or moving the System Extend it so that you can obtain the best reception FM antenna supplied AM loop antenna supplied FM outdoor antenna not supplied DO NOT connect more than one speaker to each terminal DO NOT push or pull the speakers as this will damage the foot spacers at the bottom of the speakers Left speaker Transparent Press and hold ...

Page 8: ...on the display tell you a lot of things while you are operating the System Before operating the System be familiar with when and how the indicator illuminates on the display 1 Source status indicators CD MEMORY USB Always lights Source detection indicators CD MEMORY USB See page 8 REC See page 21 2 AHB PRO indicator See page 12 3 Audio file format indicators 4 Main display 5 A STBY Auto Standby in...

Page 9: ...l are mainly explained however you can use the buttons and controls on the main unit if they have the same or similar name and marks 1 2 1 3 REPEAT 3 FM PLAY MODE 4 7 2 SET ENTER QP LINK GROUP SELECT GROUP SKIP TITLE EDIT Number buttons Remote control The STANDBY lamp on the main unit lights in red A small amount of power is always consumed even while on standby For private listening Connect a pai...

Page 10: ...eo effect press the button again the ST indicator lights If the beats are heard while listening to AM station Select from BEAT CUT 1 to BEAT CUT 4 whichever reduce the beats To preset the stations You can preset 30 FM and 15 AM stations 1 Tune in to a station you want to preset You can also store the monaural reception mode for FM preset stations if selected 2 Activate the preset number entry mode...

Page 11: ...ven while playing another source When using an 8 cm disc place it on the inner circle of the disc tray To close the disc tray press 0 on the main unit again Pressing CD 6 also closes the disc tray and starts playback depending on how the disc is programmed internally Before using the built in memory Before playing back the tracks on the built in memory you need to record or move some tracks to the...

Page 12: ...into MTP device This System cannot edit the files in MTP device Microsoft and Windows Media are either registered trademarks or trademarks of Microsoft Corporation in the United States and or other countries To play back a disc track To select a group While playing a disc track You can select a group directly by pressing a number button after pressing GROUP SELECT Group name appears for MP3 WMA WA...

Page 13: ...o the connector part Do not touch or hit the iPod terminal pins or connector pins directly It might cause damages to the connector part If incompatible iPod type is connected the iPod may not be operated from the System To enable the operation before connecting the iPod switch the charge mode to OFF refer to To turn ON OFF the charge mode on page 11 with iPod selected as source Sound distortion ma...

Page 14: ...plug audio output use a plug adaptor to convert the stereo mini plug to the corresponding plug of the audio output To select AUX as a source To activate QP Link When QP Link is activated playing back an external equipment connected to the AUX jack performs the followings While listening to another source Change the source to AUX automatically If you change from AUX to another source QP Link will b...

Page 15: ... 5 To adjust the bass To adjust the treble To select the sound mode You can select from 3 types of the sound mode Remote control Main unit To restore the volume press again or adjust the volume level VOLUME Remote control Main unit REPEAT VOLUME A STANDBY SLEEP AHB PRO SET CLOCK TIMER DISP CHARA BASS TREBLE FADE MUTING DIMMER CANCEL 4 SOUND MODE Remote ONLY SOUND 1 Produces a sound in natural ambi...

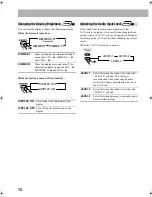
Page 16: ...ghts around the CD 8 MEMORY 8 and USB 8 DIMMER 2 Dims the display more and turn off the illumination lights around the CD 8 MEMORY 8 and USB 8 DISPLAY ON Turn on the clock indication on the display DISPLAY OFF Turn off the clock indication on the display Remote ONLY DIMMER 2 DIMMER 1 DIMMER OFF Canceled DISPLAY ON DISPLAY OFF LEVEL 1 Select this when the sound is too loud with LEVEL 2 selected Thi...

Page 17: ...elected as a source 4 Not displayed while iPod or USB is selected as a source Turning Off the Power Automatically Auto Standby This function only available for CD built in memory USB iPod and AUX When Auto Standby is in use the A STBY indicator lights on the display When the playback stops the A STBY indicator starts flashing If no operation is done while the indicator is flashing for about 3 minu...

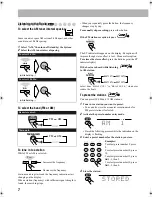
Page 18: ...rack number 3 Repeat steps 1 and 2 above For CD 1 Select tracks If you try to entry a track after registering 99 tracks PROGRAM FULL appears on the display and the track will not be programmed 4 Start playback 7 4 0 CD 8 USB 8 MEMORY 8 REPEAT 7 PLAY FM MODE REPEAT USB 6 MEMORY 6 CD 6 TITLE SEARCH SET ENTER CANCEL 4 GROUP SKIP Remote control Main unit Number buttons Remote ONLY INFO To enter the nu...

Page 19: ... contents Before or after playback To modify the program Before or after playback To exit from Program Play Before or after playback Appears only when MEMORY or USB is selected as a source When program the tracks on the USB device When program the tracks on the built in memory Program number PROGRAM RANDOM GROUP RANDOM GROUP Canceled Number of the programmed tracks Group number of a track that pro...

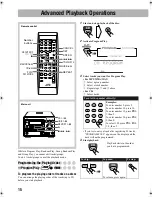
Page 20: ...only Group Play You can play a selected group on the built in memory or USB device You cannot use this function for CD 1 Before starting playback activate Group Play 2 Start playback Playback starts in the current group Group Play ends after finishing playback of all the tracks in the group 3 Select a desired group To exit from Group Play Before or after playback To skip a track To stop Remote ONL...

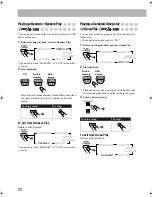
Page 21: ...p To exit from Group Random Play Before or after playback Playing Repeatedly Repeat Play You can repeat playback While playing or before playback Appears only while playing back an MP3 WMA WAV track from the disc To skip a track To stop Remote ONLY INFO PROGRAM RANDOM GROUP RANDOM GROUP Canceled USB device Built in memory PROGRAM RANDOM GROUP RANDOM GROUP Canceled REPEAT TRACK Repeats the current ...

Page 22: ...arts When no track or group was found SEARCH END appears on the display Prohibiting Disc Ejection Child Lock You can lock the disc tray so that no one can eject the loaded disc This is possible only while the System is on standby While the system is on standby To cancel the prohibition repeat the same procedure UNLOCKED appears on the display TRACK T SEARCH Search for a track by title GROUP T SEAR...

Page 23: ...n memory the tracks are moved to the built in memory and the tracks on the USB device are deleted You cannot record WMA DRM Digital Rights Management tracks from a USB device to the built in memory When you record tracks from the built in memory to a USB device the tracks are moved to the USB device and the tracks on the built in memory are deleted When you record the tracks from an iPod or portab...

Page 24: ... USB device Display USB REMAIN When you check the available remaining time to record while any source other than MEMORY or USB is selected as a source the available remaining time to record is calculated using the current Recording Mode When you check the available remaining time to record while MEMORY or USB is selected as a source the available remaining time to record is calculated using the SP...

Page 25: ...o record tracks into When you make a new group for the tracks 1 Select FORM GR mode 2 Make a new group The first new group you make is displayed as the 2nd group because the root of the memory of USB device is recognized as the 1st group You can enter the title of new group in this step When you want to enter the title of new group see Entering Titles on page 29 3 Start recording When you select a...

Page 26: ... 3 Pause playback at the beginning of the desired track When you want to record tracks from the other equipment 1 Connect the other equipment See Playing Back an other equipment on page 11 2 Select AUX as a source See To select AUX as a source on page 11 2 Select a Recording Mode See step 2 of Recording from a Disc on page 21 3 Select a Marking Mode 4 Select the recording device To record onto bui...

Page 27: ...g When you want to record into the root group G1 MUSIC 6 Start playing the source Only for the iPod or portable audio device When the sound signal comes into the System recording starts automatically When the incoming signal from portable audio device is too weak recording does not start In this case increase the volume on the portable audio device When recording does not start you can start recor...

Page 28: ...lect the target device to move tracks onto 4 Confirm the selection 5 Select the group to move the tracks into When you make a new group 1 Select FORM GR mode 2 Make a new group The first new group you make is displayed as the 2nd group because the root of the memory of USB device is recognized as the 1st group You can enter the title of new group in this step When you want to enter the title of ne...

Page 29: ...d stop playback 2 Activate Group Play then select a group to move See Playing a Selected Group only Group Play on page 17 3 Select the target device to move the group onto 4 Start moving When moving starts MOVE START appears and movement process is shown by on the display After the progress indication become 100 WRITING flashes on the display When WRITING goes off moving is completed and Group Pla...

Page 30: ...n page 29 3 Start moving When you select an existing group 1 Select a desired group How to select an existing group see To select a group on page 9 2 Start moving the programmed tracks When you want to move to the root group G1 MUSIC of the target device When moving starts MOVE START appears and movement process is shown by on the display After the progress indication become 100 WRITING flashes on...

Page 31: ... you want to edit a group title 1 Enter the group title editing mode 2 Select a group You cannot edit the title for the root group G1 MUSIC 3 Display the title editing screen 4 Enter a title For entering a title see Entering Titles on page 29 5 Finish the procedure To quit title editing To give next title REPEAT SET DISP CHARA ENTER CANCEL 4 GROUP SKIP MEMORY 3 8 TITLE EDIT GROUP TITLE EDIT USB 3 ...

Page 32: ... Select the space from Symbols See Available Characters below You can also enter a space at the end of a title by pressing 10 To quit title entry The entered titles are not stored Available Characters For built in memory you can use only the following symbols for the track title and group title For USB device it can be displayed but cannot be used Track number or group number Character entry posit...

Page 33: ...memory 2 Select FORM GR 3 Make a new group 4 Enter a title of a new group For entering a title see Entering Titles on page 29 5 Store the entered title EDITING appears on the display The message goes off as the group is stored Moving a Track MOVE You can move a track to another group in the built in memory Example Moving the track B in the 1st group to the 2nd group 1 Start playing a track you wan...

Page 34: ...y or USB device Once the tracks are erased you cannot resume them Example Erasing the track B 1 Select a desired source 2 Select ERASE 3 Confirm your selection 4 Select the numbers of tracks you want to erase You can select up to 15 tracks by repeating this step When you select a 16th track MEMORY FULL appears on the display 5 Confirm your selection To go back to previous step To quit editing Grou...

Page 35: ...ing group 2 1 Select a desired source 2 Select ERASE GR 3 Confirm your selection 4 Select an unwanted group When you want to erase an empty group select a group while playback is stopped 5 Start erasing EDITING appears on the display The message goes off as the editing result is stored To go back to previous step To quit editing or INFO Group 1 Group 3 Group 2 Group 2 Group 1 USB device Built in m...

Page 36: ...re erased you cannot resume them Example Erasing all tracks 1 Select a desired source 2 Select FORMAT 3 Confirm your selection 4 5 Confirm the erasing 6 Start erasing EDITING appears on the display The message goes off as the editing result is stored All tracks are erased Blank USB device Built in memory TITLE FORM GR ERASE MOVE FORMAT TITLE FORM GR ERASE GR FORMAT Canceled or Canceled To go back ...

Page 37: ... your selection REPEAT SET CANCEL 4 STANDBY ON CLOCK TIMER ENTER Remote control Number buttons When you want to activate two or three timers leave a blank time of 6 minutes or more between the end time of the first timer and the start time of the second timer If the blank time is less than 6 minutes another timer does not work How Recording Timer works When Recording Timer has been set the indicat...

Page 38: ...n memory When Recording Timer works the group named TIMER is made automatically and the recordings are stored as the tracks into that group You cannot select other groups for storage To cancel Recording Timer In step 2 on page 34 select the timer number you want to cancel then press CANCEL Even when you cancel Recording Timer the setting remains stored To activate Recording Timer again In step 2 o...

Page 39: ...d station You can also use the number buttons to select the preset number When you want to play back a disc built in memory or USB device Select the group number then the track number of the desired track When the loaded disc is an audio CD simply select the track number then press SET 5 Adjust the playback volume You can also use the number buttons to adjust the playback volume 6 Turn off the Sys...

Page 40: ...ce whose rating is other than 5 V and does not exceed 500 mA This System may not play back some USB devices This System may not play back some files even though their formats are listed above It will take some time to start up a USB device larger than 1 GB For MP3 WMA WAV playback MP3 WMA WAV discs require a longer readout time than regular CDs It depends on the complexity of the group file config...

Page 41: ...annot play tracks of different sources at random When you turn off the System or disconnect the USB device Random Play is canceled When you select iPod as a source the Random Play of the USB device is canceled The track that played once is not played again Playing a Selected Group only Group Play When you turn off the System or disconnect the USB device Group Play is canceled When you select iPod ...

Page 42: ...t track will be played with the timer activated When Playback Timer works the volume increases gradually to the volume you have set Timer Priority If you set the Sleep Timer after Recording or Playback Timer starts Recording or Playback Timer is canceled Maintenance To get the best performance of the System keep your discs and mechanism clean Handling discs Remove the disc from its case by holding...

Page 43: ...n off then turn on the power of the system The USB device is write protected CANNOT PLAY The file is unplayable CANNOT REC While in Random Play or Group Random Play you cannot move tracks between built in memory and USB device You cannot record tracks from an iPod to a USB device CANNOT REC CHANGE MSC Change the USB connection mode to MSC see page 9 CANNOT REC MTP DEVICE You cannot record to the c...

Page 44: ...number of the groups exceeds 999 HCMS CANNOT COPY When you record tracks using REC SPEED HIGH wait for 74 minutes to start another recording using REC SPEED HIGH see page 21 MEM NO AUDIO No music file is recorded in the built in memory NO USB The USB device is not connected SCMS CANNOT COPY You cannot record from a duplicated CD R or CD RW into the built in memory or USB device Select ANALOG REC s...

Page 45: ... WMA DRM Digital Rights Management track you want to play is restricted to play back For example the license is invalid the playable times exceed the limit and so on A track on the USB device does not play and DRM FILE appears on the display sWhen MSC is selected for the USB connection mode see page 9 you cannot play the WMA DRM Digital Rights Management track on the USB device sYou cannot play th...

Page 46: ... USB section USB type USB Ver 2 0 Full Speed Connection type MTP MSC File system FAT16 FAT32 Playable file MP3 WMA WAV format Recording format MP3 format Recording bit rate 64 kbps at EP REC 128 kbps at SP REC 192 kbps at HQ REC USB output power 5 V 500 mA iPod section iPod output power 5 V 500 mA General Power requirement AC 110 V 240 V 50 Hz 60 Hz For Australia AC 240 V 50 Hz For Hong Kong AC 22...

Page 47: ...uttons 1 7 9 15 25 29 30 PLAY FM MODE p 7 15 18 QP LINK u 11 REC SPEED r 22 REPEAT l 18 SET s 7 13 14 16 19 22 24 25 27 28 30 36 SLEEP w 14 SOUND MODE y 12 STANDBY ON o 6 35 36 TITLE EDIT 5 28 33 TITLE SEARCH h 19 USB 6 j 6 8 9 16 18 24 25 26 31 33 USB MODE u 9 VOLUME b 6 12 Button Page 3 6 7 35 36 x 9 7 9 11 15 18 4 8 7 9 11 15 16 0 8 19 30 AUX jack 3 11 Display 2 5 CD 8 6 8 9 15 17 21 FM AM AUX ...

Page 48: ...0607JSKMDCJMM EN 2007 Victor Company of Japan Limited UX DM8 MICRO COMPONENT SYSTEM ...

Reviews: