background image


G-1


Warnings, Cautions and Others


CAUTION—

 button!


Disconnect the mains plug to shut the power off completely (the 
STANDBY lamp goes off). When installing the apparatus, 
ensure that the plug is easily accessible. The 

 button in any 

position does not disconnect the mains line.
• When the unit is on standby, the STANDBY lamp lights red.
• When the unit is turned on, the STANDBY lamp goes off.
The power can be remote controlled.


CAUTION


To reduce the risk of electrical shocks, fire, etc.:
1. Do not remove screws, covers or cabinet.
2. Do not expose this appliance to rain or moisture.


IMPORTANT FOR LASER PRODUCTS


1. CLASS 1 LASER PRODUCT
2.


CAUTION:


 Do not open the top cover. There are no user 

serviceable parts inside the unit; leave all servicing to 
qualified service personnel.

3.


CAUTION:


 Visible and/or invisible class 1M laser radiation 

when open. Do not view directly with optical instruments.

4. REPRODUCTION OF LABEL: CAUTION LABEL, PLACED 

INSIDE THE UNIT.


IMPORTANT for the U.K.

DO NOT


 cut off the mains plug from this equipment. If the 

plug fitted is not suitable for the power points in your home 
or the cable is too short to reach a power point, then obtain 
an appropriate safety approved extension lead or consult 
your dealer.


BE SURE


 to replace the fuse only with an identical 

approved type, as originally fitted.

If nonetheless the mains plug is cut off ensure to remove the 
fuse and dispose of the plug immediately, to avoid a possible 
shock hazard by inadvertent connection to the mains supply.

If this product is not supplied fitted with a mains plug then 
follow the instructions given below:


IMPORTANT:

DO NOT


 make any connection to the terminal which is 

marked with the letter E or by the safety earth symbol or 
coloured green or green-and-yellow.

The wires in the mains lead on this product are coloured in 
accordance with the following code:

Blue:        Neutral
Brown:     Live

As these colours may not correspond with the coloured 
markings identifying the terminals in your plug proceed as 
follows:

The wire which is coloured blue must be connected to the 
terminal which is marked with the letter N or coloured black.

The wire which is coloured brown must be connected to the 
terminal which is marked with the letter L or coloured red.


IF IN DOUBT - CONSULT A COMPETENT ELECTRICIAN.


CAUTION


• Do not block the ventilation openings or holes.

(If the ventilation openings or holes are blocked by a 
newspaper or cloth, etc., the heat may not be able to get 
out.)

• Do not place any naked flame sources, such as lighted 

candles, on the apparatus.

• When discarding batteries, environmental problems must 

be considered and local rules or laws governing the 
disposal of these batteries must be followed strictly.

• Do not expose this apparatus to rain, moisture, dripping or 

splashing and that no objects filled with liquids, such as 
vases, shall be placed on the apparatus.

Dear Customer,
This apparatus is in conformance with the valid European 
directives and standards regarding electromagnetic 
compatibility and electrical safety.

European representative of Victor Company of Japan 
Limited is:
JVC Technology Centre Europe GmbH
P.O. Box 10 05 52
61145 Friedberg
Germany


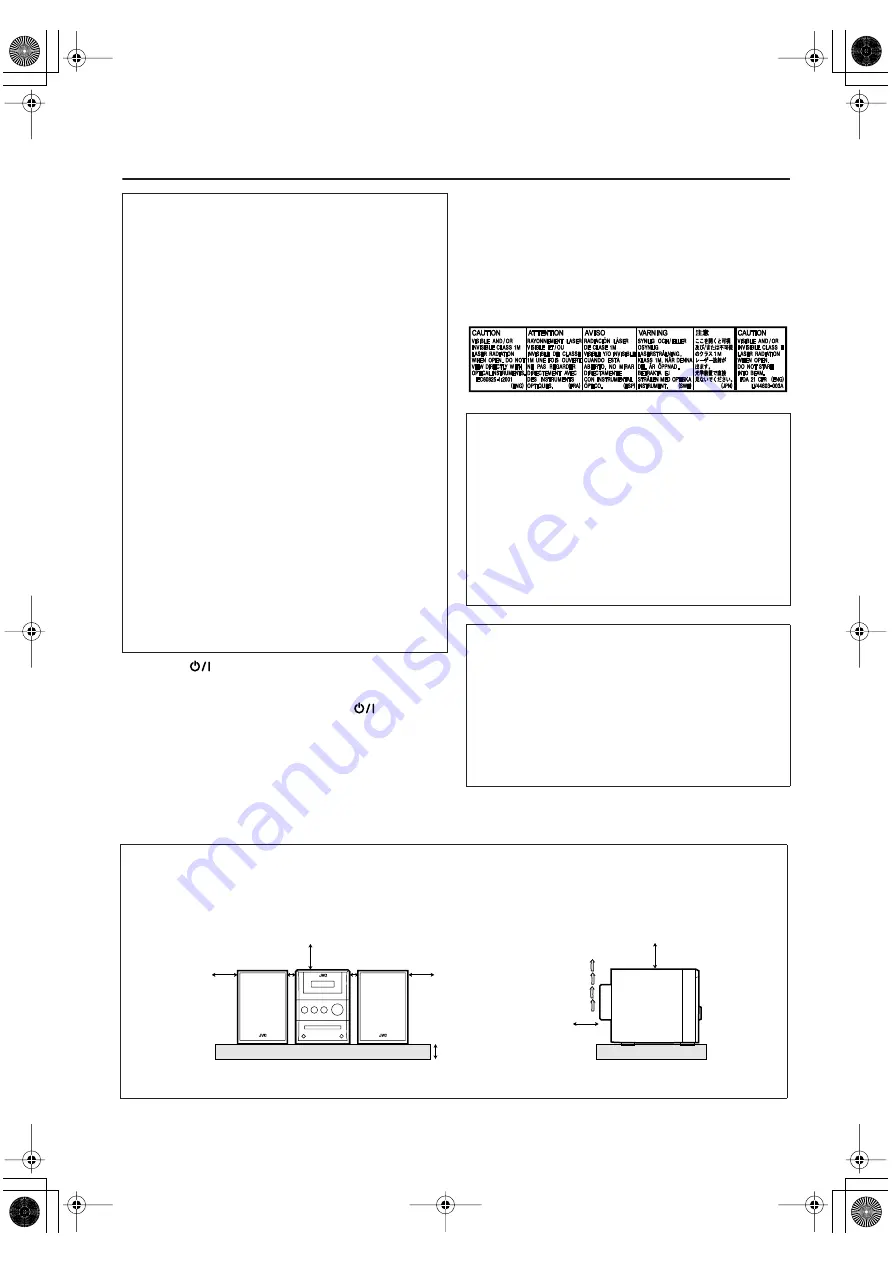
Caution: Proper Ventilation


To avoid risk of electric shock and fire, and to prevent damage, locate the apparatus as follows:
1. Front: No obstructions and open spacing.
2. Sides/Top/Back: No obstructions should be placed in the areas shown by the dimensions below.
3. Bottom: Place on the level surface. Maintain an adequate air path for ventilation by placing on a stand with a height of 10 cm 

or more.

10 cm

15 cm

1 cm

15 cm

15 cm

1 cm

15 cm

15 cm

Front view

Side view

CA-UXGB9DAB

SP-UXGB9DAB

CA-UXGB9DAB

SP-UXGB9DAB

UX_GB9.book Page 1 Thursday, May 18, 2006 4:18 PM

Summary of Contents for CA-UXGB9DAB

Page 1: ...MICRO COMPONENT SYSTEM UX GB9DAB Consists of CA UXGB9DAB and SP UXGB9DAB INSTRUCTIONS GVT0172 001A B UX_GB9 book Page 1 Thursday May 18 2006 4 18 PM ...

Page 2: ... wires in the mains lead on this product are coloured in accordance with the following code Blue Neutral Brown Live As these colours may not correspond with the coloured markings identifying the terminals in your plug proceed as follows The wire which is coloured blue must be connected to the terminal which is marked with the letter N or coloured black The wire which is coloured brown must be conn...

Page 3: ...nd human health which could otherwise be caused by inappropriate waste handling of this product For more information about collection point and recycling of this product please contact your local municipal office your household waste disposal service or the shop where you purchased the product Penalties may be applicable for incorrect disposal of this waste in accordance with national legislation ...

Page 4: ...wer cord and consult your dealer How to Read This Manual Button and control operations are explained in the table below Some related tips and notes are explained later in the sections Learning More about This System and Troubleshooting but not in the same section explaining the operations indicates that the content has some information DO NOT install the System in a location near heat sources or i...

Page 5: ...f Your Choice Automatically 13 Description of the PTY codes for Radio Data System 13 DAB Operations 14 Listening to a Service 14 Presetting Services 15 Changing the Display Mode 16 Searching for a Service by PTY Codes 16 Switching Temporarily to a Service of Your Choice Automatically 17 Description of the PTY codes for DAB 17 Advanced Disc Operations 18 Programming the Playing Order Program Play 1...

Page 6: ...ries 2 Do not connect the AC power cord until all other connections have been made PHONES AUX Rear view Front view 1 1 1 1 From DAB antenna See page 4 3 3 3 3 From the speakers See page 5 4 4 4 4 To a wall outlet Plug in the AC power cord only after all connections are complete From the analog audio output of portable audio devices See page 5 2 2 2 2 From AM FM antenna See page 4 UX_GB9 book Page ...

Page 7: ...5 Make sure the antenna conductors do not touch any other terminals connecting cords or the power cord Also keep the antennas away from metallic parts of the System connecting cords and the AC power cord This could cause poor reception DAB antenna supplied Extend the wire so that you can receive your desired ensembles Active antenna not supplied FM antenna supplied Extend it so that you can obtain...

Page 8: ... to the corresponding plug of the audio output Preparing the remote control Dispose of batteries in the proper manner according to federal state and local regulations When using the remote control Point the top of the remote control toward the remote sensor as directly as possible If you operate it from a diagonal position the operating range approx 5 m may be shorter DO NOT connect more than one ...

Page 9: ...Band III 6 Timer indicators lights when Daily Timer is on standby flashes while working or being set 1 2 3 lights when a Daily Timer 1 2 or 3 is on standby flashes while working or being set SLEEP lights when Sleep Timer is activated 7 S TURBO Sound Turbo indicator Lights when Sound Turbo is activated 8 AHB PRO Active Hyper Bass Pro indicator Lights when AHB Pro is activated 9 QP Link Quick Portab...

Page 10: ... NUMBER SELECT QP LINK DIMMER 3 PRESET GROUP PTY DOWN UP PTYSEARCH 7 In this manual the operations using the remote control are explained mainly however you can use the buttons and controls on the main unit if they have the same or similar name and symbol The STANDBY lamp on the main unit lights in red A small amount of power is always consumed even while on standby For private listening Connect a...

Page 11: ... the preset number for the preset station Playing Back a Disc This System can play back the following discs regular CD and CD R CD RW recorded either in the audio CD or MP3 format To insert a disc You can insert a disc while playing another source To close the disc tray press 0 again If you press CD 6 disc tray closes automatically and playback starts Remote control Main unit Remote control Main u...

Page 12: ...u can easily start playing back a portable audio device connected to the AUX jack Make sure to set the volume of your portable audio device loud enough so that the System can detect the sound signal To activate QP Link When QP Link is activated connecting a portable device to the AUX jack and starting playback performs the following While listening to another source Changes the source to AUX autom...

Page 13: ...e tone Bass Treble You can adjust the bass and treble level from 3 to 3 To adjust the bass To adjust the treble Remote control Main unit SLEEP SET ANT P CANCEL A STANDBY AHB PRO VOLUME DISPLAY MODE CLOCK TIMER BASS TREBLE DIMMER FADE MUTING SOUND TURBO PRESET GROUP PTY DOWN UP DIMMER SOUND TURBO VOLUME UP DOWN 4 Remote control Main unit VOLUME VOLUME To restore the volume press again or adjust the...

Page 14: ...starts flashing When disc playback stops When the sound signal from the AUX jack stops or is too weak The System will turn off on standby automatically if no operation is done for about 3 minutes while the indicator is flashing Sleep Timer You can set the unit to turn off after a certain period of time 1 Specify the time in minutes 2 Wait until the set time disappears To check the time remaining u...

Page 15: ...ching after it stops on an unwanted station While the indications on the display are flashing PS Program Service Shows commonly known station names PTY Program Type Shows types of broadcast programs RT Radio Text Shows text messages the station sends Enhanced Other Networks Provides the information about the types of the programs broadcast by the Radio Data System stations of the different network...

Page 16: ...g or enlarging upon the news debate or analysis INFO Programs the purpose of which is to impart advice in the widest sense SPORT Programs concerned with any aspect of sports EDUCATE Educational programs DRAMA All radio plays and serials CULTURE Programs concerning any aspect of national or regional culture including language theater etc SCIENCE Programs about natural sciences and technology VARIED...

Page 17: ... next page 2 Select an ensemble You can choose from the ensembles found by the ensemble scanning To choose from all the ensembles see To tune in to all the ensembles on the next page 3 Select a service either primary or secondary you want to listen to Ex When the signal is strong enough the ST indicator lights on the display Remote control DAB PTY SEARCH 7 DISPLAY MODE REPEAT TA News Info PRESET G...

Page 18: ...ng on your reception condition You can improve the reception of both L Band and Band III ensembles by connecting an active antenna see page 4 and supplying electricity to the antenna While on standby Display ON Presetting Services You can preset 30 services in memory 1 Tune in to an ensemble then select a service you want to preset 2 Activate the preset number entry mode 3 Select a preset number f...

Page 19: ...ue searching after it stops on an unwanted service While the PTY code is flashing on the display for 10 seconds press PTY SEARCH again Service label NOSIGNAL will appear if no signal is sent PTY The broadcast program type is displayed NONE will appear if no signal is sent DLS Dynamic Label Segment text messages the station sends is displayed NO TEXT will appear if no signal is sent Remote ONLY DIS...

Page 20: ...nd technology TALK Used for mainly speech based programs such as quizzes panel games and personality interviews POP M Commercial music of current popular appeal ROCK M Rock music EASY M Current contemporary music considered to be easy listening CLASSICL Instrumental music and vocal or choral works CLASSICM Performances of major orchestral works symphonies chamber music etc OTHER M Music not fittin...

Page 21: ... playback To check the programmed contents Before playback or while playback is stopped To modify the program Before playback or while playback is stopped CANCEL SET ANT P 4 CD 6 FM MODE PLAY MODE REPEAT TA News Info PRESET GROUP PTY DOWN UP 0 CD 8 7 UP DOWN 4 Remote control Main unit Remote ONLY FM MODE PLAY MODE PROGRAM RANDOM Canceled The tracks you have selected are played back in the order yo...

Page 22: ...hile the System is on standby While on standby To cancel the prohibition repeat the same procedure UNLOCKED appears on the display Playback starts in random order Random Play ends when all tracks have been played FM MODE PLAY MODE PROGRAM RANDOM Canceled Remote ONLY PROGRAM RANDOM FM MODE PLAY MODE QP Link S TURBO RND Canceled FM MODE PLAY MODE PROGRAM RANDOM Canceled REP TRK Repeats the current o...

Page 23: ...elect the volume level You can select the volume level VOLUME 1 to VOLUME 40 and VOLUME If you select VOLUME the volume is set to the last level when the unit has been turned off Continued on the next page Daily Timer initial settings when shipped from the factory Daily 1 ON Time 6 00 Source TUNER Volume level 8 Daily 2 ON Time 7 00 Source TUNER Volume level 8 Daily 3 ON Time 10 00 Source TUNER Vo...

Page 24: ...er is turned off manually see the next column or another Daily Timer is activated When the on time comes The System turns on tunes in to the last received station service or start playing the loaded disc and increases the volume level gradually to the preset level About one hour after playback starts the System stops playback and turns off standby automatically The timer setting remains in memory ...

Page 25: ...roups are handled as Group 1 Playing Back a Portable Audio Device When QP Link fails due to a weak sound signal from the AUX jack Auto Standby may turn the System off even if you can hear the sound from the speakers In such cases adjust the volume level of the component louder so that the System can detect the sound signal properly Changing from AUX to another source while QP Link works will deact...

Page 26: ...emble The DAB antenna is not properly extended or positioned Adjust the antenna and try the ensemble scanning again Connect an active antenna not supplied Disc Operations The disc does not play The disc is placed upside down Place the disc with the label side up ID3 Tag on an MP3 disc cannot be shown There are two types of ID3 Tag Version 1 and Version 2 This System can only show ID3 Tag Version 1...

Page 27: ...ment AC 230 V 50 Hz Power consumption 60 W at operation 11 W on standby display on 0 95 W on standby display off Dimensions approx 165 mm x 231 mm x 328 mm W H D Mass approx 4 1 kg Parts Index Refer to the pages to see how to use the buttons and controls SLEEP FADE MUTING NUMBER SELECT PTY SEARCH DISPLAY MODE CD DAB AUX QP LINK SOUND TURBO AHB PRO VOLUME PRESET GROUP PTY DIMMER A STANDBY DOWN UP S...

Page 28: ... stated that it is designed for unattended operation or has a standby mode Switch off using the switch on the equipment and make sure that your family know how to do this Special arrangements may need to be made for infirm or handicapped people DON T use equipment such as personal stereos or radios so that you are distracted from the requirements of traffic safety It is illegal to watch television...

Reviews: