29
Preparations
1.
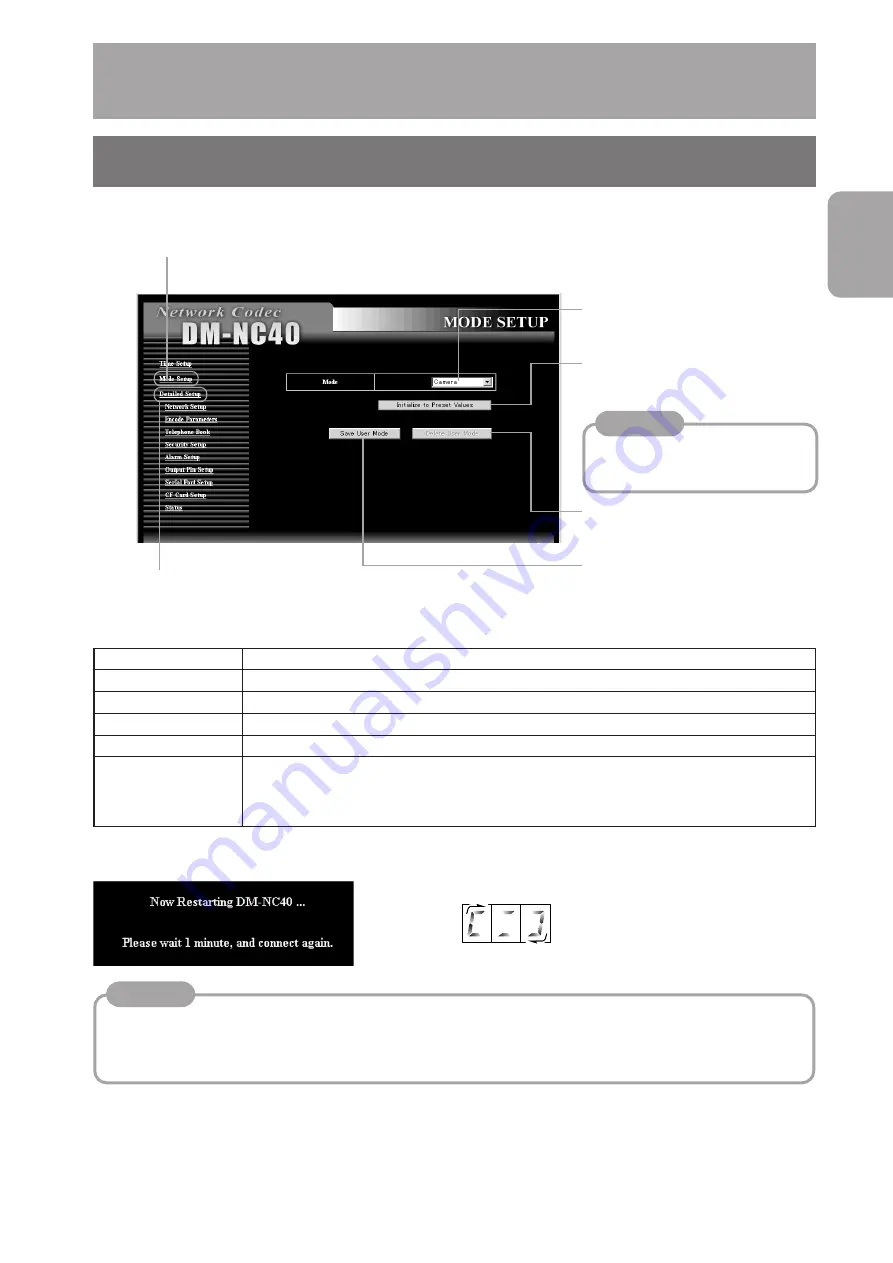
Click Mode Setup in the Network Codec screen
•
The MODE SETUP screen is displayed.
5-1 Setting in the MODE SETUP screen
(Be sure to perform)
Step 5 Mode Setup
Select mode of the unit according to the system of use.
2
Click “Initialize to Preset Values”
to reset to the initial values of the
mode selected in
1
.
4
Click “Save User Mode” to
register the current settings as
the user mode.
3
Click “Delete User Mode” to
delete the user mode.
Select the mode according to the system of use.
Mode
System of use
Camera
Camera side of remote monitoring system (
see page 14)
Monitor
Monitoring side of remote monitoring system (
see page 14)
Teleconference
Teleconference system (
see page 13)
ISMA Server
Streaming system (
see page 15)
User Mode
Values changed in “Step 6 Detailed Setup” are saved.
Name of the mode will be “User_Mode_Camera”, etc. It means user defined mode
changed from Camera mode.
Click “Detailed Setup” to display
submenus.
Memo
When clicking this button, the
HOLD display lamp will turn on and
panel operations will be locked.
* The following screen appears on the Browser after performing changes, and the number display of the unit
will show a circling display.
and
are displayed
1
Select the mode.
(Factor y setting: CAMERA
mode)
Cautions concerning setting changes
•
Settings can not be changed when the unit is communicating with other units. Warning page is displayed on
Web browser if you try to chang settings during communication.
•
In such case, stop all communications with other units.
•
To check current communications, refer to “Telnet Settings” on page 54 and execute the “stat” command.
Memo
•
When the mode is changed, the unit will restart and all settings will return to their initial values of each mode.
•
If the current mode is “User Mode”, “User Mode” can not be deleted even when clicking “Delete User
Mode”. Do not click “Delete User Mode” during “User Mode”.
•
Only one “User Mode” can be saved.
Summary of Contents for DM-NC40
Page 59: ...59 ...


