6
DV-180 PC COMM
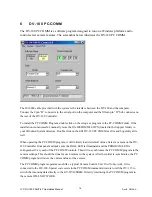
The DV-180 PC COMM is a software program designed to run on a Windows platform and to
control select camera features. The screenshot below illustrates the DV-180 PC COMM.
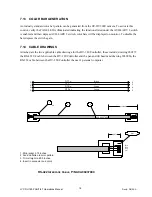
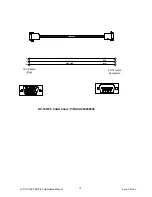
The 2030066 cable provided with the system is the interface between the DV-180 and the computer.
Connect the 9 pin “D” connector to the serial port on the computer and the fifteen pin “D” Sub connector on
the rear of the DV-180 Controller.
To install the PC COMM Program, double click on the setup.exe program in the PC-COMM Folder. If the
installation is unsuccessful, manually move the file MSCOMM32.OCX (located in the Support folder) to
your Windows/System directory. Double click on the ESI DV-180 PC COMM.exe file and hopefully all is
well.
When operating the PC COMM program, it will initially load its default values. Select a camera on the DV-
180 Controller front panel and make sure the PAGE LED is illuminated and the PROGRAM LED is
extinguished. Vary each of the PC COMM controls. This will re-synchronize the PC COMM program to the
camera settings. This should be done for each camera in the system. After the initial re-synchronize, the PC
COMM program will store the current values of the camera.
The PC COMM program operates much like a typical Camera Control Unit. It will only work, if it is
connected to the DV-180. Special code exists in the PC COMM command structure to tell the DV-115 to
switch the incoming data directly to the GY-DV300REM. Directly interfacing the PC COMM program to
the camera WILL NOT WORK.
JVC DV-180 PAN/TILT Operations Manual
Doc #: D0154-A
14


