background image

10

ENGLISH

RADIO OPERATIONS

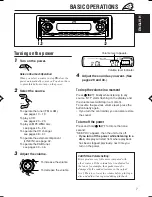
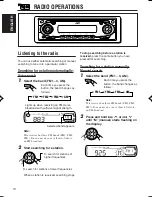
Listening to the radio

You can use either automatic searching or manual
searching to tune in to a particular station.

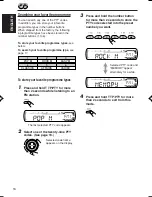
Searching for a station automatically:
Auto search

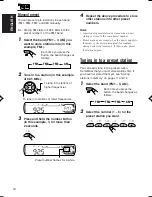
1

Select the band (FM1 – 3, AM).

Each time you press the
button, the band changes as
follows:

Note:

This receiver has three FM bands (FM1, FM2,
FM3). You can use any one of them to listen to
an FM broadcast.

2

Start searching for a station.

When a station is received, searching stops.

Selected band appears.

Lights up when receiving an FM stereo
broadcast with sufficient signal strength.

FM1

FM2

FM3

AM

FM1

FM2

FM3

AM

To search for stations of
higher frequencies

To search for stations of lower frequencies

To stop searching before a station is
received, 

press the same button you have

pressed for searching.

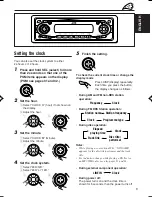
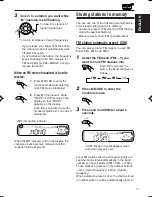
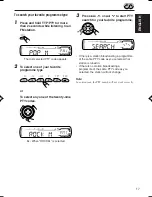
Searching for a station manually:
Manual search

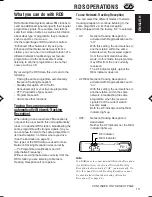
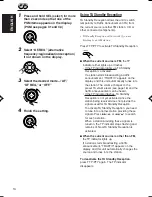
1

Select the band (FM1 – 3, AM).

Each time you press the
button, the band changes as
follows:

Note:

This receiver has three FM bands (FM1, FM2,
FM3). You can use any one of them to listen to
an FM broadcast.

2

Press and hold 

¢


 or 

4


until “M” (manual) starts flashing on
the display.

EN10-12_KD-SC601[E_EX_EU]f.p65

10/3/03, 12:35 PM

10

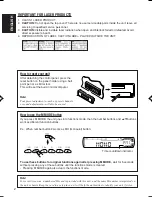
Summary of Contents for GET0191-001A

Page 1: ...sbetreffende handleiding INSTRUCTIONS BEDIENUNGSANLEITUNG MANUEL D INSTRUCTIONS GEBRUIKSAANWIJZING This unit is equipped with the display demonstration To cancel it see page 8 Dieses Gerät ist mit einer Demonstrationsfunktion für das Display ausgestattet Auf Seite 8 wird beschrieben wie Sie diese Demonstrationsfunktion deaktivieren können Cet appareil est équipé d une fonction de démonstration des...

Page 2: ...serviceable parts inside the unit leave all servicing to qualified service personnel 3 CAUTION Visible and invisible laser radiation when open and interlock failed or defeated Avoid direct exposure to beam 4 REPRODUCTION OF LABEL CAUTION LABEL PLACED OUTSIDE THE UNIT How to reset your unit After detaching the control panel press the reset button on the panel holder using a ball point pen or a simi...

Page 3: ...ack 24 MP3 WMA OPERATIONS 25 Playing a disc 25 Locating a file or a particular portion on a disc 26 Selecting playback modes 28 SOUND ADJUSTMENTS 29 Selecting preset sound modes C EQ custom equalizer 29 Adjusting the sound 30 OTHER MAIN FUNCTIONS 31 Changing the general settings PSM 31 Assigning names to the source 34 Changing the standard plate 35 Detaching the control panel 37 CD CHANGER OPERATI...

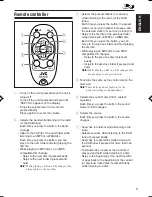
Page 4: ...P PTY traffic programme programme type button s CD CD CH CD changer button d down button 10 button Display window f Tuner reception indicators MO monaural ST stereo g Disc type indicators WMA MP3 h CH CD changer indicator j CD indicator k RDS indicators TP PTY AF REG l Playback mode item indicators RND random disc folder RPT repeat LOUD loudness indicator z EQ equalizer indicator x Sound mode C EQ...

Page 5: ...le listening to the radio Selects services while listening to the DAB tuner if pressed briefly Searches for ensembles while listening to the DAB tuner if pressed for more than one second Fast forwards or reverses the track file if pressed and held while listening to a disc Skips to the beginning of the next track file or goes back to the beginning of the current or previous tracks files if pressed...

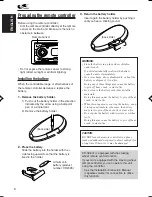
Page 6: ...e children cannot reach If a child accidentally swallows the battery consult a doctor immediately Do not recharge short disassemble or heat the battery or dispose of it in a fire Doing any of these things may cause the battery to give off heat crack or start a fire Do not leave the battery with other metallic materials Doing this may cause the battery to give off heat crack or start a fire When th...

Page 7: ... compared with other sources If the volume level is adjusted for the tuner for example the speakers may be damaged by the sudden increase in the output level Therefore lower the volume before playing a disc and adjust it as required during playback Turning on the power 1 Turn on the power Note on One Touch Operation When you select a source in step 2 below the power automatically comes on You do n...

Page 8: ...onstration before you use the unit for the first time To cancel the display demonstration follow the procedure below 1 Press and hold SEL select for more than 2 seconds so that one of the PSM items appears on the display PSM see pages 31 and 32 2 Select DEMO if not shown on the display 3 Select DEMO OFF 4 Finish the setting To activate the display demonstration repeat the same procedure and select...

Page 9: ... or change the display mode Press DISP display repeatedly Each time you press the button the display changes as follows During AM and FM non RDS station operation During FM RDS Station operation During disc operation Notes While playing a conventional CD NO NAME appears for the disc title performer and the track title For indication change while playing a CD Text or an MP3 WMA disc see also pages ...

Page 10: ...d searching stops Selected band appears Lights up when receiving an FM stereo broadcast with sufficient signal strength FM1 FM2 FM3 AM FM1 FM2 FM3 AM To search for stations of higher frequencies To search for stations of lower frequencies To stop searching before a station is received press the same button you have pressed for searching Searching for a station manually Manual search 1 Select the b...

Page 11: ...e in to stations of lower frequencies MO monaural indicator FM1 FM2 FM3 AM Storing stations in memory You can use one of the following two methods to store broadcasting stations in memory Automatic preset of FM stations SSM Strong station Sequential Memory Manual preset of both FM and AM stations FM station automatic preset SSM You can preset 6 local FM stations in each FM band FM1 FM2 and FM3 1 S...

Page 12: ... pages 11 and 12 1 Select the band FM1 3 AM Each time you press the button the band changes as follows 2 Select the number 1 6 for the preset station you want Manual preset You can preset up to 6 stations in each band FM1 FM2 FM3 and AM manually Ex Storing FM station of 92 5 MHz into the preset number 1 of the FM1 band 1 Select the band FM1 3 AM you want to store stations into in this example FM1 ...

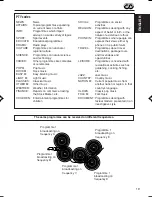
Page 13: ... make Network Tracking Reception work correctly PI Programme Identification and AF Alternative Frequency Without receiving these data correctly from the RDS station you are listening to Network Tracking Reception will not operate To use Network Tracking Reception You can select the different modes of network tracking reception to continue listening to the same programme in its finest reception Whe...

Page 14: ...dcasting a traffic announcement TRAFFIC appears on the display and this unit automatically tunes in to the station The volume changes to the preset TA volume level see page 18 and the traffic announcement can be heard If the TP indicator flashes TA Standby Reception is not yet activated since the station being received does not provide the signals used for TA Standby Reception To activate TA Stand...

Page 15: ...When the current source is FM the PTY indicator either lights up or flashes If the PTY indicator lights up PTY Standby Reception is activated If a station starts broadcasting the selected PTY programme this unit automatically tunes in to the station If the PTY indicator flashes PTY Standby Reception is not yet activated since the station being received does not provide the signals used for PTY Sta...

Page 16: ...ge 17 To store your favorite programme types 1 Press and hold T TP PTY for more than 2 seconds while listening to an FM station 2 Select one of the twenty nine PTY codes See page 19 Selected code name appears on the display 3 Press and hold the number button for more than 2 seconds to store the PTY code selected into the preset number you want 4 Press and hold T TP PTY for more than 2 seconds to e...

Page 17: ... a programme of the same PTY code as you selected the station will not change Note In some areas the PTY search will not work correctly To search your favorite programme type 1 Press and hold T TP PTY for more than 2 seconds while listening to an FM station 2 To select one of your favorite programme type or To select any one of the twenty nine PTY codes Ex When ROCK M is selected The last selected...

Page 18: ...ustment repeat the same procedure and select ON in step 3 by turning the control dial clockwise Note You must stay tuned to the same station for more than 2 minutes after setting AUTO ADJ to ON Otherwise the clock time will not be adjusted This is because the unit takes up to 2 minutes to capture the CT data in the RDS signal Other convenient RDS functions and adjustments Automatic selection of th...

Page 19: ...N Programmes dealing with any aspect of belief or faith or the nature of existence or ethics PHONE IN Programmes where people can express their views either by phone or in a public forum TRAVEL Programmes about travel destinations package tours and travel ideas and opportunities LEISURE Programmes concerned with recreational activities such as gardening cooking fishing etc JAZZ Jazz music COUNTRY ...

Page 20: ...rack title will automatically appear Refer MP3 WMA OPERATIONS on pages 25 to 28 for operating MP3 WMA discs Playing a CD 1 Open the control panel Note on One Touch operation When a CD is already in the loading slot pressing CD CD CH turns on the unit and starts playback automatically 2 Insert a CD into the loading slot The unit turns on draws the CD and starts playback automatically 3 Close the co...

Page 21: ...k number from 7 12 Press and hold 1 7 6 12 for more than one second To go to a track quickly 10 and 10 buttons 1 Press M MODE to enter the functions mode while playing a CD 2 Press 10 or 10 First time you press 10 or 10 button the track skips to the nearest higher or lower track with a track number of multiple ten ex 10th 20th 30th Then each time you press the button you can skip 10 tracks see How...

Page 22: ...lect track number 32 while playing track number 6 Ex 2 To select track number 8 while playing track number 36 Selecting CD playback modes To play back tracks at random Disc Random Play You can play back all tracks on the CD at random 1 Press M MODE to enter the functions mode while playing a CD 2 Press RND random while MODE is still flashing on the display so that DISC RND appears on the display E...

Page 23: ... when you play a CD Text To change the CD Text information manually select text display mode while playing a CD Text Press DISP display repeatedly Each time you press the button the display changes as follows Notes The display shows up to 8 characters at one time and scrolls if there are more than 8 characters See also To select the scroll mode SCROLL on page 33 Some characters or symbols will not...

Page 24: ...MA files tracks can be recorded in folders in PC terminology During recording the files and folders can be arranged in a way similar to arranging files and folders of computer data Root is similar to the root of a tree Every file and folder can be linked to and be accessed from the root The illustration below shows an example of how MP3 WMA files are recorded on a CD R or CD RW how they are played...

Page 25: ...ts up depending on the first detected file Notes MP3 WMA discs require a longer readout time It differs due to the complexity of the folder file configuration When playback starts folder and file names or ID3 tags will automatically appear See also page 26 If you change the source or turn the power off disc playback stops without ejecting the disc Next time you select the CD player as the source o...

Page 26: ...e display Locating a file or a particular portion on a disc To fast forward or reverse the file Note During this operation you can only hear intermittent sounds The elapsed playing time also changes intermittently on the display To skip to the next or previous files Press 4 briefly while playing to skip back to the beginning of the current file Each time you press the button consecutively the begi...

Page 27: ...the folder does not contain any MP3 WMA files You cannot directly select a folder with a number greater than 12 To select a particular file in a folder press or 4 after selecting the folder To go to a particular file quickly within the current folder 10 and 10 buttons 1 Press M MODE to enter the functions mode while playing a disc 2 Press 10 or 10 First time you press 10 or 10 button the file skip...

Page 28: ...ile or all the files in the current folder repeatedly 1 Press M MODE to enter the functions mode while playing a disc 2 Press RPT repeat while MODE is still flashing on the display so that TRK RPT or FLDR RPT appears on the display Each time you press the button the repeat play mode changes as follows Mode Active Plays repeatedly indicator TRK RPT RPT indicator The current or lights up specified f...

Page 29: ... as follows Indication For Preset values BAS TRE LOUD USER Flat sound 00 00 OFF ROCK Rock or 03 01 ON disco music CLASSIC Classical 01 02 OFF music POPS Light music 04 01 OFF HIP HOP Funk or rap 02 00 ON music JAZZ Jazz music 02 03 OFF Note You can adjust each sound mode to your preference Once you make an adjustment it is automatically stored for the currently selected sound mode See Adjusting th...

Page 30: ...justment you have made is stored for the currently selected sound mode C EQ including USER 2 If you are using a two speaker system set the fader level to 00 3 This takes effect only when a subwoofer is connected 4 Normally the control dial works as the volume control So you do not have to select VOL to adjust the volume level 5 Depending on the amplifier gain control setting See page 34 for detail...

Page 31: ...ish the setting OTHER MAIN FUNCTIONS 0 23 1 12 00 59 0 0 00 9 DEMO Display demonstration CLOCK H Hour adjustment CLOCK M Minute adjustment COLOR Display color 24H 12H 24 12 hour time display AUTO ADJ Automatic clock setting AF REG Alternative frequency Regionalization reception 12H 24H OFF ON 24H ON 9 18 Preferred Setting Mode PSM items For detailed operations of each PSM items refer to the pages ...

Page 32: ...e amplifier gain control setting See page 34 for details 3 Displayed only when the DAB tuner is connected 4 Displayed only when one of the following sources is selected FM AM and CD VOL 00 VOL 30 or 50 2 VOL 20 OFF ON AF OFF AF ON VOL 12 VOL 12 OFF AF ON VOL 00 OFF MUTING 2 MUTING 1 OFF 18 18 46 46 33 33 CHANGER LINE IN CHANGER 34 AUTO AUTO OFF ON 33 OFF ON ON 33 ONCE ONCE AUTO OFF 33 TAG OFF TAG ...

Page 33: ...er equipped for this unit may not work correctly on some vehicles particularly on those having a control dial for dimming In this case set the dimmer mode to ON or OFF To select the telephone muting TEL This mode is used when a cellular phone system is connected Depending on the phone system used select either MUTING 1 or MUTING 2 whichever mutes the sounds from this unit When shipped from the fac...

Page 34: ...ns on the ID3 tag display while playing MP3 WMA files If an MP3 WMA file does not have ID3 tags folder name and file name appear TAG OFF Turns off the ID3 tag display while playing MP3 WMA files Only the folder name and file name can be shown To select the amplifier gain control AMP GAIN You can change the maximum volume level of this unit When the maximum power of the speakers is less than 50 W s...

Page 35: ...rints on the plate or cover 1 Loosen the screws with the supplied hex screwdriver 2 Remove the plate cover and the standard plate 2 While pressing DISP display press and hold SEL select for more than 2 seconds 3 Select a character 4 Move the cursor to the next or previous character position 5 Repeat steps 3 and 4 until you finish entering the name 6 Finish the procedure while the last selected cha...

Page 36: ...ow and two knobs using a knife on a rubber mat 3 Replace with another plate a standard cutout or downloaded plate of your preference When attaching a standard plate When attaching a cutout or downloaded plate Add the transparent plate supplied between the cutout or downloaded plate and the plate cover in order to attach the plate cover in place When attaching the plate cover Ensure the two protrud...

Page 37: ...el 2 Pull the control panel out of the unit 3 Put the detached control panel into the provided case Attaching the control panel 1 Insert the right side of the control panel into the groove on the panel holder 2 Press the left side of the control panel to fix it to the panel holder Note on cleaning the connectors If you frequently detach the control panel the connectors will deteriorate To minimize...

Page 38: ...e with MP3 discs so you cannot play back MP3 discs You cannot use the KD MK series CD changers with this unit Before operating your CD changer Refer also to the Instructions supplied for your CD changer If no discs are in the magazine of the CD changer or the discs are inserted upside down NO DISC will appear on the display If this happens remove the magazine and set the discs correctly If no maga...

Page 39: ...utively the beginning of the next tracks files is located and played back Press 4 briefly during play to skip back to the beginning of the current track file Each time you press the button consecutively the beginning of the previous tracks files is located and played back Press and hold during play to fast forward the track file When the current disc is a CD Playback starts from the first track of...

Page 40: ...the button you can skip 10 tracks files see How to use the 10 and 10 buttons below After the last track file the first track file will be selected and vice versa Note If the current playing disc is an MP3 disc files are skipped within the same folder How to use the 10 and 10 buttons Ex 1 To select track file number 32 while playing track file number 6 Ex 2 To select track file number 8 while playi...

Page 41: ...able for MP3 discs To play back tracks files repeatedly Track Repeat Folder Repeat Disc Repeat Play 1 Press M MODE to enter the functions mode during play 2 Press RPT repeat while MODE is still flashing on the display Each time you press the button the repeat play mode changes as follows For MP3 discs For CDs Note MP3 indicator also lights up if the current playing disc is an MP3 disc Mode Active ...

Page 42: ...owing procedure select the external input correctly See To select the external component to use EXT IN on page 34 1 Select the external component LINE IN If LINE IN does not appear on the display see page 34 and select the external input LINE IN Displayed only when one of the following sources is selected FM AM and CD Note on One Touch Operation When you press CD CD CH the power automatically come...

Page 43: ...r Refer also to the Instructions supplied for your DAB tuner What is DAB system DAB is one of the digital radio broadcasting systems available today It can deliver CD quality sound without any annoying interference and signal distortion Furthermore it can carry text pictures and data In contrast to FM broadcast where each programme is transmitted on its own frequency DAB combines several programme...

Page 44: ...ress or 4 repeatedly until the ensemble you want is reached If you hold down the button the frequency keeps changing until you release the button 5 Press 5 up or down to select a service either primary or secondary you want to listen to To restore the FM AM tuner Press and hold FM AM DAB again Storing DAB services in memory You can preset up to 6 DAB services in each DAB band DAB1 DAB2 and DAB3 ma...

Page 45: ...eset the DAB services again To select the next service To select the previous service FM AM DAB Tuning in to a preset DAB service You can easily tune in to a preset DAB service Remember that you must store services first If you have not stored them yet see Storing DAB services in memory on pages 44 and 45 Before you start Press FM AM DAB briefly if CD CD changer or external component is the curren...

Page 46: ...s the programme among DAB services and FM RDS stations Alternative Reception The AF indicator lights up on the display see page 13 AF OFF Alternative Reception is deactivated 4 Press SEL select to finish the setting Note When Alternative Reception for DAB services is activated Network Tracking Reception for RDS stations see page 13 is also activated automatically On the other hand Network Tracking...

Page 47: ... into the loading slot Insert the disc correctly Causes The volume level is set to the minimum level Connections are incorrect The built in microcomputer may have functioned incorrectly due to noise etc Signals are too weak The aerial is not connected firmly Disc is inserted upside down CD R CD RW is not finalized Disc is locked You are driving on rough roads Disc is scratched Connections are inco...

Page 48: ... MP3 WMA file although it has the extension code mp3 or wma Readout time varies due to the complexity of the folder file configuration Playback order is determined when the files are recorded This sometimes occurs during play This is caused by how the files are recorded on the disc The current folder does not contain any MP3 WMA file The current disc does not contain any MP3 WMA file This unit can...

Page 49: ...e magazine Discs are inserted upside down No magazine is loaded in the CD changer This unit is not connected to the CD changer correctly The built in microcomputer may function incorrectly due to noise etc Symptoms NO DISC appears on the display NO MAG appears on the display RESET 8 appears on the display RESET 1 RESET 7 appears on the display The CD changer does not work at all CD Changer About m...

Page 50: ...ad their instructions or cautions carefully Use only finalized CD Rs or CD RWs Some CD Rs or CD RWs may not be played back on this unit because of their disc characteristics and for the following reasons Discs are dirty or scratched Moisture condensation on the lens inside the unit The pickup lens inside the unit is dirty CD RWs may require a longer readout time since the reflectance of CD RWs is ...

Page 51: ... Ω Alternate Channel Selectivity 400 kHz 65 dB Frequency Response 40 Hz to 15 000 Hz Stereo Separation 30 dB Capture Ratio 1 5 dB MW Tuner Sensitivity 20 µV Selectivity 35 dB LW Tuner Sensitivity 50 µV CD PLAYER SECTION Type Compact disc player Signal Detection System Non contact optical pickup semiconductor laser Number of channels 2 channels stereo Frequency Response 5 Hz to 20 000 Hz Dynamic Ra...

Page 52: ...te setzen Sie Ihr Gerät zurück Siehe Seite Zurücksetzen des Geräts Vous avez des PROBLÈMES de fonctionnement Réinitialisez votre appareil Référez vous à la page intitulée Comment réinitialiser votre appareil Hebt u PROBLEMEN met de bediening Stel het apparaat terug Zie de pagina met de paragraaf Het apparaat terugstellen 2003 VICTOR COMPANY OF JAPAN LIMITED ...

Page 53: ...chniker einbauen INSTALLATION IN DASH MOUNTING The following illustration shows a typical installation If you have any questions or require information regarding installation kits consult your JVC IN CAR ENTERTAINMENT dealer or a company supplying kits If you are not sure how to install this unit correctly have it installed by a qualified technician 1 When you stand the unit be careful not to dama...

Page 54: ...vis d une longueur de 8 mm Si des vis plus longues sont utilisées elles peuvent endommager l appareil Opmerking Wanneer u het apparaat aan de bevestigingsklem vastmaakt moet u de 8 mm lange schroeven gebruiken Als u langere schroeven gebruikt kan het apparaat worden beschadigd When using the optional stay Beim Verwenden der Anker Option Lors de l utilisation du hauban en option Wanneer u de steun ...

Page 55: ...reil Remarque Si votre véhicule ne possède pas de borne accessoire déplacez le fusible de la position de fusible 1 position originale à la position de fusible 2 et connectez le fil rouge A7 à la borne positive de la batterie Le fil jaune A4 n est pas utilisé dans ce cas Alvorens de verbindingen tot stand te brengen Moet u de bedrading in de auto zorgvuldig Het apparaat kan door verkeerde verbindin...

Page 56: ...aar or oder ou of Connecting cord supplied for your DAB tuner or CD changer Verbindungskabel das zum Lieferumfang des DAB Tuners oder CD Wechslers gehört Cordon de connexion fourni avec votre tuner DAB ou changeur CD Verbindingskabel die met de DAB tuner of CD wisselaar wordt meegeleverd Connecting cord supplied for your DAB tuner Verbindungskabel das zum Lieferumfang des DAB Tuners gehört Cordon ...

Page 57: ... соблюдения инструкции по эксплуатации данного товара проводя необходимое обслуживание включающее замену расходных материалов и или соответствующее ремонтное обеспечение в специализированном сервисном центре Дополнительные косметические материалы к данному товару поставляемые вместе с ним могут храниться в течение двух 2 лет со дня его производства Срок службы годности кроме срока хранения дополни...

Page 58: ...ator IMPORTANT FOR LASER PRODUCTS 1 CLASS 1 LASER PRODUCT 2 CAUTION Do not open the top cover There are no user serviceable parts inside the unit leave all servicing to qualified service personnel 3 CAUTION Visible and invisible laser radiation when open and interlock failed or defeated Avoid direct exposure to beam 4 REPRODUCTION OF LABEL CAUTION LABEL PLACED OUTSIDE THE UNIT How to reset your un...

Page 59: ...0 Listening to the radio 10 Storing stations in memory 11 Tuning in to a preset station 12 RDS OPERATIONS 13 What you can do with RDS 13 Other convenient RDS functions and adjustments 18 CD OPERATIONS 20 Playing a CD 20 Locating a track or a particular portion on a CD 21 Selecting CD playback modes 22 Playing a CD Text 23 Prohibiting disc ejection 23 MP3 WMA INTRODUCTION 24 What are MP3 WMA 24 How...

Page 60: ...traffic programme programme type button s CD CD CH CD changer button d down button 10 button Display window f Tuner reception indicators MO monaural ST stereo g Disc type indicators WMA MP3 h CH CD changer indicator j CD indicator k RDS indicators TP PTY AF REG l Playback mode item indicators RND random disc folder RPT repeat LOUD loudness indicator z EQ equalizer indicator x Sound mode C EQ custo...

Page 61: ...ou press the button the source changes 7 Searches for stations while listening to the radio Fast forwards or reverses the track file if pressed and held while listening to a disc Skips to the beginning of the next track file or goes back to the beginning of the current or previous tracks files if pressed briefly while listening to a disc 1 Turns on the unit if pressed when the unit is turned off T...

Page 62: ...the battery holder Insert again the battery holder by pushing it until you hear a clicking sound WARNING Store the battery in a place where children cannot reach If a child accidentally swallows the battery consult a doctor immediately Do not recharge short disassemble or heat the battery or dispose of it in a fire Doing any of these things may cause the battery to give off heat crack or start a f...

Page 63: ...uce very little noise compared with other sources If the volume level is adjusted for the tuner for example the speakers may be damaged by the sudden increase in the output level Therefore lower the volume before playing a disc and adjust it as required during playback Turning on the power 1 Turn on the power Note on One Touch Operation When you select a source in step 2 below the power automatica...

Page 64: ...onstration before you use the unit for the first time To cancel the display demonstration follow the procedure below 1 Press and hold SEL select for more than 2 seconds so that one of the PSM items appears on the display PSM see pages 31 and 32 2 Select DEMO if not shown on the display 3 Select DEMO OFF 4 Finish the setting To activate the display demonstration repeat the same procedure and select...

Page 65: ... or change the display mode Press DISP display repeatedly Each time you press the button the display changes as follows During AM and FM non RDS station operation During FM RDS Station operation During disc operation Notes While playing a conventional CD NO NAME appears for the disc title performer and the track title For indication change while playing a CD Text or an MP3 WMA disc see also pages ...

Page 66: ...d appears Lights up when receiving an FM stereo broadcast with sufficient signal strength To search for stations of higher frequencies To search for stations of lower frequencies To stop searching before a station is received press the same button you have pressed for searching Note FM1 and FM2 87 5 MHz 108 0 MHz FM3 65 00 MHz 74 00 MHz Searching for a station manually Manual search 1 Select the b...

Page 67: ...to stations of higher frequencies To tune in to stations of lower frequencies MO monaural indicator Storing stations in memory You can use one of the following two methods to store broadcasting stations in memory Automatic preset of FM stations SSM Strong station Sequential Memory Manual preset of both FM and AM stations FM station automatic preset SSM You can preset 6 local FM stations in each FM...

Page 68: ...ows 2 Select the number 1 6 for the preset station you want Note You can also use the 5 up or down button on the unit to select the next or previous preset stations Each time you press the 5 up or down button the next or previous preset station is tuned in Manual preset You can preset up to 6 stations in each band FM1 FM2 FM3 and AM manually Ex Storing FM station of 92 5 MHz into the preset number...

Page 69: ...e same programme in its finest reception no matter where you drive See the illustration on page 19 Two types of the RDS data are used to make Network Tracking Reception work correctly PI Programme Identification and AF Alternative Frequency Without receiving these data correctly from the RDS station you are listening to Network Tracking Reception will not operate To use Network Tracking Reception ...

Page 70: ...dcasting a traffic announcement TRAFFIC appears on the display and this unit automatically tunes in to the station The volume changes to the preset TA volume level see page 18 and the traffic announcement can be heard If the TP indicator flashes TA Standby Reception is not yet activated since the station being received does not provide the signals used for TA Standby Reception To activate TA Stand...

Page 71: ...When the current source is FM the PTY indicator either lights up or flashes If the PTY indicator lights up PTY Standby Reception is activated If a station starts broadcasting the selected PTY programme this unit automatically tunes in to the station If the PTY indicator flashes PTY Standby Reception is not yet activated since the station being received does not provide the signals used for PTY Sta...

Page 72: ...ge 17 To store your favorite programme types 1 Press and hold T TP PTY for more than 2 seconds while listening to an FM station 2 Select one of the twenty nine PTY codes See page 19 Selected code name appears on the display 3 Press and hold the number button for more than 2 seconds to store the PTY code selected into the preset number you want 4 Press and hold T TP PTY for more than 2 seconds to e...

Page 73: ... a programme of the same PTY code as you selected the station will not change Note In some areas the PTY search will not work correctly To search your favorite programme type 1 Press and hold T TP PTY for more than 2 seconds while listening to an FM station 2 To select one of your favorite programme type or To select any one of the twenty nine PTY codes Ex When ROCK M is selected The last selected...

Page 74: ...ustment repeat the same procedure and select ON in step 3 by turning the control dial clockwise Note You must stay tuned to the same station for more than 2 minutes after setting AUTO ADJ to ON Otherwise the clock time will not be adjusted This is because the unit takes up to 2 minutes to capture the CT data in the RDS signal Other convenient RDS functions and adjustments Automatic selection of th...

Page 75: ...N Programmes dealing with any aspect of belief or faith or the nature of existence or ethics PHONE IN Programmes where people can express their views either by phone or in a public forum TRAVEL Programmes about travel destinations package tours and travel ideas and opportunities LEISURE Programmes concerned with recreational activities such as gardening cooking fishing etc JAZZ Jazz music COUNTRY ...

Page 76: ...rack title will automatically appear Refer MP3 WMA OPERATIONS on pages 25 to 28 for operating MP3 WMA discs Playing a CD 1 Open the control panel Note on One Touch operation When a CD is already in the loading slot pressing CD CD CH turns on the unit and starts playback automatically 2 Insert a CD into the loading slot The unit turns on draws the CD and starts playback automatically 3 Close the co...

Page 77: ...k number from 7 12 Press and hold 1 7 6 12 for more than one second To go to a track quickly 10 and 10 buttons 1 Press M MODE to enter the functions mode while playing a CD 2 Press 10 or 10 First time you press 10 or 10 button the track skips to the nearest higher or lower track with a track number of multiple ten ex 10th 20th 30th Then each time you press the button you can skip 10 tracks see How...

Page 78: ...lect track number 32 while playing track number 6 Ex 2 To select track number 8 while playing track number 36 Selecting CD playback modes To play back tracks at random Disc Random Play You can play back all tracks on the CD at random 1 Press M MODE to enter the functions mode while playing a CD 2 Press RND random while MODE is still flashing on the display so that DISC RND appears on the display E...

Page 79: ... when you play a CD Text To change the CD Text information manually select text display mode while playing a CD Text Press DISP display repeatedly Each time you press the button the display changes as follows Notes The display shows up to 8 characters at one time and scrolls if there are more than 8 characters See also To select the scroll mode SCROLL on page 33 Some characters or symbols will not...

Page 80: ...ecorded on a disc ID3v2 information will be shown How are MP3 WMA files recorded and played back MP3 WMA files tracks can be recorded in folders in PC terminology During recording the files and folders can be arranged in a way similar to arranging files and folders of computer data Root is similar to the root of a tree Every file and folder can be linked to and be accessed from the root The illust...

Page 81: ...ts up depending on the first detected file Notes MP3 WMA discs require a longer readout time It differs due to the complexity of the folder file configuration When playback starts folder and file names or ID3 tags will automatically appear See also page 26 If you change the source or turn the power off disc playback stops without ejecting the disc Next time you select the CD player as the source o...

Page 82: ...e display Locating a file or a particular portion on a disc To fast forward or reverse the file Note During this operation you can only hear intermittent sounds The elapsed playing time also changes intermittently on the display To skip to the next or previous files Press 4 briefly while playing to skip back to the beginning of the current file Each time you press the button consecutively the begi...

Page 83: ...the folder does not contain any MP3 WMA files You cannot directly select a folder with a number greater than 12 To select a particular file in a folder press or 4 after selecting the folder To go to a particular file quickly within the current folder 10 and 10 buttons 1 Press M MODE to enter the functions mode while playing a disc 2 Press 10 or 10 First time you press 10 or 10 button the file skip...

Page 84: ...ile or all the files in the current folder repeatedly 1 Press M MODE to enter the functions mode while playing a disc 2 Press RPT repeat while MODE is still flashing on the display so that TRK RPT or FLDR RPT appears on the display Each time you press the button the repeat play mode changes as follows Mode Active Plays repeatedly indicator TRK RPT RPT indicator The current or lights up specified f...

Page 85: ... the sound modes change as follows SOUND SOURCE R F U D ATT Ex When you select ROCK Indication pattern changes for each sound mode except for USER CLASSIC POPS HIP HOP JAZZ USER ROCK Selecting preset sound modes C EQ custom equalizer You can select a preset sound mode C EQ custom equalizer suitable to the music genre There is a time limit in doing the following procedure If the setting is canceled...

Page 86: ...s the adjustment you have made is stored for the currently selected sound mode C EQ including USER 2 If you are using a two speaker system set the fader level to 00 3 Normally the control dial work as the volume control So you do not have to select VOL to adjust the volume level 4 Depending on the amplifier gain control setting See page 34 for details 2 Adjust the setting 3 Repeat steps 1 and 2 to...

Page 87: ...items if necessary 5 Finish the setting OTHER MAIN FUNCTIONS 0 23 1 12 00 59 0 0 00 9 DEMO Display demonstration CLOCK H Hour adjustment CLOCK M Minute adjustment COLOR Display color 24H 12H 24 12 hour time display AUTO ADJ Automatic clock setting AF REG Alternative frequency Regionalization reception 12H 24H OFF ON 24H ON 9 18 Preferred Setting Mode PSM items For detailed operations of each PSM i...

Page 88: ...ing on the amplifier gain control setting See page 34 for details 2 Displayed only when one of the following sources is selected FM AM and CD VOL 00 VOL 30 or 50 1 VOL 20 OFF ON OFF OFF MUTING 2 MUTING 1 OFF 18 18 33 33 CHANGER LINE IN CHANGER 34 AUTO AUTO OFF ON 33 ONCE ONCE AUTO OFF 33 TAG OFF TAG ON TAG ON 34 OFF OFF 29 programme types see page 19 15 Indications Selectable values items Factory ...

Page 89: ...e factory Auto Dimmer mode is activated AUTO Activates Auto Dimmer OFF Cancels Auto Dimmer ON Always dims the display Note Auto Dimmer equipped for this unit may not work correctly on some vehicles particularly on those having a control dial for dimming In this case set the dimmer mode to ON or OFF To select the telephone muting TEL This mode is used when a cellular phone system is connected Depen...

Page 90: ...ns on the ID3 tag display while playing MP3 WMA files If an MP3 WMA file does not have ID3 tags folder name and file name appear TAG OFF Turns off the ID3 tag display while playing MP3 WMA files Only the folder name and file name can be shown To select the amplifier gain control AMP GAIN You can change the maximum volume level of this unit When the maximum power of the speakers is less than 50 W s...

Page 91: ...rints on the plate or cover 1 Loosen the screws with the supplied hex screwdriver 2 Remove the plate cover and the standard plate 2 While pressing DISP display press and hold SEL select for more than 2 seconds 3 Select a character 4 Move the cursor to the next or previous character position 5 Repeat steps 3 and 4 until you finish entering the name 6 Finish the procedure while the last selected cha...

Page 92: ...ow and two knobs using a knife on a rubber mat 3 Replace with another plate a standard cutout or downloaded plate of your preference When attaching a standard plate When attaching a cutout or downloaded plate Add the transparent plate supplied between the cutout or downloaded plate and the plate cover in order to attach the plate cover in place When attaching the plate cover Ensure the two protrud...

Page 93: ...el 2 Pull the control panel out of the unit 3 Put the detached control panel into the provided case Attaching the control panel 1 Insert the right side of the control panel into the groove on the panel holder 2 Press the left side of the control panel to fix it to the panel holder Note on cleaning the connectors If you frequently detach the control panel the connectors will deteriorate To minimize...

Page 94: ...e with MP3 discs so you cannot play back MP3 discs You cannot use the KD MK series CD changers with this unit Before operating your CD changer Refer also to the Instructions supplied for your CD changer If no discs are in the magazine of the CD changer or the discs are inserted upside down NO DISC will appear on the display If this happens remove the magazine and set the discs correctly If no maga...

Page 95: ...utively the beginning of the next tracks files is located and played back Press 4 briefly during play to skip back to the beginning of the current track file Each time you press the button consecutively the beginning of the previous tracks files is located and played back Press and hold during play to fast forward the track file When the current disc is a CD Playback starts from the first track of...

Page 96: ...the button you can skip 10 tracks files see How to use the 10 and 10 buttons below After the last track file the first track file will be selected and vice versa Note If the current playing disc is an MP3 disc files are skipped within the same folder How to use the 10 and 10 buttons Ex 1 To select track file number 32 while playing track file number 6 Ex 2 To select track file number 8 while playi...

Page 97: ...able for MP3 discs To play back tracks files repeatedly Track Repeat Folder Repeat Disc Repeat Play 1 Press M MODE to enter the functions mode during play 2 Press RPT repeat while MODE is still flashing on the display Each time you press the button the repeat play mode changes as follows For MP3 discs For CDs Note MP3 indicator also lights up if the current playing disc is an MP3 disc Mode Active ...

Page 98: ...owing procedure select the external input correctly See To select the external component to use EXT IN on page 34 1 Select the external component LINE IN If LINE IN does not appear on the display see page 34 and select the external input LINE IN Displayed only when one of the following sources is selected FM AM and CD Note on One Touch Operation When you press CD CD CH the power automatically come...

Page 99: ... into the loading slot Insert the disc correctly Causes The volume level is set to the minimum level Connections are incorrect The built in microcomputer may have functioned incorrectly due to noise etc Signals are too weak The aerial is not connected firmly Disc is inserted upside down CD R CD RW is not finalized Disc is locked You are driving on rough roads Disc is scratched Connections are inco...

Page 100: ... MP3 WMA file although it has the extension code mp3 or wma Readout time varies due to the complexity of the folder file configuration Playback order is determined when the files are recorded This sometimes occurs during play This is caused by how the files are recorded on the disc The current folder does not contain any MP3 WMA file The current disc does not contain any MP3 WMA file This unit can...

Page 101: ...e magazine Discs are inserted upside down No magazine is loaded in the CD changer This unit is not connected to the CD changer correctly The built in microcomputer may function incorrectly due to noise etc Symptoms NO DISC appears on the display NO MAG appears on the display RESET 8 appears on the display RESET 1 RESET 7 appears on the display The CD changer does not work at all CD Changer About m...

Page 102: ...ad their instructions or cautions carefully Use only finalized CD Rs or CD RWs Some CD Rs or CD RWs may not be played back on this unit because of their disc characteristics and for the following reasons Discs are dirty or scratched Moisture condensation on the lens inside the unit The pickup lens inside the unit is dirty CD RWs may require a longer readout time since the reflectance of CD RWs is ...

Page 103: ...ity 400 kHz 65 dB Frequency Response 40 Hz to 15 000 Hz Stereo Separation 30 dB Capture Ratio 1 5 dB MW Tuner Sensitivity 20 µV Selectivity 35 dB LW Tuner Sensitivity 50 µV CD PLAYER SECTION Type Compact disc player Signal Detection System Non contact optical pickup semiconductor laser Number of channels 2 channels stereo Frequency Response 5 Hz to 20 000 Hz Dynamic Range 96 dB Signal to Noise Rat...

Page 104: ...reset your unit Refer to page of How to reset your unit Затруднения при эксплуатации Пожалуйста перезагрузите Ваше устройство Для получения информации о перезагрузке Вашего устройства обратитесь на соответствующую страницу 2003 VICTOR COMPANY OF JAPAN LIMITED ...

Page 105: ...фиксаторы предназначенные для прочной установки корпуса 1 ENGLISH This unit is designed to operate on 12 V DC NEGATIVE ground electrical systems If your vehicle does not have this system a voltage inverter is required which can be purchased at JVC IN CAR ENTERTAINMENT dealers Additional standard plates 3 and transparent plate 1 Дополнительные стандартные панели 3 и прозрачная накладка 1 See pages ...

Page 106: ...maged BEFORE connecting the speaker leads of the power cord to the speakers check the speaker wiring in your car 2 Removing the unit Before removing the unit release the rear section Insert the two handles then pull them as illustrated so that the unit can be removed Вставьте два рычажка затем потяните их как показано на рисунке чтобы вынуть устройство K D B ПРЕДОСТЕРЕЖЕНИЯ по питанию и подключени...

Page 107: ...оричневый Ignition switch Переключатель зажигания To CD changer or another external component see diagram К устройству автоматической смены компакт дисков или к другому внешнему устройству см схему Typical Connections Типичные подключения Aerial terminal Разъем антенны Fuse position 2 Положение 2 предохранителя Fuse position 1 Положение 1 предохранителя TROUBLESHOOTING The fuse blows Are the red a...

Page 108: ...устройство отключено CD changer Устройство автоматической смены компакт дисков External Component Внешний компонент Signal cord not supplied for this unit Кабель сигнала не входит в комплект External component Внешний компонент KD SC607 4 Line Input Adapter KS U57 not supplied with this unit 4 Адаптер входной линии KS U57 не входит в комплект KS U57 4 CD changer jack Гнездо проигрывателя автомата ...

Reviews: