background image

EN

 51

MasterPage: Start_Right

REFERENCES

USER MAINTENANCE

Before cleaning, turn off the camcorder and 
remove the battery pack and AC Adapter.

To clean the exterior

Wipe gently with a soft cloth. Put the cloth in 
diluted mild soap and wring it well to wipe off 
heavy dirt. Then wipe again with a dry cloth.

To clean the LCD monitor

Wipe gently with a soft cloth. Be careful not to 
damage the monitor. Close the LCD monitor.

To clean the lens

Blow it with a blower brush, then wipe gently with 
lens cleaning paper.

To clean the viewfinder lens

Remove dust from the viewfinder using a blower 
brush.

NOTES:

Avoid using strong cleaning agents such as 
benzine or alcohol.

Cleaning should be done only after the battery 
pack has been removed or other power units have 
been disconnected.

Mold may form if the lens is left dirty.

When using a cleaner or chemically treated cloth 
refer to the cautions of each product.

To clean the viewfinder, please consult your 
nearest JVC dealer.

Cleaning The Camcorder

GR-D370AH_EN.book  Page 51  Monday, April 17, 2006  2:24 PM

Summary of Contents for GR-D370 - Camcorder - 800 KP

Page 1: ...es http www jvc co jp english accessory INSTRUCTIONS DIGITAL VIDEO CAMERA GETTING STARTED 8 VIDEO RECORDING PLAYBACK 20 DIGITAL STILL CAMERA D S C RECORDING PLAYBACK 27 ADVANCED FEATURES 32 REFERENCES 47 Back cover For Customer Use Enter below the Model No and Serial No which is located on the bottom of the camcorder Retain this information for future reference Model No Serial No To deactivate the...

Page 2: ... product includes patented and other proprietary technology and will operate only with JVC Data Battery Use the JVC BN VF707U VF714U VF733U battery packs Using generic non JVC batteries can cause damage to the internal charging circuitry This camcorder is designed exclusively for the digital video cassette SD Memory Card and MultiMediaCard Only cassettes marked and memory cards marked or can be us...

Page 3: ... accommodate different designs of AC outlets in different countries Caution on Replaceable lithium battery The battery used in this device may present a fire or chemical burn hazard if mistreated Do not recharge disassemble heat above 100 C or incinerate Replace battery with Panasonic Matsushita Electric Sanyo Sony or Maxell CR2025 Danger of explosion or Risk of fire if the battery is incorrectly ...

Page 4: ...ing the camcorder by the viewfinder and or the LCD monitor can result in dropping the unit or in a malfunction Take care not to get your finger caught in the cassette holder cover Do not let children operate the camcorder as they are particularly susceptible to this type of injury Do not use a tripod on unsteady or unlevel surfaces It could tip over causing serious damage to the camcorder CAUTION ...

Page 5: ...eads with a cleaning cassette optional Be sure to store your cassette tapes and camcorder in the proper environment Video heads can become dirty more easily if your cassette tapes and camcorder are stored in a dusty area Cassette tapes should be removed from the camcorder and stored in cassette cases Store the camcorder in a bag or other container Use SP Standard mode for important video recording...

Page 6: ...y backlight pg 40 You can also select a spot metering area so that more precise exposure compensation is available pg 40 Spot Exposure Control Data Battery You can check the battery status by simply pressing the DATA button pg 15 Live Slow You can record and play back precious or hard to see moments at a slow speed The sound is recorded and played back in real time pg 37 Auto Button You can change...

Page 7: ...l Playback Of Images 28 Auto Playback Of Images 28 Index Playback Of Files 28 Removing On Screen Display 28 ADDITIONAL FEATURES FOR D S C 29 Resetting The File Name 29 Protecting Files 29 Deleting Files 30 Setting Print Information DPOF Setting 30 Initialising A Memory Card 31 ADVANCED FEATURES 32 MENUS FOR DETAILED ADJUSTMENT 32 Changing The Menu Settings 32 Recording Menus 33 Playback Menus 36 F...

Page 8: ...8 EN GETTING STARTED Index 16 9 ...

Page 9: ... 14 Recording Start Stop Button pg 20 Power Switch REC PLAY OFF pg 16 Lock Button pg 16 Cassette Open Eject Switch OPEN EJECT pg 19 Connectors The connectors are located beneath the covers USB Universal Serial Bus Connector pg 45 Digital Video Connector DV IN OUT i LINK pg 44 45 i LINK refers to the IEEE1394 1995 industry specification and extensions thereof The logo is used for products compliant...

Page 10: ...mber of shots that can be stored during D S C recording During Both Video And D S C Recording 1Battery Remaining Power Indicator 2Operation Mode pg 16 A Auto Mode M Manual Mode 3LED Light Indicator pg 37 4 Night Scope Indicator pg 38 Gain Up Mode pg 34 5Shutter Speed 6White Balance Indicator pg 40 7Selected Effect Indicator 8Selected Program AE Indicator pg 42 9Approximate Zoom Ratio pg 21 Zoom In...

Page 11: ...h 8 Pause 8 3 Forward Frame By Frame Playback Slow Motion 2 8 Reverse Frame By Frame Playback Slow Motion Audio Dubbing 8 Audio Dubbing Pause 6Date Time pg 36 7VOLUME Volume Level Indicator pg 23 BRIGHT Brightness Control Indicator LCD monitor Viewfinder pg 18 8Time Code pg 36 During D S C Playback 1Folder File Number pg 28 2Operation Mode Indicator pg 28 3Brightness Control Indicator LCD monitor ...

Page 12: ... be equipped with one or more core filter If a cable has only one core filter the end that is closest to the filter should be connected to the camcorder Make sure to use the provided cables for connections Do not use any other cables How To Attach The Lens Cap To protect the lens attach the provided lens cap to the camcorder as shown in the illustration NOTE To confirm the lens cap is on correctly...

Page 13: ...r 2 Run the cable through the core filter leaving approx 3 cm of cable between the cable plug and the core filter Wind the cable once around the outside of the core filter as shown in the illustration 3 Close the core filter until it clicks shut NOTES Take care not to damage the cable When connecting a cable attach the end with the core filter to the camcorder Stopper Core filter Wind once 3 cm ...

Page 14: ...ing the camcorder cannot be operated Charging is not possible if the wrong type of battery is used When charging the battery pack for the first time or after a long storage period the POWER CHARGE lamp may not light In this case remove the battery pack from the camcorder then try charging again If a fully charged battery pack is attached to the unit the POWER CHARGE lamp does not blink to indicate...

Page 15: ...f the button is pressed and hold for several seconds If COMMUNICATION ERROR appears instead of the battery status even though you tried to press DATA several times there may be a problem with your battery In such a case consult your nearest JVC dealer Using AC Power Perform steps 4 6 in Charging The Battery Pack NOTE The provided AC Adapter features automatic voltage selection in the AC range from...

Page 16: ... The following explanations in this manual supposes the use of LCD monitor in your operation If you want to use the viewfinder close the LCD monitor and pull out the viewfinder fully Operation Mode Power Switch Position REC Allows you to perform recording on the tape Allows you to set various recording functions using the menus pg 33 OFF Allows you to switch off the camcorder PLAY Allows you to pl...

Page 17: ...o the tape at all times but its display can be turned on or off during playback pg 35 36 1 Perform steps 1 5 in Language Settings on the left column 2 Press 4 3 1 or 2 to select CLOCK ADJ and press SET The date display format is highlighted 3 Press 3 or 4 to select the desired date display format then press SET or 2 Select from MONTH DATE YEAR DATE MONTH YEAR or YEAR MONTH DATE 4 Press 3 or 4 to s...

Page 18: ...Lock Button located on the switch 2 Open the LCD monitor fully pg 20 To adjust the brightness of the viewfinder pull out the viewfinder fully and set PRIORITY to FINDER pg 32 34 3 Press MENU The Menu Screen appears If you are in Playback mode please proceed to step 5 4 Press 4 3 1 or 2 to select DISPLAY and press SET The DISPLAY Menu appears 5 Press 4 3 1 or 2 to select BRIGHT and press SET The Me...

Page 19: ...n If the tape does not load properly open the cassette holder cover fully and remove the cassette A few minutes later insert it again When the camcorder is suddenly moved from a cold place to a warm environment wait a short time before opening the cassette holder cover 1 Make sure the camcorder s power is off 2 Open the card cover 3 To load a memory card firmly insert it with its clipped edge firs...

Page 20: ... To avoid this refer to Recording From The Middle Of A Tape pg 22 To turn the melody sounds off pg 34 Tape Remaining Time Approximate tape remaining time appears on the display min means the camcorder is calculating the remaining time When the remaining time reaches 2 minutes the indication starts blinking The time required to calculate and display the remaining tape length and the accuracy of the...

Page 21: ...us mode the camcorder may automatically zoom out depending on the distance between the camcorder and the subject This will not occur when TELE MACRO is set to ON pg 33 Journalistic Shooting In some situations different shooting angles may provide more dramatic results Hold the camcorder in the desired position and tilt the LCD monitor in the most convenient direction It can rotate 270 90 downward ...

Page 22: ...ing When a tape is removed and re inserted during shooting When shooting using a partially recorded tape When shooting on a blank portion located partway through the tape When shooting again after shooting a scene then opening closing the cassette holder cover NOTES The time code cannot be reset During fast forwarding and rewinding the time code indication does not move smoothly The time code is d...

Page 23: ...ong as you hold the button Once you release the button normal playback resumes A slight mosaic effect appears on the display during Shuttle Search This is not a malfunction ATTENTION During Shuttle Search parts of the picture may not be clearly visible particularly on the left side of the screen Blank Search Helps you find where you should start recording in the middle of a tape to avoid time code...

Page 24: ...de 6 Start playback on the camcorder pg 23 To choose whether or not the following displays appear on the connected TV Date Time Set DATE TIME to ON or OFF pg 32 36 Or press DISPLAY on the remote control to turn on off the date indication Time Code Set TIME CODE to ON or OFF pg 32 36 Indications other than date time and time code Set ON SCREEN to OFF LCD or LCD TV pg 32 36 NOTES It is recommended t...

Page 25: ...ons are available only when the camcorder s Power Switch is set to PLAY 2PAUSE Button Pauses the tape pg 26 Up Button pg 26 3SLOW Rewind Button pg 26 4REW Button Rewind Reverse Shuttle Search on a tape pg 23 Displays previous file in a memory card pg 28 Left Button pg 26 5INSERT Button pg 46 6SHIFT Button pg 26 7DISPLAY Button pg 24 43 8SLOW Forward Button pg 26 9PLAY Button Starts Playback of a t...

Page 26: ...n T To zoom out press the Zoom Button W 3 You can move the image on the screen around to find a particular portion of the picture While holding down SHIFT press Left Right Up and Down To end zoom press and hold W until magnification returns to normal Or press STOP 7 and then press PLAY 3 during video playback To end zoom during D S C playback press PLAY 3 NOTES Zoom can also be used during slow mo...

Page 27: ... Deleting Files pg 30 When you do not want to hear the shutter sound set MELODY to OFF pg 32 34 NOTE If shooting is not performed for approx 5 minutes when the Power Switch is set to REC and power is supplied from the battery pack the camcorder shuts off automatically to save power To perform shooting again push back and pull out the viewfinder again or close and re open the LCD monitor Approximat...

Page 28: ... are displayed in descending order If you press 2 during Auto Playback files are displayed in ascending order 3 To end Auto Playback press 7 You can view several different files stored in the memory card at a time This browsing capability makes it easy to locate a particular file you want 1 Perform steps 1 3 in Normal Playback Of Images see the left column 2 Press INDEX The Index Screen appears 3 ...

Page 29: ...s 1 or 2 to select the desired file 6 Press 4 or 3 to select EXECUTE and press SET To cancel protection select RETURN Repeat steps 5 and 6 for all files you want to protect To protect all files stored in the memory card 4 Press 4 or 3 to select PROT ALL and press SET or 2 The PROTECT screen appears 5 Press 4 or 3 to select EXECUTE and press SET To cancel protection select RETURN NOTES If the mark ...

Page 30: ...the memory card or perform any other operation such as turning off the camcorder during deletion Also be sure to use the provided AC Adapter as the memory card may be corrupted if the battery becomes exhausted during deletion If the memory card becomes corrupted initialise it pg 31 This camcorder is compatible with the DPOF Digital Print Order Format standard in order to support future systems suc...

Page 31: ...30 2 Press 4 or 3 to select RESET and press SET or 2 The DPOF screen appears 3 Press 4 or 3 to select EXECUTE and press SET The normal playback screen appears To cancel selection select RETURN The number of prints is reset to 0 for all still images CAUTION While performing the above never disconnect power as this may cause the memory card to be corrupted You can initialise a memory card any time A...

Page 32: ...1 Press 4 3 1 or 2 to select the desired selection and press SET Example WIPE FADER Menu Press to return to the Main Menu screen 2 Press 4 or 3 to select the desired parameter and press SET or 2 Selection is complete The 3 indicator shows the setting that is currently saved inside the camcorder s memory Press 1 whenever you want to cancel or return to the previous Menu Screen 3 Press MENU The Menu...

Page 33: ...he recording mode is switched the playback picture will be blurred at the switching point It is recommended that tapes recorded in the LP mode on this camcorder be played back on this camcorder During playback of a tape recorded on another camcorder blocks of noise may appear or there may be momentary pauses in the sound 12BIT Enables video recording of stereo sound on four separate channels and i...

Page 34: ...ubject s movements are not smooth or natural The overall appearance may be grainy While the shutter speed is being automatically adjusted is displayed OFF Disengages the function ON Helps cut down on noise created by wind The indicator appears The quality of the sound will change This is normal To enable your tv to display images in 16 9 wide mode set the tv screen size correctly 4 3TV For TV with...

Page 35: ...ow these functions operate Demonstration starts in the following cases When the Menu Screen is closed after DEMO MODE is turned ON With DEMO MODE set to ON if there is no operation for about 3 minutes after the Power Switch is set to REC Performing any operation during the demonstration stops the demonstration temporarily If no operation is performed for more than 3 minutes after that the demonstr...

Page 36: ...SP indicator does not appear on the screen STEREO Sound is output on both L and R channels in stereo SOUND L Sound from the L channel is output SOUND R Sound from the R channel is output OFF Original sound is output on both L and R channels in stereo ON Dubbed sound is output on both L and R channels in stereo pg 46 MIX Original and dubbed sounds are combined and output in stereo on both L and R c...

Page 37: ... to M pg 16 3 Select and set SNAP SLOW to SLOW pg 32 34 The Live Slow indicator appears 4 Press SNAPSHOT SLOW during recording or playback The moving pictures are divided into four frames They are recorded or played back for 1 5 seconds and then normal recording or playback resumes This feature is effective when the recording mode selection is set to both A or M NOTE Available only when the VIDEO ...

Page 38: ...l recording resumes Snapshot is effective when the recording mode selection is set to both A or M Snapshot mode cannot be used when the 16 9 Wide mode 16 9 indicator is selected Motor Drive Mode Keeping SNAPSHOT pressed in step 5 provides an effect similar to serial photography Interval between still images approx 1 second The Motor Drive mode is disabled when REC SELECT is set to pg 35 The camcor...

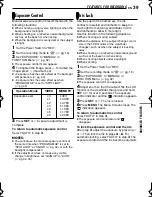
Page 39: ...ments to keep too much light from entering and dilates in dim environments to allow in more light Use this function in the following situations When shooting a moving subject When the distance to the subject changes so its size in the LCD monitor or the viewfinder changes such as when the subject is backing away When shooting on a reflective natural background such as at the beach or when skiing W...

Page 40: ...te To lock the iris After step 4 press and hold SET over 2 seconds The indication appears and the iris is locked To cancel Spot Exposure Control Press BACKLIGHT once so that the indicator disappears NOTES You cannot use the Spot Exposure Control at the same time with following functions 16 9 in WIDE MODE pg 37 STROBE in EFFECT pg 42 Digital Zoom pg 21 Depending on the shooting location and conditi...

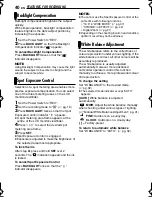
Page 41: ... result Once you adjust white balance manually the setting is retained even if the power is turned off or the battery removed These effects let you make pro style scene transitions Use them to spice up the transition from one scene to the next Wipe or Fader works when video recording is started or stopped 1 Set the VIDEO MEMORY Switch to VIDEO 2 Set the Power Switch to REC 3 Set the recording mode...

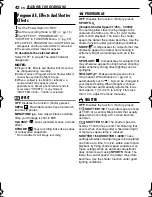
Page 42: ... The faster the shutter speed the darker the picture becomes Use the shutter function under good lighting conditions SNOW Compensates for subjects that may otherwise appear too dark when shooting in extremely bright surroundings such as in the snow SPOTLIGHT Compensates for subjects that may otherwise appear too bright when shooting under extremely strong direct lighting such as spotlights TWILIGH...

Page 43: ...order and the VCR s input connectors 2 Start playback on the camcorder pg 23 3 At the point you want to start dubbing start recording on the VCR Refer to the VCR s instruction manual 4 To stop dubbing stop recording on the VCR then stop playback on the camcorder NOTES It is recommended to use the AC Adapter as the power supply instead of the battery pack pg 15 To choose whether or not the followin...

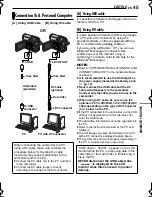
Page 44: ... Playback Zoom pg 26 or Playback Special Effects pg 26 is attempted or SNAPSHOT is pressed during playback only the original playback image recorded on the tape is output from the DV IN OUT connector When using a DV cable be sure to use the optional JVC VC VDV204U DV cable To use this camcorder as a recorder 1 Make sure all units are turned off 2 Connect this camcorder to a video unit equipped wit...

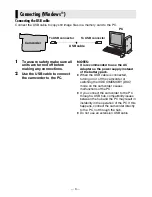
Page 45: ...connected to the camcorder via the USB cable is not powered the camcorder does not enter the USB mode The date time information cannot be captured into the PC Refer to the instruction manuals of the PC and Software The still images can also be transferred to a PC with a DV connector equipped capture board The system may not work properly depending on the PC or capture board you are using Connectio...

Page 46: ... section of the original recording with minimal picture distortion at the in and out points The original audio remains unchanged Use the provided remote control NOTES Before performing the following steps make sure that TIME CODE in both Recording and Playback Menus is set to ON pg 32 35 36 Insert Editing is not possible on a tape recorded in the LP mode or on a blank portion of a tape 1 Play back...

Page 47: ...9 Clean the video heads with an optional cleaning cassette pg 53 Advanced features Focus is set to the Manual mode Set Focus to the Auto mode pg 38 The lens is dirty or covered with condensation Clean the lens and check the focus again pg 51 The Wide 16 9 mode 16 9 indicator is selected Disengage the 16 9 16 9 indicator Wide mode pg 32 34 The light source or the subject does not include white Or t...

Page 48: ...n operate it In places subject to low temperature images become dark due to the characteristics of the LCD monitor This is not a malfunction Adjust the brightness and angle of the LCD monitor pg 18 20 When the LCD monitor s fluorescent light reaches the end of its service life images on the LCD monitor become dark Consult your nearest JVC dealer The LCD monitor and the viewfinder are made with hig...

Page 49: ...assette pg 52 Appears if condensation occurs When this indication is displayed wait more than 1 hour until condensation disappears Appears if a tape is not loaded when the Recording Start Stop Button or SNAPSHOT Button is pressed while the Power Switch is set to REC and the VIDEO MEMORY Switch is set to VIDEO Appears when the tape ends during recording or playback Appears when the date time is not...

Page 50: ...does not recognise the loaded memory card Remove the memory card once and insert it again Repeat these procedures until no indication appears If the indication still appears the memory card is corrupted Appears when you attempt to shoot digital still images when the write protection tab on the SD Memory Card is set to the LOCK position The error indications 01 02 or 06 show what type of malfunctio...

Page 51: ...he LCD monitor To clean the lens Blow it with a blower brush then wipe gently with lens cleaning paper To clean the viewfinder lens Remove dust from the viewfinder using a blower brush NOTES Avoid using strong cleaning agents such as benzine or alcohol Cleaning should be done only after the battery pack has been removed or other power units have been disconnected Mold may form if the lens is left ...

Page 52: ...o read the following cautions During use make sure the cassette bears the Mini DV mark be aware that recording onto prerecorded tapes automatically erases the previously recorded video and audio signals make sure the cassette is positioned properly when inserting do not load and unload the cassette repeatedly without allowing the tape to run at all This slackens the tape and can result in damage d...

Page 53: ...f over 50 C in places where humidity is extremely low below 35 or extremely high above 80 in direct sunlight in a closed car in summer near a heater To protect the unit DO NOT allow it to become wet drop the unit or strike it against hard objects subject it to shock or excessive vibration during transportation keep the lens directed at extremely bright objects for long periods expose the lens and ...

Page 54: ...f water to form on the glass outer surface This same phenomenon occurs on the head drum of a camcorder when it is moved from a cool place to a warm place after heating a cold room under extremely humid conditions or in a place directly subjected to the cool air from an air conditioner Moisture on the head drum can cause severe damage to the video tape and can lead to internal damage to the camcord...

Page 55: ...V format SD mode Signal format PAL standard Recording Playback format Video Digital component recording Audio PCM digital recording 32 kHz 4 channel 12 BIT 48 kHz 2 channel 16 BIT Cassette Mini DV cassette Tape speed SP 18 8 mm s LP 12 5 mm s Maximum recording time using 80 min cassette SP 80 min LP 120 min Storage media SD Memory Card MultiMediaCard Compression system JPEG compatible File size St...

Page 56: ...SOFTWARE INSTALLATION AND USB CONNECTION GUIDE ENGLISH LYT1520 006A EN ...

Page 57: ... Windows 9 Copying Files to the PC Windows 10 Playing Back Files on the PC Windows 10 Disconnecting the USB cable Windows 11 Connections Macintosh 12 Viewing the Contents of a Memory Card Macintosh 13 Copying Files to the PC Macintosh 14 Playing Back Files on the PC Macintosh 14 Disconnecting the USB cable Macintosh 15 User s Guide Help Readme Windows 15 Contents ...

Page 58: ... Program 4 LIMITED WARRANTY JVC warrants that any media in which the Program is embodied are free from any defects in materials and workmanship for a period of thirty 30 days from the date of Your purchasing any our products accompanying the Program JVC s entire liability and your exclusive remedy in connection with the Program shall be replacement of such defective media EXCEPT FOR THE EXPRESS WA...

Page 59: ...s a Commercial Item as defined in Federal Acquisition Regulation FAR part 2 101 g consisting unpublished Commercial Computer Software as those items are used at FAR part 12 212 and is only licensed to You with the same use rights JVC grants all commercial end users pursuant to the terms of this Agreement 9 GENERAL 1 No modification change addition deletion or other alternation of or to this Agreem...

Page 60: ...pplications or drivers CAUTION Operate this equipment according to the operating procedures described in this manual Use only the provided CD ROM Never use any other CD ROM to run this software Do not attempt to modify this software Changes or modifications not approved by JVC could void user s authority to operate the equipment How to handle a CD ROM Take care not to soil or scratch the mirror su...

Page 61: ... equipped with a USB connector OS Mac OS X 10 1 5 10 2 1 to 10 2 8 10 3 1 to 10 3 9 10 4 2 10 4 3 RAM At least 128 MB The system requirements information above is not a guarantee that the provided software will work on all personal computers meeting those requirements If your PC does not meet the system requirements above you can use the optional USB reader writer CU VUSD70 the PC card adapter CU ...

Page 62: ...Navigator on Windows Me License Agreement screen appears Click Yes Then Choose Destination Location screen appears Click Next Then Select Program Folder screen appears Click Next Setup Status screen appears Wait for a moment until the installation is finished When the installation is finished Digital Photo Navigator Setup screen appears and asks you if you want to create the icon on the desktop If...

Page 63: ...d of the battery pack When the USB cable is connected turning on or off the camcorder or switching the VIDEO MEMORY DSC mode on the camcorder causes malfunctions of the PC If you connect the camcorder to the PC through a USB hub compatibility issues between the hub and the PC may result in instability in the operation of the PC If this happens connect the camcorder directly to the PC not through t...

Page 64: ...in the camcorder appears in the My Computer window 2 Double click the Removable Disk icon 6 The folders in the memory card appear Different file types are stored in different folders DCIM Contains folders with still images extension jpg MISC Contains folders with DPOF setting data NOTES Saving the wrong kinds of files in a memory card or deleting files or folders from a memory card can cause probl...

Page 65: ...r 3 Select the folder to be copied and then drag and drop that folder in the destination folder To copy still images Copy the folder within the DCIM folder appears on the LCD monitor of the camcorder and the folder is copied from the memory card to the PC NOTE Never disconnect the USB cable while is displayed on the camcorder s LCD monitor Still Images Use an application that can handle the JPEG f...

Page 66: ...ve Hardware or Unplug or Eject Hardware dialogue box appears Windows XP If not wait a while then go to step 5 3 Select USB Mass Storage Device or USB Disk and then click Stop Windows 2000 XP Windows Me The Stop a Hardware device dialogue box appears 4 Click OK Windows 2000 Me If a message indicating that the device can be safely removed appears click OK and then click Close Windows 2000 XP Windows...

Page 67: ...ry pack When the USB cable is connected turning on or off the camcorder or switching the VIDEO MEMORY DSC mode on the camcorder causes malfunctions of the PC If you connect the camcorder to the PC through a USB hub compatibility issues between the hub and the PC may result in instability in the operation of the PC If this happens connect the camcorder directly to the PC not through the hub Do not ...

Page 68: ...ferent file types are stored in different folders DCIM Contains folders with still images extension jpg MISC Contains folders with DPOF setting data NOTES Saving the wrong kinds of files in a memory card or deleting files or folders from a memory card can cause problems with the operation of the camcorder When it is necessary to delete a file from a memory card delete it through the camcorder Neve...

Page 69: ... be copied and then drag and drop that folder in the destination folder To copy still images Copy the folder within the DCIM folder NOTE Never disconnect the USB cable while is displayed on the camcorder s LCD monitor Still Images Use an application that can handle the JPEG file format To view a still image either double click the still image file extension jpg or drag and drop the file on the app...

Page 70: ...h to OFF The camcorder turns off This manual only refers to software installation and PC connection For more details of each software refer to its user s guide help Readme 䡲 Digital Photo Navigator The instruction manual is included on the CD ROM in PDF format Right click the CD ROM icon in My Computer then click Open Double click the Docs folder Open the Start pdf file and click the button of the...

Page 71: ...Printed in Malaysia 0306ASR PR VM 2006 Victor Company of Japan Limited M6D1 SOFTWARE INSTALLATION AND USB CONNECTION GUIDE EN ...

Page 72: ... 39 L LCD Monitor and Viewfinder 20 LED Light 37 Live Slow 37 Loading A Cassette 19 Loading A Memory Card 19 M Manual Focus 38 Melody 34 Memory Card 19 52 Motor Drive Mode 38 N Night Scope 38 P Picture Quality 35 Playback Sound 36 Playback Special Effects 26 Power Linked Operation 16 Program AE Effects and Shutter Effects 42 Q Quick Review 22 R Recording Capacity Memory Card 27 Tape 20 Recording M...

Reviews: